Pages

November 27, 2013

Pinterest Tested: How to Clean A Microfiber Couch

Yes.

I am still unpacking.

Yes.

Our house is still full of boxes.

And yes.

It's driving me completely insane.

BUT.

My mattress is clean. Whew.

And now my couch is also clean, thanks to another Pinterest Tested moment.

I've pinned many pins on Pinterest (hahaha, alliteration is fun), and many of those are about cleaning a microfiber couch. You see, I wasn't sure this was possible, but fellow bloggers have assured me it is. In fact, it's not even that difficult.

Some of my resources were this post from 551 East and this one from Chris and Robins Nest. Both had similar tips I utilized, plus I added a few of my own. I'll start by saying, this really worked. My couch looks cleaner and smells better (not like dog anymore!). However, this was more time consuming than I expected.

You've been warned.

So, this is what my couch looked like before:


As you can see, it's been well-used. Flat cushions, general wear and tear. We didn't have any drastic staining, but there were lots of small, not as easily visible, marks. Like these:


PCSing is a good opportunity for the deep cleanings we often push aside in the normal course of life. This "deep cleaning" is why I'm still living out of boxes. It takes forever!

Ok, whining session over.

The first thing you want to look at before the cleaning commences is the tag on your couch. There will be one of several letters on it which will be extremely important to your process. My tag said WS on it. This means I can use both water and solvent-based cleaners on my couch. Your tag may only have one or the other. If yours only has an "S" on it, then you probably don't want to use any water on your couch and vice versa. Capsize?

Luckily, my couch is down with whatever. So I used a variety of methods to ensure my finished product was clean and fresh.

Rubbing alcohol, spray bottle, white scrub brushes 


Step 1: I removed all cushions from the sofa and vacuumed well with my upholstery attachment. This got rid of the dog hair, dust, and any stray crumbs.

Step 2: My bottom cushions have removable cases. Because of the WS factor, I figured I could put these in the wash. So I did. On delicate. With perfume and dye-free detergent. Tumble-dry low to avoid shrinkage.

Step 3: The upper pillows do not have removable cases. This seemed incredibly wrong to me, but such is life. Using another pin I discovered, I washed these also (no easy feat, due to their size), then dried them one at a time with a sleeve of tennis balls to accompany them.

Obviously, take the tennis balls
out of the can!! 

This worked. However, it also took forever. Each pillow needed to run several cycles in the dryer. I would think they were dry, I really would! But then a few hours later, the back of the pillows would dampen as moisture leaked from the inside out. Don't be like me, peeps.

Dry those pillows several times. Each.

Step 4: Clean couch base with the alcohol and scrubbing method.

This actually worked on stains, I was quite impressed. Simply spray the alcohol on the spot you'd like to clean (I used basic rubbing alcohol that I picked up at the commissary). Rub with the rough side of a white sponge.

This is important.

If you use a color other than white, that color may spread to your couch. We don't want that. Plus, the white allows you to see all the gross coming off the fabric. I didn't have any problems with color fastness, but I would test a discrete area of your couch first, just in case.

Unused sponge next to a used one


After you've scrubbed (don't be afraid to scrub hard), allow the area to dry. Both pins I researched said to "fluff" the area with a white scrub brush once dry. I followed this step, but didn't find it strictly necessary on my couch.

I also used this same method to spot clean my cushions once they were dry.

*Note: I suggest opening your windows during this step. The stench was pretty unbearable for a while without any air flow. After about 30 minutes, the smell of rubbing alcohol was gone.

Step 5: Put your couch back together again! This might have taken the longest amount of time for me. While the cases for my pillows didn't shrink, they were quite difficult to put back on. If you want (and I did), you can fluff your bottom cushions by beating them with a wooden spoon before you put the cases back on.

This also relieves any suppressed aggression. Win win.

Here's what my couch looked like after it's spa day:


Much better, ja? It's hard to tell a major difference with pictures, but all of my small stains are gone and my pillows are closer to their original shape (especially the bottom cushions). Also, the dog smell has disappeared, though I'm sure my Lucy dog will be happy to take care of that. Here is a comparison photo for you:


Now that I see this works, I'll likely use these steps to keep my couch clean in the future. The spot cleaning will especially come in handy, as both Hubs and dog are known mess-makers. Plus, I can throw my cases/pillows in the wash whenever the mood strikes!

Have you tried this pin, or any others that you'd like to share? What was your experience?

I'm sure I'll have more Pinterest Tested soon. Until then, happy pinning, my friends!


Thanks for reading, everyone!
Follow me on Facebook @ OurArmyLifeAccordingToTheWife
or on Pinterest, my newest obsession ArmyLifeFromTheWife


November 25, 2013

Pavlova, Darling

When I told my girlfriends I was making 'pavlova' for Ladies Night In, only ONE of them knew what that was.

Do you know what it is?

If you do, come hang with us cool people (me and Caleigh). If you don't, no worries. I'm gonna show you, and then you'll spread the word to the rest of the world...


Pavlova with Strawberry Compote 

What is it, you wonder? Well, according to my Canadian guru, it's "a rainbow in your mouth". That's a direct quote, people.

However, if "rainbow" is a bit too vague for you, here are the nuts and bolts:  Pavlova is a baked meringue, usually filled with fresh cream and fruit.

Or, it's a rainbow in your mouth. That just sounds so much cooler, don't you think?

Warning: This recipe seems complicated, but I promise it's NOT. In fact, pavlova is fairly simple to make. People think it's hard because there are three layers we're working with. However, each layer is pretty simple, and one can be made ahead of time.

These are the layers (from the bottom up):

1. The baked meringue - these whip up, literally, in about 10 minutes, but then they spend an hour in the oven. So, it may appear to take a long time, but you're really only working "hard" for ten minutes.

2. The fresh whipped cream - Again, this takes about 5 minutes to whisk to perfection. You can also skip this step entirely by using fake whipped cream (aka: Cool Whip or ReddiWip), but please, please don't do that. Fresh is worth it, I swear. Try it once, and you'll see the light.

3. The strawberry compote - Only a few steps, this takes 10 minutes to prep. AND, you can make this ahead of time and keep in the refrigerator until you need it.

So, you see, this whole process isn't as complicated as it seems! I'll start by showing you the steps to make strawberry compote and you'll be amazed at how easy this is.


Begin by combining 1/4 cup warm water with 2 teaspoons of cornstarch. Then, in a saucepan, combine the cornstarch mixture with 4 cups of strawberries (hulled and cut in half), 2 teaspoons lemon juice and 1/2 cup sugar. Warm this over medium heat for 5-7 minutes, stirring frequently. The strawberries will break down slightly, and a thicker sauce will develop.

This will smell fantastic. When done, remove from heat and let cool. Easy, yes? At this point, you can refrigerate the sauce for up to a week. I like to make mine the day before so it has plenty of cooling time, plus it thickens a bit in the fridge, but the choice is yours.

Onward!

The next item you'll make is the meringue. Also super easy, peeps!

Meringue ingredients 

Go ahead and preheat your oven to 275 degrees. Prepare a cookie sheet with parchment paper. You likely need two cookie sheets. I did.

In a small bowl, mix together 1 1/2 tablespoons cornstarch with 1 1/2 cups sugar. Set aside.

For the next step, you need 6 large egg whites at room temperature. This is very important as it helps ensure volume in your meringue. Oddly enough, egg whites separate better when they are cold, so this is what I suggest:

Separate your whites from yolks immediately after removing the eggs from the fridge (save the yolks for another recipe, if you like). Then, allow the whites to sit on your counter for about 30 minutes. This will bring them to the proper temperature.

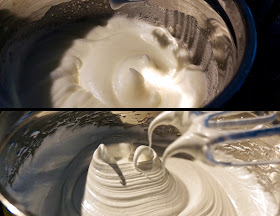
In a large bowl, whip the whites (on medium speed) with 1/2 teaspoon cream of tartar, until soft peaks form. Increase your speed to medium-high and slowly add the cornstarch/sugar mixture to the whites. Whip until stiff peaks form, but not so long that the meringue becomes brittle or dry.

Top: Soft peaks
Bottom: Stiff peaks 

Then, gently fold in 1 1/2 teaspoons each of vanilla and fresh lemon juice. Try not to eat this right out of the bowl either, though you'll be tempted!

Spoon individual sized portions onto a cookie sheet, circles about three or four inches in diameter. Use a spoon to leave an indention in the center. Later, we'll fill this hole with yummy goodness. It's that whole "rainbow in the mouth" thing that you've been looking forward to. At this point, your meringues should resemble these:

Meringue prior to oven
Place your meringues in the oven, and immediately reduce the oven temperature to 250 degrees.

Trust me, people.

Bake the meringues anywhere from 45-60 minutes. Because all ovens, locations, and humidity factors vary, I suggest checking them at around 30 minutes. If the meringue is browning too quickly, reduce your temperature. I find mine are done at about 54 minutes. You will know they're done when the outside is lightly brown and the meringues lift easily from the parchment paper.

Meringue after baking 
Allow to cool slightly, ok? While these are cooling, it's a good opportunity to make your whipped cream.

Now, as I said, you could always use the fake stuff, but why would you? Not when you can quickly and easily make it yourself.

See how simple it is: Whip together 2 cups of heavy cream and 6 tablespoons of sugar until soft peaks form. Don't over whip though, or you'll make butter instead.

And that's it for whipped cream! You can't keep the fresh stuff longer than about 8 hours (refrigerated), so plan on using what you make that day. Not exactly hard though. I'd eat it right out of the bowl, if necessary. Sacrifices must be made.

Now that all your pieces are complete, you only need to put them together...

Start with a baked meringue on the plate. Spoon some whipped cream into the hole. Add fresh fruit (I like blueberries, but you can use anything), and drizzle all over with your strawberry compote. Top with another spoonful of whipped cream, because it's pretty.

Then prepare for your guests to be amazed. I love fancy desserts that aren't really fancy, don't you?


You see, this dessert may have looked complicated (and your guests will certainly think so), but it's actually pretty simple. Who doesn't want to be served a dessert that's a rainbow in your mouth? Nobody I know!

Happy cooking, my friends. As always, the recipe is below. I'll be back soon with more fun desserts!


Thanks for reading, everyone!
Follow me on Facebook @ OurArmyLifeAccordingToTheWife
or on Pinterest, my newest obsession ArmyLifeFromTheWife


The Standard Form:


Pavlova with Strawberry Compote

Ingredients:
Strawberry Compote:

4 cups strawberries, hulled and halved (or quartered if large)
½ cup sugar
¼ cup warm water
2 teaspoons cornstarch
2 teaspoons lemon juice

Pavlova:

6 large egg whites (about ¾ cup), room temperature
½ teaspoon cream of tartar
1 ½ tablespoons cornstarch
1 ½ teaspoons vanilla extract
1 ½ teaspoons fresh lemon juice
1 ½ cups sugar

Whipped cream:
2 cups heavy cream
6 tablespoons sugar


Directions:

For the strawberry compote – Combine the water and cornstarch together. Add all ingredients to a saucepan over medium heat. Heat, stirring frequently, for 5-7 minutes. The strawberries will break down slightly, form a sauce, and thicken. Mixture will become very fragrant. Once thick, remove from heat and set aside to cool.

For the pavlova - Preheat oven to 275 degrees.  Prepare a large cookie sheet with parchment paper (may require two cookie sheets).

Blend the sugar and cornstarch together. In a separate bowl, whip the egg whites with the cream of tartar on medium speed until soft peaks form (about 3 minutes). Increase the speed to medium-high, then slowly add the cornstarch/sugar combo to the egg whites. Whip until the mixture is stiff, but not dried out.

Gently fold in the vanilla and lemon juice.

Spoon individual portions onto the parchment paper. The meringues should be circular, about 3 inches in diameter. Be sure to place the meringues several inches apart. Use the back of a spoon to make an indentation in the center of each meringue (this will later be filled with cream and fruit).

Reduce your oven temperature to 250 degrees. Bake the meringues for 45-60 minutes. Check for doneness at 30 minutes, as ovens vary and this is a delicate dessert you do not wish to overbake. If the meringues are browning too quickly, reduce oven temperature to 225 degrees.

The meringues are done when the outside is lightly brown and they lift easily from the parchment paper.

For the whipped cream – Wisk together the heavy cream and sugar until soft peaks form. Do not overwhip or you will make butter instead of whipped cream.

To serve: Place a meringue on plate. Fill the indention with a bit of whipped cream. Top with fresh fruit of your choosing (blueberries, raspberries, blackberries, kiwi slices, etc), then add a generous drizzle of the strawberry compote. Top with another dollop of whipped cream if desired.

Leftovers: Store the meringue covered, at room temperature. These will only keep for a few days. The whipped cream must be used within a few hours. Do not store the cream, always make fresh and discard any leftovers. Refrigerate the strawberry compote up to a week. 


November 24, 2013

Thanksgiving Mashed Potatoes

This year for Thanksgiving, the Hubs and I will be sharing the day with many of our new neighbors. And we'll also be missing many of our old ones.

You see, we hardly ever travel home for Thanksgiving. It's quite expensive and too long of a trip for a four day weekend (especially now that we're in a different country). Instead, we began a new tradition the first year we were stationed at Fort Bliss.

We still have a meal with our family. But it's our army family I'm referring to.

Our first Army Thanksgiving
So many of us can't travel home for the holiday, but we're thankful to have wonderful friends to share it with. Though we'll be having Thanksgiving this year with a new crop of army pals, I'll still miss the ones we've left behind (only physically, though... No worries, we're all still friends!).

Our menu for the big meal is fairly constant, and includes all the basics. I tend to cook for days on end, often in several ovens. One of my specialties are mashed potatoes.

Of course, they're not ordinary potatoes. They're actually baked in the oven, and can be partially made ahead of time. Early prep is a huge advantage when you're feeding a crowd. This week, I was so pleased to hear from my friend Becky...

... and I was even more pleased that she wanted my potato recipe for their holiday table. What a compliment, yes?

So, in the spirit of giving, I want to also share the recipe with you. I've never photographed this recipe, so there will be no images to guide you. But I promise, these are fantastic and oh, so easy. Try them out and let me know what you think. And feel free to share your recipes in the comments as well, I love hearing from you!


Baked Mashed Potatoes

Ingredients:

5 lbs. Russet potatoes, peeled and chopped
Salt, for the water
1 ¼ cups half-n-half
½ cup butter
8 ounces cream cheese with chives
1 teaspoon garlic salt
¼ teaspoon nutmeg
Sliced almonds, to taste

Directions:

Coat a baking dish with some butter or cooking spray. Set aside.

Place the potatoes in a large pot, cover with water, and season with salt. Do not undersalt the water! Bring to a boil, reduce heat, and simmer for 20 minutes or until the potatoes are soft. Drain.

Mash the potatoes in a large bowl (I use a hand mixer for this step).

In a saucepan, warm the half-n-half with the butter. Add this to the mashed potatoes, along with the cream cheese, garlic salt, and nutmeg.

Beat the potatoes on high speed until smooth. Spoon the potatoes into the buttered baking dish.

Bake at 350 degrees for 30 minutes. Top the potatoes with sliced almonds and bake another 15 minutes. Let sit 15 minutes before serving.


The potatoes can be made the night before and refrigerated. Before baking, let sit on counter for 30 minutes to come to room temperature


Thanks for reading, everyone!
Follow me on Facebook @ OurArmyLifeAccordingToTheWife
or on Pinterest, my newest obsession ArmyLifeFromTheWife


November 15, 2013

Pinterest Tested: Basic Mattress Cleaning

Yep, it's another Pinterest tested moment! There will be several of these in the near future (or next several months), as I finish unpacking and organizing my house. PCSing is a great opportunity for deep cleaning. Granted, a lot of these procedures should be done more regularly, but let's pretend I do that, ok?

In the past, we've tested microwave and dishwasher cleaning, with varying degrees of success. Today, I'll tell you all about my mattress cleaning experience.

There are many pins and websites on this subject. The one I found most helpful was Clean My Space. Nearly all the tips I've researched mentioned baking soda in one way or another. I chose the simplest route for this "test" cleaning.

Here's what you need to get started:


A fine mesh strainer, and a box of baking soda... and that's pretty much it. You'll also need a good vacuum. If your mattress is stained, you'll need other materials. I was merely performing a basic "freshening" of my mattresses, like regular maintenance. If your require a deeper scrub, check out the tips from Clean My Space.

Step 1: Strip your mattress of all bedding, then give a thorough vacuuming. This will pick up a lot of the dust that can collect in the fabric.

Step 2: Using the fine mesh strainer, evenly sprinkle baking soda on the top of your mattress. It should look a little like this:


My mattress is on the floor because we just moved in, and I thought a cleaning would be fab before I put everything together and we slept on our bed again. Especially since everything smelled vaguely of the ocean it spent six weeks crossing.

Tip: If you'd like a sweeter smelling mattress for a few days, you could add a few drops of essential oil to the baking soda, prior to sprinkling.

Step 3: Spend 30 minutes elsewhere and leave your mattress alone. If you've just PSCed like us, you'll probably use that time unpacking. If not, you could play with your dog/kids, watch a sitcom episode, prep for dinner, call your mother... whatever floats your boat, peeps.

Step 4: Vacuum all the baking soda off your mattress. Use an upholstery attachment if you have one.

Step 5: Flip mattress and repeat steps 1-4 (only necessary if your mattress is fabric on both sides. Some less expensive mattresses are one-sided).

Step 6: Pat yourself on the back for a job well done! Your mattress should be fresh and clean smelling.

My mattress "after"


So, did it work? Is this a Pinterest success?

YES! After this quick clean, my mattress no longer smelled like the ocean. This is an easy chore which will be added to my regular rotation. Every time I flip the mattress, I'll now be doing a quick baking soda vacuum as well (or anytime my bed smells too much like the dog who routinely sleeps on it, ha!).

My next plan is to scrub our microfiber couch. I'll let you know how that goes in my next Pinterest Tested post.

Do you have any tips for a better mattress clean? Please share in the comments below!

Until next time, happy pinning!


Thanks for reading, everyone!
Follow me on Facebook @ OurArmyLifeAccordingToTheWife
or on Pinterest, my newest obsession ArmyLifeFromTheWife


November 5, 2013

Fresh Corn and Tomato Bruschetta

I haven't had much time for cooking since The Hubs and I arrived in Germany. Of course, I also had no pots and pans (or anything else for that matter!), so cooking would have posed a few problems anyway.

But I've really missed this daily chore. Which for me is really no chore at all, more like a mad science experiment. And I've especially missed cooking with my friends, or cooking for them (and them cooking for me!).

Remember my deployment battle buddies? Of course you do! We developed Ladies' Night In, a fantastic opportunity to hang out together and test our culinary skills on each other. I really, really miss my ladies. I think they should all move to Germany too! I'd like you to be on my side in this matter.

Earlier this week, when I was especially missing my gal pals, I came across these photos of an experiment gone right. Inspired by my best Canadian pal, and another Ladies' Night In moment, I created this Fresh Corn and Tomato Bruschetta.

I'm completely obsessed. Have been, actually, from the first moment Caleigh (my Canadian pal!) served us something similar at her home. I immediately started on a recreation and elaboration. THIS is the result:

Corn and Tomato Bruschetta


Nom nom nom nom nom.

Let me repeat that. Nom nom nom nom nom. 

You've no idea, seriously. This is a MUST try. Hubs will be forever grateful to Ladies Night In evenings for this delicious treat. After the creation, we actually ate it three more times in the same week!

It's that good, people.

So let's get this party started:


The ingredients

To start, I should warn you: This recipe makes A LOT. But don't worry, you'll eat it all. Or, make this as an appetizer for a party. Huge hit. HUGE.

As usual, my pictures don't quite capture all the ingredients. After creation, I realized I need twice the filling to use up all the spread (you'll see). So, some of the ingredients are actually double what you see here. Plus, ahem... you won't be using basil at all, but cilantro instead.

My bad.

Anyway, let's begin with the spread. Using a ripe avocado, blend it together with 8 ounces of whipped cream cheese (1 container), 1 tablespoon fresh lemon juice, and five cloves of roasted garlic. If you've never roasted garlic before, it's quite simple. This tutorial on WikiHow is easy to follow.

Avocado spread

The picture above is what your spread will look like once blended. For now, set this mixture aside in your refrigerator while you finish the rest.

Next, slices two loaves of French (or Italian) bread. I like mine sliced thick, but this is up to you. The thicker the bread, the more topping it will comfortably hold. I'm a glutton for this stuff.

Toast the bread using your preferred method. I like the bread toasted on only one side, so I usually spray that side with a bit of baking spray, then toss it under the broiler for a few minutes. You can toast yours however you like!

In the meantime, finely chop 2 small red onions (or 1, if you like things less oniony). Sauté in a bit of butter to draw the sweetness out. Set aside to cool.

Lightly sautéed onions 

At the same time (or separately if you've a tendency to get distracted and burn stuff), cook 12 slices of peppered bacon. If you don't have access to peppered bacon, that's ok. Just add a little extra pepper to your final corn mixture to make up for it, kay? Crumble the bacon into small pieces.

Now comes the really fun part.

In a large mixing bowl, mix together your onions and bacon, plus 4 ears worth of sliced-off-the-cob corn kernels. You heard me, just slice it right off the cob and into the bowl. No cooking necessary!

To this, add 1 pint of quartered cherry (or grape) tomatoes. Drizzle in just enough olive oil to coat (about 2 teaspoons, maybe less). Salt and pepper to taste. This doesn't require much! Unless, of course, you are without the peppered portion of the bacon.

Gently stir in some chopped cilantro. I used... a bunch. Maybe two bunches. Probably about a cup.

I like cilantro.

When all is said and done, it should look a little something like this:


Corn mixture

Everything else is a cake walk!

Shmear your bread with a bit of the avocado mixture, and then spoon some corn mixture on top. Bite in. Savor the moment. Thank Caleigh for the inspiration, because your life won't ever be the same after this.

Mmmmmmm......


As always peeps, I've included the recipe at the bottom here. I'll be back in my kitchen soon, testing some new recipes for my favorite people.

That would be you.

Until then, happy cooking!!


Thanks for reading, everyone!
Follow me on Facebook @ OurArmyLifeAccordingToTheWife
or on Pinterest, my newest obsession ArmyLifeFromTheWife


The Standard Form:

Fresh Corn and Tomato Bruschetta

Ingredients:

8 ounces whipped cream cheese
1 ripe avocado
5 cloves roasted garlic
1 tablespoon fresh lemon juice
4 ears fresh corn, shucked and the kernels cut off
1 pint cherry (or grape) tomatoes, quartered
2 small red onions, diced and sautéed
12 slices peppered bacon, cooked and crumbled
2 teaspoon olive oil (or less)
2 bunches roughly chopped cilantro (about 1 cup)
Salt and pepper to taste
2 loaves French or Italian bread, for serving

Directions:

* Note: This recipe makes A LOT. If desired, cut in half for a smaller serving

In a large mixing bowl, blend the cream cheese with the avocado, roasted garlic, and lemon juice until smooth. Set aside.

Slice your French (or Italian) bread into thick slices. Spray one side with cooking spray (if desired) and brown underneath the broiler.  Keep close watch on your bread, you don’t want it to burn! Alternatively, you can toast in a regular toaster. Set aside to cool.

In another bowl, stir together the fresh corn kernels, tomatoes, sautéed red onion, and peppered bacon. Drizzle in the olive oil, adding just enough to lightly coat. Salt and pepper to taste. Gently stir in the chopped cilantro.

To serve: Spread the bread with the avocado mixture. Top with as much of the corn mixture as desired. Eat (with napkins!)