August 15, 2014

DIY Eiffel Tower Cake Topper

A couple months ago, I took a quick 12 hour trip to Paris with one of my neighbors, her daughter, and my pal Becky. I absolutely loved Paris! In fact, I went back with The Fam just a few weeks ago for a longer, 5 day trip (you can check out the first installment of my Keep Calm and Go To Paris series if you want!).

Our 12 hour whirlwind was an early birthday present for my friend's daughter, Jaden. She wanted to see Paris, and especially the Eiffel Tower, more than anything.

Hanging in Paris 

Now that her actual birthday date has rolled around, her mom wanted to commemorate that trip with the cake.

Before we get started, let me tell you that I am definitely not a pro at cake decorating. My only experiences are the cakes I make the Hubs every year for his birthday. But that's why this post is so great for the average person like me. Seriously peeps… if I can do this, you totally can too! It's super basic.

Eiffel Tower cake

See, it doesn't look too complicated, does it?

The cake is a standard box mix. And the icing is the kind you buy in a can at the grocery store. The only technique here is a bit of flair with the icing and creating a chocolate Eiffel Tower on top. Lemme show you how to make the tower...

I began by looking for images that I could trace in chocolate. I found this one that worked well, but I had to print it in several sizes until I found the one that would work on top of this cake. If you were doing a sheet cake, you could easily choose a larger size to work with. Download the PDF file here if you want to try it yourself.

Eiffel Tower template


Once you print out the appropriate size, lay a piece of wax paper over your image. Then (this is important, peeps!), tape the paper down to your countertop to prevent it moving while you trace.
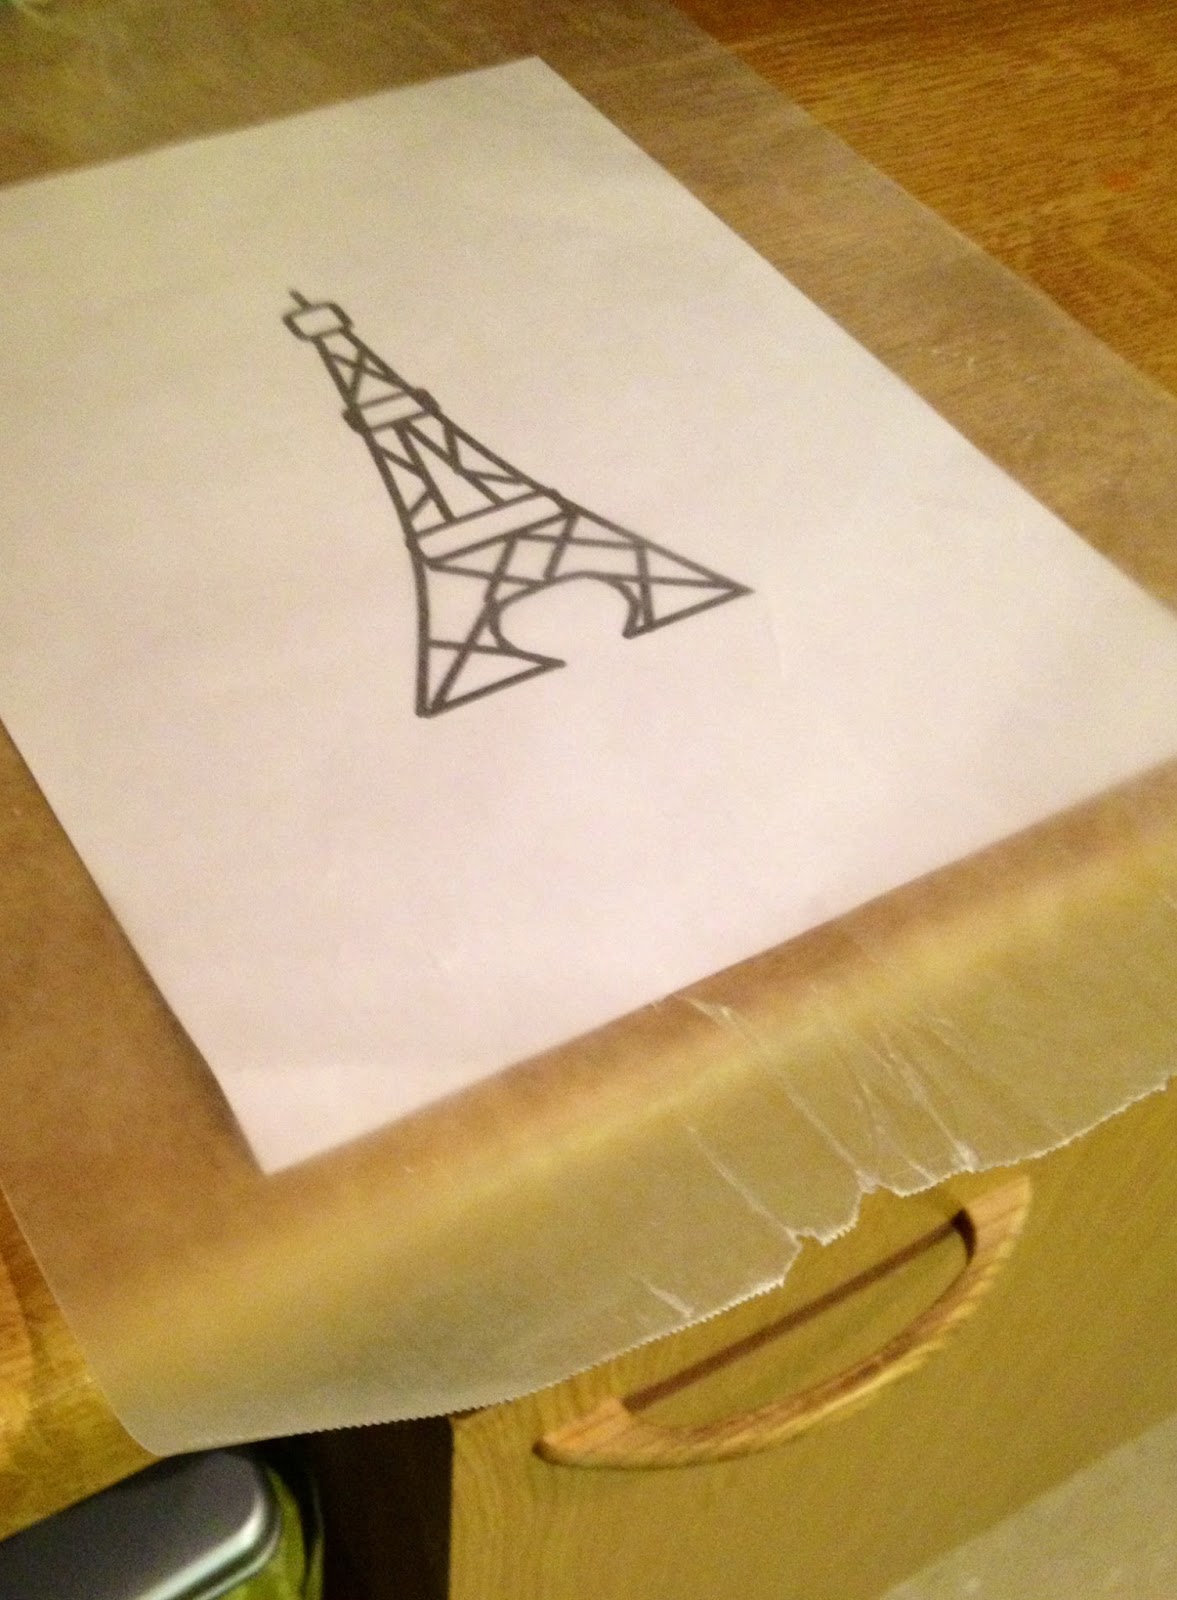

You'll notice that the wax paper allows you to still see the image well. You can use this technique with any image you want on a cake, not just the Eiffel Tower here.

Fill a piping bag with some melted and slightly cooled chocolate. Couple tips:

1. If you don't have a piping bag, use a ziploc bag with a small piece snipped off the corner.
2. The chocolate will be quite warm, so wear some kitchen gloves.
3. If you don't have kitchen gloves, you can do what I did… use your winter mittens!
4. Practice piping on a spare piece of wax paper before tackling your design. It's not hard to do, but this will give you a feel for how fast the chocolate will come out, etc.
5. Your chocolate doesn't have to be fancy. I used plain old chocolate chips that I melted over low heat.

Then, trace your design with your chocolate "ink".


Easy, yes?

Then, let your chocolate cool. I use the fridge for mine, it speeds things up a bit. Very carefully remove the design after it has hardened, and place it on the cake. The bottom side of the chocolate will be quite smooth, without the lumpiness you see above. Place that side up on your cake for a nicer look.

I was making a small tower, so it was easier to remove in one piece. If you're making a larger cake, I suggest making your tower in sections. Print several images and trace only a section of each. When putting it on the cake, put the pieces together like a jigsaw puzzle.


See! You can totally do this.

I added some detail with a set of piping tips and colored icing, and then I sprinkled some pink sugar pearls on top. Easy peasy, my friends.

Do you have any tips for DIY birthday cakes? Share below in the comments!

Until next time my friends, happy baking!


Thanks for reading, everyone!
Follow me on Facebook @ OurArmyLifeAccordingToTheWife
or on Pinterest, my newest obsession ArmyLifeFromTheWife


August 14, 2014

Keep Calm and Go To Paris, Part 1

This all began with a simple phone conversation… "Kid, where is the one place you really want to go this summer?"

The answer? Paris.

Seriously, what 15 year old doesn't want to see Paris? I should have known. Thanks to a great deal through Air BnB, we could stay for 5 whole days. The Kid was thrilled! I gotta admit, I was pretty excited too. There is so much to see and do in Paris, I don't think I'll ever check it all off my list. I already have plans to go back again in December with one of my other siblings.

Eiffel Tower view

This will be a several part series, because we saw too many things to cram into only a single post. I'll include as many links and tips as I can, of course. I scouted for this trip during a quick stop (12 hours only!) a few months ago. I decided then and there to stay in a flat versus a hotel room. I wanted The Kid to have as authentic an experience as possible.

The view from our apartment

Our apartment was a five flight walk up, but totally worth it. I figure the extra exercise made up for the pastries and macaroons we ate all week long! The great thing about an apartment is the kitchen. Eating in Paris is quite pricey, so saving on meals is huge. There was a small grocery just down the road that we stocked up at. Even in a tiny shop like that, the cheese aisle made me swoon!

Cheese aisle at French grocery store

Of course, the price of peanut butter was outrageous! We hadn't planned on buying it anyway (we stuck to local food where we could), but I had to take a picture…

Euro price for travel-sized peanut butter


That jar was tiny too!! Like, travel sized. It's crazy, I tell you, crazy!

Anyway.

We arrived in Paris by train (traveling from Kaiserslautern to Paris for 100 Euro each, round trip) and then took the metro to our apartment. The metro system is wonderful. It's simple to use, inexpensive, and can really save your feet on a trip to this city. Even with the metro, we walked miles everyday. You have a lot of ticket options, from a several day pass to purchasing individual tickets. We chose an option in between these two, and it worked out very well for us. At the ticket counters, you can purchase books of 10 metro tickets (at a discount, of course). This is less expensive than purchasing all your tickets individually. We did consider buying the unlimited pass. However, we only used the metro once or twice a day since the attractions are often close together. So the unlimited pass made no sense for us at all.


After a quick meal of sandwiches (and some people watching from our window!), we left on a great little tour of the Montmartre district. This was absolutely one of our favorite things in Paris! Actually, it's probably one of our favorite tours from the entire summer. And the price seriously can't be beat.

Lunch and people watching
The Montmartre district includes the infamous Moulin Rouge (the red windmill). You can still see shows here, of course, but they are pricey. Our tour included a walk by this site, and some of it's history. Our guide was wonderfully funny, and full of interesting facts and stories. We learned of the artists that once lived here, such as Pablo Picasso, Salvador Dali, Vincent Van Gogh (a personal favorite), and Amedeo Modigliani. We visited the Basilica of Sacré-Cœur, and admired the amazing mosaics inside. The tour included many helpful tips for dining out and exploring. This is a must-do!! The guides change regularly so your experience may be different than ours, but the Montmartre district will always remain one of the best places I've been.

Montmartre tour 
By this time, we were worn out! Being Paris, we enjoyed dinner at a great restaurant close to our apartment. The food here is simply amazing, I highly encourage you to try something new at every meal. We sampled an Avocado Shrimp salad that was divine. I'm still dreaming about it, actually.

Then it was off to bed… we needed rest for the busy day that awaited us the next morning! I'll be back soon with more tales of our adventure. Until next time my friends, happy travels!


Thanks for reading, everyone!
Follow me on Facebook @ OurArmyLifeAccordingToTheWife
or on Pinterest, my newest obsession ArmyLifeFromTheWife


August 13, 2014

Pinterest Tested: Piñata Cake

If you've been keeping up with me this week, then you know I always make the Hubs a special birthday cake each year. He's kinda spoiled…

This year, I decided to make him a piñata cake that I found on Pinterest. This is the original link I followed, if you want to check it out: A Subtle Revelry: Piñata Cake.


I didn't change much about the cake, but I only used 1 box of cake mix instead of the two suggested. Since we've been traveling a lot, I didn't want the cake to go bad. This was the perfect size for 4 people to each have a slice, and then to have two pieces left over.

To start, bake your cakes! You can do this in oven-safe bowls, like me. Or, you can bake any shape you want too. Whatever floats your boat.

Cake batter about to go in the oven

I followed the directions on my box of mix, but the cake took a bit longer in the oven. I suggest keeping an eye on it, testing occasionally for doneness. Once done, I let the cakes cool and then turned them out onto a plate.

Scooping out the inside of each cake was fun! Be careful not to cut through your cake though. If you do go too deep, you can repair the tear with a little bit of icing.

Hollow out the inside of each cake

If you're super thrifty (like me!), you can save the cake filling for cake pops. These are very basic to make: mix together your cake filling with a bit of icing, then roll into ball shapes. Place on a wax-paper lined cookie sheet and freeze until hard. Then, one at a time, dip the cake balls into some melted chocolate and return to the freezer until hardened. See, easy peasy!

So, back to the piñata cake. After you're done scooping out the inside, ice the edge you've left and fill the hole with your favorite candy. I chose Snickers bars and peanut M&Ms for the Hubs.


Next, put the other half of your cake on top and ice it all. I like to do a thin layer of icing first, then refrigerate it, and then do the final icing. You can do it however you want. Oh, and I totally added some sprinkles to the top!


The Hubs looked a little disappointed when he first saw the cake… he's used to getting a more elaborate looking cake for his birthday. But then, he started to cut the first piece and he was totally surprised by what he found inside!


This piñata cake was fairly simple to make, and was a big hit at our house. Definitely a Pinterest success!

Have you tried any cool Pinterest cakes that you'd like to share? Comment below, peeps! And until next time, happy baking!


Thanks for reading, everyone!
Follow me on Facebook @ OurArmyLifeAccordingToTheWife
or on Pinterest, my newest obsession ArmyLifeFromTheWife