Showing posts with label Cake. Show all posts

August 15, 2014

DIY Eiffel Tower Cake Topper

A couple months ago, I took a quick 12 hour trip to Paris with one of my neighbors, her daughter, and my pal Becky. I absolutely loved Paris! In fact, I went back with The Fam just a few weeks ago for a longer, 5 day trip (you can check out the first installment of my Keep Calm and Go To Paris series if you want!).

Our 12 hour whirlwind was an early birthday present for my friend's daughter, Jaden. She wanted to see Paris, and especially the Eiffel Tower, more than anything.

Hanging in Paris 

Now that her actual birthday date has rolled around, her mom wanted to commemorate that trip with the cake.

Before we get started, let me tell you that I am definitely not a pro at cake decorating. My only experiences are the cakes I make the Hubs every year for his birthday. But that's why this post is so great for the average person like me. Seriously peeps… if I can do this, you totally can too! It's super basic.

Eiffel Tower cake

See, it doesn't look too complicated, does it?

The cake is a standard box mix. And the icing is the kind you buy in a can at the grocery store. The only technique here is a bit of flair with the icing and creating a chocolate Eiffel Tower on top. Lemme show you how to make the tower...

I began by looking for images that I could trace in chocolate. I found this one that worked well, but I had to print it in several sizes until I found the one that would work on top of this cake. If you were doing a sheet cake, you could easily choose a larger size to work with. Download the PDF file here if you want to try it yourself.

Eiffel Tower template


Once you print out the appropriate size, lay a piece of wax paper over your image. Then (this is important, peeps!), tape the paper down to your countertop to prevent it moving while you trace.


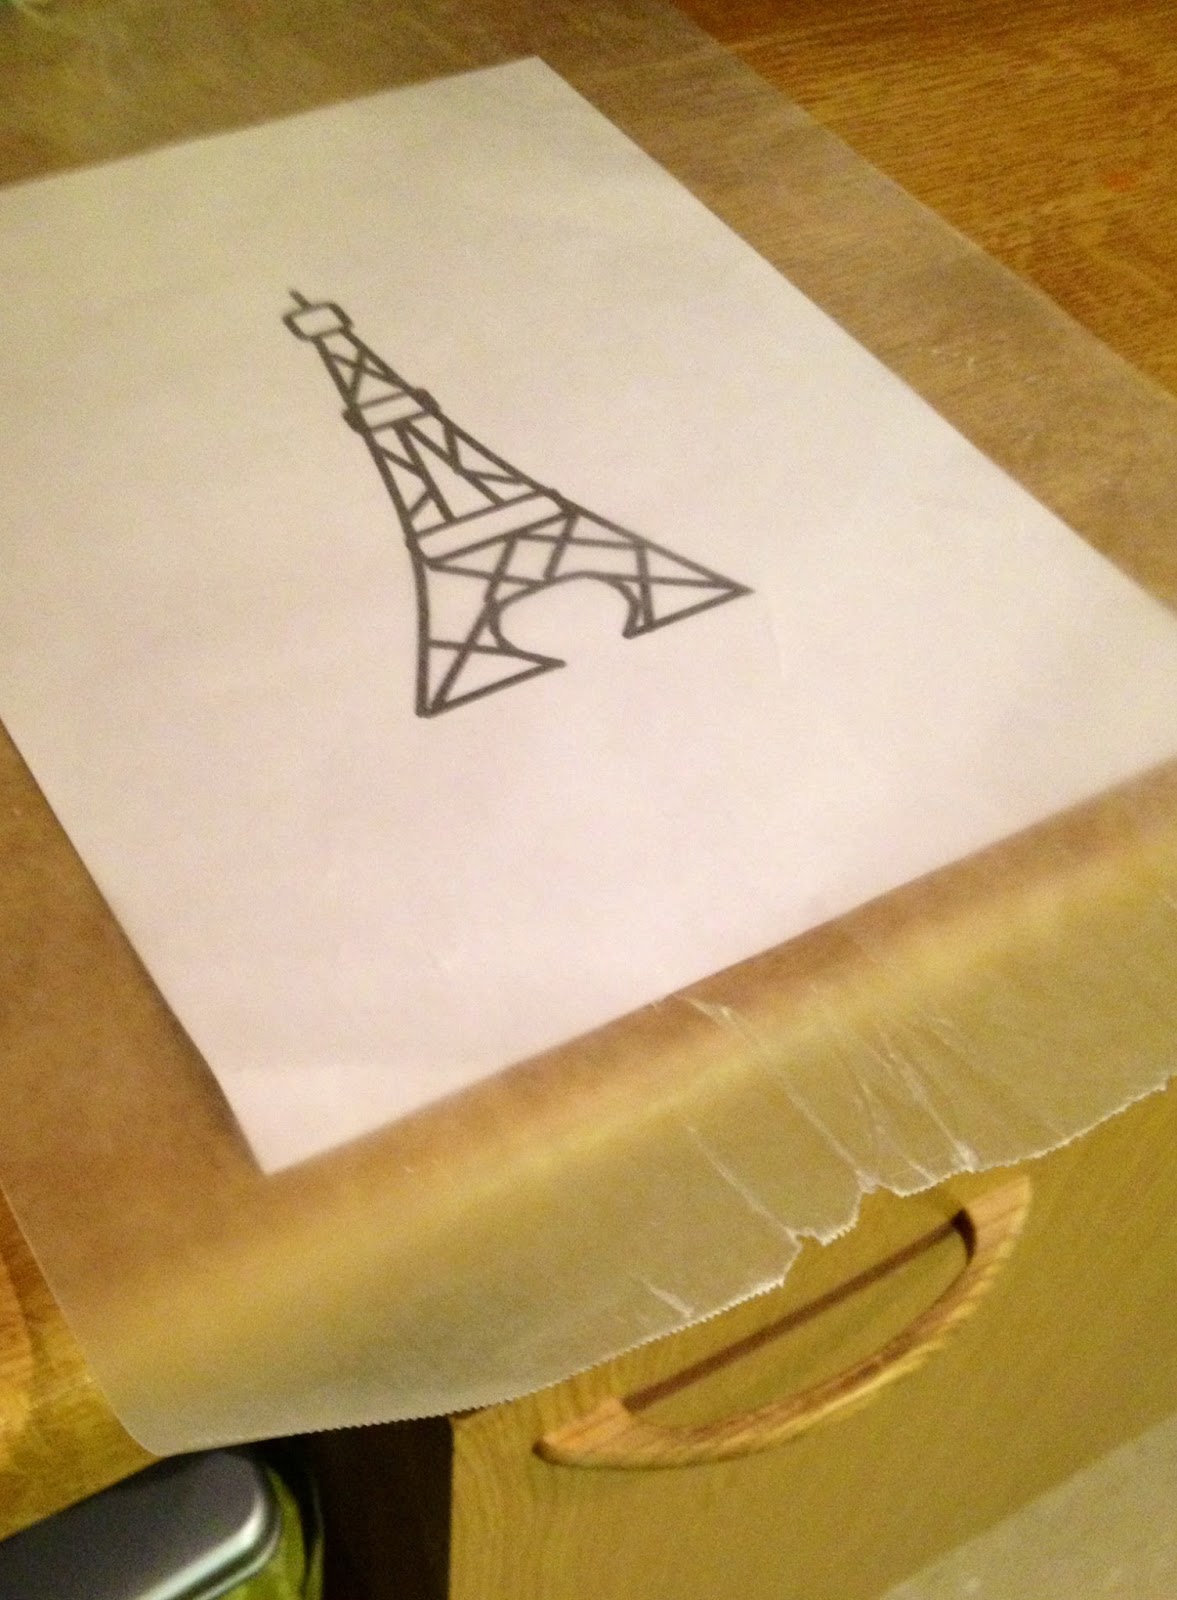
You'll notice that the wax paper allows you to still see the image well. You can use this technique with any image you want on a cake, not just the Eiffel Tower here.

Fill a piping bag with some melted and slightly cooled chocolate. Couple tips:

1. If you don't have a piping bag, use a ziploc bag with a small piece snipped off the corner.
2. The chocolate will be quite warm, so wear some kitchen gloves.
3. If you don't have kitchen gloves, you can do what I did… use your winter mittens!
4. Practice piping on a spare piece of wax paper before tackling your design. It's not hard to do, but this will give you a feel for how fast the chocolate will come out, etc.
5. Your chocolate doesn't have to be fancy. I used plain old chocolate chips that I melted over low heat.

Then, trace your design with your chocolate "ink".


Easy, yes?

Then, let your chocolate cool. I use the fridge for mine, it speeds things up a bit. Very carefully remove the design after it has hardened, and place it on the cake. The bottom side of the chocolate will be quite smooth, without the lumpiness you see above. Place that side up on your cake for a nicer look.

I was making a small tower, so it was easier to remove in one piece. If you're making a larger cake, I suggest making your tower in sections. Print several images and trace only a section of each. When putting it on the cake, put the pieces together like a jigsaw puzzle.


See! You can totally do this.

I added some detail with a set of piping tips and colored icing, and then I sprinkled some pink sugar pearls on top. Easy peasy, my friends.

Do you have any tips for DIY birthday cakes? Share below in the comments!

Until next time my friends, happy baking!


Thanks for reading, everyone!
Follow me on Facebook @ OurArmyLifeAccordingToTheWife
or on Pinterest, my newest obsession ArmyLifeFromTheWife


August 13, 2014

Pinterest Tested: Piñata Cake

If you've been keeping up with me this week, then you know I always make the Hubs a special birthday cake each year. He's kinda spoiled…

This year, I decided to make him a piñata cake that I found on Pinterest. This is the original link I followed, if you want to check it out: A Subtle Revelry: Piñata Cake.


I didn't change much about the cake, but I only used 1 box of cake mix instead of the two suggested. Since we've been traveling a lot, I didn't want the cake to go bad. This was the perfect size for 4 people to each have a slice, and then to have two pieces left over.

To start, bake your cakes! You can do this in oven-safe bowls, like me. Or, you can bake any shape you want too. Whatever floats your boat.

Cake batter about to go in the oven

I followed the directions on my box of mix, but the cake took a bit longer in the oven. I suggest keeping an eye on it, testing occasionally for doneness. Once done, I let the cakes cool and then turned them out onto a plate.

Scooping out the inside of each cake was fun! Be careful not to cut through your cake though. If you do go too deep, you can repair the tear with a little bit of icing.

Hollow out the inside of each cake

If you're super thrifty (like me!), you can save the cake filling for cake pops. These are very basic to make: mix together your cake filling with a bit of icing, then roll into ball shapes. Place on a wax-paper lined cookie sheet and freeze until hard. Then, one at a time, dip the cake balls into some melted chocolate and return to the freezer until hardened. See, easy peasy!

So, back to the piñata cake. After you're done scooping out the inside, ice the edge you've left and fill the hole with your favorite candy. I chose Snickers bars and peanut M&Ms for the Hubs.


Next, put the other half of your cake on top and ice it all. I like to do a thin layer of icing first, then refrigerate it, and then do the final icing. You can do it however you want. Oh, and I totally added some sprinkles to the top!


The Hubs looked a little disappointed when he first saw the cake… he's used to getting a more elaborate looking cake for his birthday. But then, he started to cut the first piece and he was totally surprised by what he found inside!


This piñata cake was fairly simple to make, and was a big hit at our house. Definitely a Pinterest success!

Have you tried any cool Pinterest cakes that you'd like to share? Comment below, peeps! And until next time, happy baking!


Thanks for reading, everyone!
Follow me on Facebook @ OurArmyLifeAccordingToTheWife
or on Pinterest, my newest obsession ArmyLifeFromTheWife

August 7, 2014

Fun Birthday Cakes

I really don't know how this tradition started, but a few years ago I began making The Hubs some unusual cakes. These weren't your basic, standard birthday cakes. They had to be special. Last year, I almost didn't bake him a cake because we were in the midst of packing up our household goods for our PCS to Germany. But The Hubs pouted, and begged, so I gave in and made him a cake.

See? SPOILED

This year, I decided to get him good. I made a cake that looks perfectly ordinary on the outside… BUT once you cut into it, all these goodies come spilling out like a piñata. His face was priceless! I'm writing an additional post later this week about how to make your own piñata cake, so stay tuned for that. 

In the meantime, I thought we'd take a look at The Hubs' cakes through the years:


33rd birthday - my first attempt at a "cool" cake


34th birthday, the 3ft long Snickers cake

The 35th birthday… we'd just taken our first trip to the Caribbean 


Birthday #36: The Orange Monster
(Hubs' favorite color)

And last, but not least, this year's cake:


The surprise Piñata Cake… he looks surprised, doesn't he?! 


Now, I know my cake making skills are not exactly professional or anything. But I love making these cakes every year for the Hubs. It's become our silly little tradition. Plus, he's spoiled

What are your birthday traditions?

I'll be back soon with the instructions to make your own piñata cake. Until next time, happy baking! 


Thanks for reading, everyone!
Follow me on Facebook @ OurArmyLifeAccordingToTheWife
or on Pinterest, my newest obsession ArmyLifeFromTheWife

May 27, 2014

"Piggy" Cake

I've got to be completely honest with you, and say… I have no idea why this cake is called "Piggy Cake". All I do know is that it's delicious, and I am forced to hide it from the Hubs or I won't get any.

True story. 

Normally I'm not a fan of using too many processed ingredients. But I've been eating this cake since I was a kid (mostly at various potluck dinners), and old habits die hard. Someday I may restructure this recipe to use more natural ingredients, but for now I'm sticking with what works. Since this is only a once in a while treat, I don't feel too guilty.  

Piggy Cake
I love this recipe in the summertime because it's light and refreshing without being too sweet. It's also excellent for a crowd, and can be made in advance (in fact, it's better when made the day before!). Are you ready to make your own? I thought so. 

The ingredients

Now that we're living in Germany, I've had a hard time finding some of my preferred brands. I had to make a few substitutions, but it worked out ok. 

Start by preheating your oven to 350 degrees. In a large bowl combine 1 box of yellow cake mix (I prefer Pillsbury, but Betty Crocker did ok), 1 stick of softened butter, 4 eggs, 1 teaspoon vanilla extract, and ½ cup mandarin orange juice (reserved from a 14 oz. can of mandarin oranges). Beat on medium speed for 4 minutes, until well combined. Then, add in the mandarin oranges and beat until the pieces are broken up and small. 

Mixing the batter

Pour the batter into a greased and floured 9x13 pan. Bake 25-30 minutes or until golden brown and set. Cool completely in the pan set on a wire rack. 

While the cake is cooling, make the icing. Drain the juice from a 20 ounce can of crushed pineapple. Blend the juice together with 1 package (4 ounces) of instant vanilla pudding mix. To that, add ½ cup powdered sugar and blend. Fold in 6 ounces of Cool Whip, then stir in the crushed pineapple. 

Folding in the whipped topping

Once your cake is completely cool, remove it from the pan and spread the icing over the top, allowing it to drip down the edges of the cake. Refrigerate for at least several hours. When I'm making this cake, I prefer to make it the night before. The icing sets up better after an evening in the fridge. 

When you're ready to serve, use some extra mandarin oranges to garnish each slice of cake. Be prepared to accept compliments! 


Pay no attention to the missing piece of cake from that top picture!! The Hubs did it, I swear. Ahem

ANYWAY. 

I hope you enjoy this cake. I like eating the leftovers, if there are any, for breakfast. Hey, it's got fruit in it! As always, the standard recipe is below. Until next peeps, happy cooking…  


Thanks for reading, everyone!
Follow me on Facebook @ OurArmyLifeAccordingToTheWife
or on Pinterest, my newest obsession ArmyLifeFromTheWife


The Standard Form:


Piggy Cake

Ingredients:

For the cake:
1 box yellow cake mix (I prefer Pillsbury)
1 stick butter, softened
1 can (14 oz) mandarin oranges, drained with the juice reserved
4 eggs
1 teaspoon vanilla extract

For the topping:
1 package (4 oz) vanilla instant pudding mix
1 can (20 oz) crushed pineapple, drained with juice reserved
½ cups powdered sugar
6 ounces frozen whipped topping, softened in the fridge
Extra mandarin oranges, for garnish

Directions:

Preheat the oven to 350 degrees.

In a large bowl, combine the cake mix, butter, ½ cup of the reserved mandarin orange juice, eggs, and vanilla. Beat 4 minutes on medium-high speed, then add the drained oranges and beat again, until the pieces are broken up and small. Pour the batter into a greased and floured 9x13 pan.

Bake 25-30 minutes or until golden brown and set. Remove cake from the oven and cool completely in the pan set on a wire rack. Turn the cake onto a serving plate before icing.

Once the cake is cool, blend the juice from the drained pineapples with the vanilla pudding mix. Add the powdered sugar and blend, then fold in the whipped cream topping. Stir in the drained pineapple. Spread this mix onto the cooled cake and refrigerate for several hours or overnight.

Once ready to serve, garnish each piece with a mandarin orange slice. Store leftovers in the fridge.


March 21, 2014

New York Style Crumb Cake

One of my absolute favorite things ever is Entenmann's crumb cake. I was completely devastated when Hubs and I moved to Fort Bliss, and no one there sold it! 

Depression quickly ensued. Not only did no one sell it, but Entenmann's doesn't deliver. What's a girl to do???

Each time we move to a new duty station, there are things I'm glad are gone and there are so many things I miss. At least when it comes to food, I have options. Rather than pout about the unfairness of army life, I have learned to make so many things for myself. Remember my Zuppa Toscana imitation? It's so good, better than the original even. I was absolutely positive I could re-create my favorite coffee cake too.

And I did.

NY Crumb Cake


This crumb cake is genius, if I do say so myself. And I do!

The recipe has been through several incarnations, but I've finally got it just right. Now I can share it with you. If you've never tried crumb cake, let me tell ya…. it is buttery, yummy, delicious goodness. Especially served with a cup of coffee or tea.

Ready for the recipe? Here goes:

You'll start by making the crumb topping.

Ingredients for crumb topping

Mix together ⅓ cup of white sugar, ⅓ cup of dark brown sugar, ¾ teaspoon cinnamon, and ⅛ teaspoon  salt in a medium-sized mixing bowl.  To this, add 1 stick (8 tablespoons) of melted, unsalted butter. You want the butter to still be a bit warm. Mix until combined, then stir in 1 ¾ cups of cake flour.

THIS IS VERY IMPORTANT, PEEPS!!!! 

Please don't use regular, all-purpose flour. I promise your cake will not taste the same. It won't even be close! Cake flour has a much finer consistency that improves the texture and crumb-factor of your cake. It also doesn't rise as much as all-purpose, which is a bonus in this case. Listen to ArmyLife.

Back to the recipe, mix until your dough is thick and cohesive. Set the bowl aside to cool to room temperature. The crumb will be ready once you've finished mixing the batter.

Process for making crumb topping,
from upper left to lower right 

Next, preheat your oven to 325 degrees. Coat a 9x9 baking pan with a spray that includes flour, OR butter and flour the pan. Start your batter by mixing together 1 ¼ cups cake flour, ½ cup sugar, ¼ teaspoon baking soda, and ¼ teaspoon salt.


Ingredients for batter

To this, add 8 tablespoons of unsalted butter which has been softened and cut into chunks. Cut this into your mixture using a pastry cutter. Once blended, there should be no visible chunks of butter and your batter will resemble coarse, pea-sized crumbs.

Butter cut into the flour mix

Blend in 1 whole egg and 1 egg white, along with 1 ½ teaspoons vanilla extract, and ⅓ cup buttermilk. I use my hand mixer for this, I think it makes the cake light and fluffy. (Side note: For a different flavor, try using almond extract instead!)

Pour the batter into your prepared cake pan and smooth into a nice, even layer. Now, return to the crumb topping you mixed earlier. You have two choices for crumbling the batter:

           1. Use a fork to break up the pieces, then pour on top of the cake batter. OR…
           2. Use your hands to smoosh the dough into a solid piece, then break off both larger and smaller chunks to top the batter with.

I generally go for option two. I like getting my hands in there and I love the size combination of chunks, from tiny to gigantic. Totally up to you, peeps. Pick your favorite.

Top: Batter
Bottom: Crumb topping
There's no need to press the crumb into the batter. As the cake cooks, it will rise around the crumb, so no smooshing, ok?

Bake around 30-40 minutes, until lightly golden and a toothpick inserted in the center comes out clean. Cool in pan on a wire rack for another 30-40 minutes.

THEN (this is the best part), cover the WHOLE THING with as much powdered sugar as you can stand. I like a lot. Don't skimp here, I promise you'll regret it.

And there you have it, NY Crumb Cake!


Slice the cake into good sized pieces, brew a cup of coffee, sit back and enjoy. This is a great way to start your Saturday morning.

I'll be back again soon, my friends. But until then, happy cooking! As always, the standard recipe is below.


Thanks for reading, everyone!
Follow me on Facebook @ OurArmyLifeAccordingToTheWife
or on Pinterest, my newest obsession ArmyLifeFromTheWife


The Standard Form:


NY Style Crumb Coffee Cake

Ingredients:

For the crumb topping:
⅓ cup sugar
⅓ cup dark brown sugar, packed
¾ teaspoon ground cinnamon
⅛ teaspoon salt
1 stick unsalted butter, melted and still warm
1 ¾ cup cake flour (do NOT use all-purpose)
For the cake batter:
1 ¼ cups cake flour (no substitutes!)
½ cup sugar
¼ teaspoon baking soda
¼ teaspoon salt
8 tablespoons unsalted butter, softened
1 large egg
1 egg white
1 ½ teaspoons vanilla extract
⅓ cup buttermilk (can substitute plain yogurt, but buttermilk is best!)
Powdered sugar

Directions:

Make the topping first. Combine the sugars, cinnamon, and salt in a mixing bowl. Add the melted butter. Stir in the cake flour, until the dough is thick and cohesive. Set aside and allow to cool to room temperature, about 15 minutes. It should be ready by the time you are done mixing the cake batter.

Make the cake batter next. Start by preheating the oven to 325 degrees, Spray a 9×9 baking pan with baking spray (or grease and flour the pan) and set aside. Combine the flour, sugar, baking soda, and salt in a large bowl. Cut the butter into the flour mixture with a pastry cutter, until it resembles coarse peas with no visible chunks of butter remaining. Add the egg, egg white, vanilla, and the buttermilk. Beat with a hand mixer on medium-high speed until the batter if light and fluffy. Pour the batter into the cake pan and smooth into a nice, even layer.

Go back to the crumb topping. Use a fork to help crumble it into pea-sized pieces, if desired. I like to use my hands to smoosh it together and break off larger chunks. Sprinkle the crumb topping over the cake batter, covering it completely.


Bake cake until golden, about 30-40 minutes. A toothpick inserted in center should come out clean, indicating doneness.  Cool in pan on a wire rack for 30 minutes. Generously dust the cake with powdered sugar before slicing and serving.