Showing posts with label Becky. Show all posts

March 11, 2014

Hiatus in Venice

Today, I leave on a great adventure to Venice, Italy! I am so excited to visit this city, it's been on my bucket list for a very long time. I'm traveling with my friend Becky. We've had many adventures together, and I know we're going to enjoy this one as well.


Becky and I in Ireland, 2012


I won't be doing as many posts here on the blog while I'm gone, but I did prepare a few things for you that will post as scheduled. You can also keep up with me via my Facebook page. I'll try to post some up-to-the-moment pictures of Venice when I can. I know the bed and breakfast we're staying at has wifi available, and I'm sure we'll find a connection at local cafes as well.

I'll see you on the flip side, my friends!


Thanks for reading, everyone!
Follow me on Facebook @ OurArmyLifeAccordingToTheWife
or on Pinterest, my newest obsession @ ArmyLifeFromTheWife


February 25, 2014

Dark Chocolate and Gouda Puffs

A few weeks ago, my friend Becky was visiting me from the other side of Germany for a girls' weekend. This generally involves lots of shopping, perhaps some photo taking (we're both obsessed), chick flicks, plus food and wine.

We spent plenty of time at my favorite place, Ikea (the happiest place on earth!), and we also managed some time to shop in downtown Neumarkt in der Oberpfalz.

Downtown Neumarkt in der Oberpflaz

We noshed at a few cafes during her stay, but the best part of the weekend (food-wise) was a new recipe I've been dying to test out. You see, I love chocolate. And I love cheese. And, of course, wine.

I thought, why not pair these things together? So I did. And it was magic.

Dark Chocolate and Gouda Puffs

Nom.

Nom nom nom nom nom.

Seriously.

Pair these puffs with a glass of red wine, and suddenly you've got a perfect dessert or appetizer. You can add variety with different cheeses and various toppings. Our favorite was gouda cheese and dark chocolate topped with slivered almonds and some sea salt. But I'm going to show you a multitude of ways to put your own spin on this recipe.

Ready? Good.


Here's what you need to get started: 1 box of puff pastry, 8 ounces of cheese, 1 bar of dark chocolate (at least 65% cacao), an egg, 1 tablespoon water, slivered almonds, plus some sea salt and raw sugar.

These are the basics. But you have so many options. For example, Becky and I tried 3 types of cheese, including Gouda, Brie, and Camembert. We also tried several types of chocolate, though they were all dark. We varied our toppings as well. Some puffs were topped with almonds, some were not. Some were sprinkled with sea salt, others with sugar. Options, people!

Ingredient choices

Begin with your puff pastry. Allow the box to thaw on your counter for about 30 minutes. You want the pastry to be workable, but not so soft it's falling apart everywhere. While it's thawing, line 2 baking sheets with parchment paper.

Remove both sheets of pastry from the box and unfold gently. The pastry has several fold lines in it, but that's ok, we're going to use them to our advantage.

Puff pastry. Notice the fold lines?

Each sheet of pastry will yield 12 squares. Cut along the fold lines to begin. Then cut each length into 4 even pieces. Do this for both sheets of pastry.

Puff pastry after cutting

The picture above picture is what your pastry should look like after you've cut it. 24 squares will equal 12 total puffs when finished.

Next, enjoy a sip of wine to reward yourself for a job well done.

Now it's time to add the chocolate. When choosing your chocolate, pick a dark, bittersweet bar, at least 65% cacao. You could try milk chocolate as well, but I think this would be too sweet to pair with the cheese. Most chocolate bars are divided into squares. I chose one with at least 12 squares, as this made dividing among my pastry easy.


Lay 12 pieces of the puff pastry onto your cookie sheets. I originally began with one cookie sheet, but realized I needed two once I started sealing the pastry edges. Don't be like me, peeps! Start with two cookie sheets, 6 puffs per sheet.

On top of each square of pastry, place a piece of chocolate, and then a piece of cheese.


A note about your cheese choice: I tested several varieties. All of my choices worked well and tasted great. But the Gouda was, by far, the best. I believe this was related to the texture of Gouda as it melts. The Brie and Camembert liquify more when they melt, and the chocolate slightly overpowered them.

If you're using shredded Gouda like we did, then place the cheese on the bottom of the chocolate. This isn't necessary, it just makes your life a  bit easier, as the chocolate helps anchor the cheese when you seal the pastry.

On top of the chocolate and cheese, place another square of the puff pastry. Line up the edges of the pastry pieces and use a fork to seal, like so:

Sealed puffs

If your edges aren't sealed well, then chocolate and cheese will leak out during baking. Not cool, peeps. If you notice any tears in the pastry, seal it back together before baking. You may need to stretch the top piece of puff pastry a bit, to help it fit over the chocolate and cheese. This is ok! The pastry will be very pliable at this point, so it's not difficult to stretch it to fit.

You're almost done now!

In a small dish, whisk together an egg with one tablespoon of water. This is an egg wash. Brush this over your puffs. Why do we do this, you wonder? Because the egg wash will make the top of your puff pastry golden and delicious during baking. It also helps the toppings stick better.

Trust me here, peeps.

After the egg wash, sprinkle on the toppings. I like using slivered almond pieces, because I think the dish needs a crunch factor. But you can easily leave these off if you don't like nuts. I left them off some of my puffs for Becky.

On top of the almonds, you can also sprinkle either some raw sugar or sea salt. I personally liked both. I think with a saltier cheese, I would choose the sugar. And with a milder cheese, I would choose the sea salt. Up to you! Another option would be to leave out the salt and sugar entirely, then dust the pastries with powdered sugar after they have cooked and cooled.

Puffs sprinkled with almonds, sugar and/or salt
Pop these babies into a preheated 375 degree oven for about 14-20 minutes. Check them often, ok? Ovens vary quite a bit, and you wouldn't want yours to burn. You'll know they are done when the pastry if puffy, golden brown, and delicious looking. Cool slightly before serving, the filling will be hot!

Dark Chocolate and Gouda Puffs with slivered almonds and sea salt

These are perfect for dessert or even as an appetizer. You could make them even smaller by cutting the squares in half again and halving your filling as well. I served mine with a glass of red wine and a side of green grapes. The grapes were the perfect palate cleanser between bites.

Becky and I enjoyed trying the different varieties, and they were all delicious. Here is a list of our combinations:

Brie and dark chocolate with sea salt (both with and without almonds)
Brie and dark chocolate with raw sugar (both with and without almonds)
Gouda and dark chocolate with sea salt (both with and without almonds)
Gouda and dark chocolate with raw sugar (both with and without almonds)
Camembert and dark chocolate with sea salt (both with and without almonds)
Camembert and dark chocolate with raw sugar (both with and without almonds)

As always, I've included the standard recipe below! Experiment and see what combos you like best, and then send me your photos and tips. I'll be back again soon with some new recipes.

Until then, happy cooking, peeps!


Thanks for reading, everyone!
Follow me on Facebook @ OurArmyLifeAccordingToTheWife
or on Pinterest, my newest obsession @ ArmyLifeFromTheWife


The Standard Form:

Dark Chocolate and Gouda Puffs

Ingredients:
1 box of frozen puff pastry
1 bar of dark chocolate (divided into 12 squares)
8 ounces Gouda cheese, cut into 12 pieces
1 egg
1 tablespoon water
Slivered almonds, for garnish
Sea salt, for garnish
Raw sugar, for garnish

Directions:

Preheat oven to 375 degrees. Line two cookie sheets with parchment paper.

Thaw puff pastry for 30 minutes. Remove from packaging and slice each sheet into 12 even squares (do this by cutting along the 3 fold lines, then cutting each of those strips into 4 even pieces).

Place 6 pieces of pastry on each cookie sheet, a few inches apart. Place 1 piece of cheese onto each piece of pastry. Top with one square of chocolate per pastry piece. Top with another piece of puff pastry, and seal the edges with a fork.

In a small dish, whisk together the egg and one tablespoon of water. Evenly brush this egg wash over the pastry squares (12 total). Sprinkle with almonds, and either sea salt or raw sugar.


Bake in preheated oven for 14 – 20 minutes, until puffy and golden brown. Cool a few minutes before serving.   


February 21, 2014

Pinterest Tested: Brown Sugar Scrub

I've been curious about making my own bath products for quite a while now, but never seemed to have the time. I mean, first you need to find a recipe, then buy the ingredients, then make it, then test it…

But I found that this process was totally worth it!

After some recent medical issues, I started doing a little research. Your skin absorbs so much of what you put on it everyday - deodorants, lotions, creams, makeup, bath soap, etc. Most of these products contain harmful chemicals, and we don't even realize it! I could give you my long spiel here, about organic foods and natural cleaning products, and a whole host of other things… but I won't.

Just know that chemicals are bad, peeps. By making different choices, one simple choice at a time, we can decrease our exposure to these chemicals and hopefully make the world a better place for future generations. I've started my own journey down this path, picking one item to change at a time.

With that in mind, I was hard at work looking for a homemade bath scrub, minus as many chemicals as possible. And eureka, I finally came up with my perfect combo!

Brown Sugar Scrub


I scoured Pinterest for weeks, tried a few scrubs, but eventually created my own combination. Here are some of the people I took inspiration from:

The Pinterest Project

Simply Southern Mom

Homemade Ginger


To get started, this is what you need:


Brown sugar, white sugar, coconut oil, olive oil, Vitamin E, and vanilla. The basic recipe is quite simple: 2 parts sugar to 1 part oil.

Start by mixing together your oil and sugars. I use ½ cup coconut oil and ½ cup olive oil. The coconut oil is much more solid at room temperature. I like the contrast in consistency, I think it creates a nice scrub texture.


Oils

I use 1 cup EACH of brown sugar and white sugar. You can use all of one type of sugar, but I prefer the combo. You might also try raw sugar, as well. I think this would make the scrub extra exfoliating, and I may test it one of these days (*see my update below! Thanks to Abigail Austin Photography, this combo has now been tested). If you try this yourself, please comment below and let us know how it goes.

Once the sugar and oils are combined, you could definitely stop right there and have a great scrub. However, I also add a teaspoon of vanilla (smells delicious!) and 4 capsules of Vitamin E (just cut the capsule open and squeeze the liquid into your mix). You could also purchase straight Vitamin E oil, which wouldn't require the additional task of opening the capsules.


That's it! The recipe makes about 2 medium-size jars (this greatly depends on the type of jar you are using). I've been using the scrub for a while now, and I LOVE it. Your skin feels so soft after stepping out of the shower. I especially like how well it helps the dry skin on my feet and hands.

I've also added raw honey to the scrub before (about ¼ cup), and this makes a nice addition. Play around with the recipe, and discover what works best for you.


This also makes an excellent gift for birthdays or Christmas, or any occasion. Decorate your jar with ribbon and a label for a polished look. Heck, decorate the bag to match (credit for the decorations here go to my pal, Becky!).

I hope you enjoy the recipe. Please comment below with any tips you may have for fellow readers. I'll be back with more posts soon, my friends! I've included the full recipe below.


UPDATE: A fellow blogger and great friend of mine, Abigail Austin Photography, tried this scrub at home and was nice enough to share her results with us. This is what she had to say:

"I just finished trying your Brown Sugar Scrub, and I loved it! My skin feels soft, and I smell pretty.

I tried the recipe spontaneously without a trip to the grocery store, so I substituted brown sugar with raw sugar. The grains did not absorb the oil, so my texture was different than yours. I added more white sugar and the oils. As a scrub, the larger granules of the raw sugar did well exfoliating, but they were harsh in the ratio I used. A tablespoon of raw sugar would give the extra exfoliation power.

I'm very happy with this recipe, and I can't wait to make it again. A natural, chemical free scrub that leaves skin this moist is a must-have for any beauty queen in the north where heaters zap all the moisture. Thanks for this great recipe, Our Army Life!"


Brown sugar scrub with raw sugar

From Abby's test, I suggest only adding raw sugar for a little exfoliating boost, perhaps a tablespoon. Stick with either brown or white sugar for the main portion of your base. Thanks for the tips, Abby!


Thanks for reading, everyone!
Follow me on Facebook @ OurArmyLifeAccordingToTheWife
or on Pinterest, my newest obsession @ ArmyLifeFromTheWife


The Standard Form:


Brown Sugar Scrub

1 cup white sugar
1 cup brown sugar
½ cup coconut oil
½ cup olive oil
1 teaspoon pure vanilla extract
4 capsules Vitamin E 

Directions: Combine all ingredients in a bowl (open the vitamin E capsules and squeeze out the oil). Mix well. Store at room temperature. 


January 2, 2014

Heidelberg Christmas Markets

Before our move, the Hubs and I were a little worried about meeting new people, and finding friends at a new duty station. After all, our old pals are so wonderful! We miss all the good times we had together, and really hope they can visit us sometime.

Lucky for us, a few of our friends have followed us to Europe! Of course, none are at our exact location, but they're closer than some of our other friends. Also lucky us, we discovered that we have amazing new neighbors! Most of us are new here, so we have the chance to discover this beautiful country together.

One of my new pals is actually from Germany, and she has been an incredible help to all of us as we fumble with the language, train schedules, and grocery stores. She's originally from Heidelberg, a gorgeous town. And, she offered to show me around a couple weekends ago...

Naturally, I said heck yes! 

The Christmas Markets were in full swing when we arrived. My friend, Becky (who lives in Germany now too!) met us there, and we all spent an excellent afternoon together. Mostly, we wandered the markets. Shopping, eating, and chatting…


I'm really, really obsessed with the Christmas markets. They're so much fun, just to hang out and socialize. Not to mention, a great place to pick up gifts for our family back in the States.

Though we only had the afternoon and a bit of the evening, Jasmina (my new neighbor) managed to show us so much of her lovely hometown. We stopped for breakfast at a fantastic cafe, wandered the markets, and eventually made our way to Heidelberg Castle.


Panoramic of Heidelberg Castle and the town


We spent some time seeing the sights, with Jasmina as our guide (she was excellent!). The history in Europe runs much longer than what I'm used to in the States, it's fascinating. Not only did we tour the outside of the castle area, with it's excellent views, but we wandered into the castle itself before making our way back to town.

Us ladies goofing off 


Left: Giant wine barrel (room sized!)
Top right: Entering the castle center
Bottom right: Sun clock on castle tower

Someday I might take a guided tour of the castle, but we saw so much even without a pro guide. Though I think Jasmina should qualify, ha! In the image above, you can see some of the sights. The ginormous (that's a real word, peeps!) wine barrel especially impressed me.

I'm not sure what that says about me… but I'm ok with it.

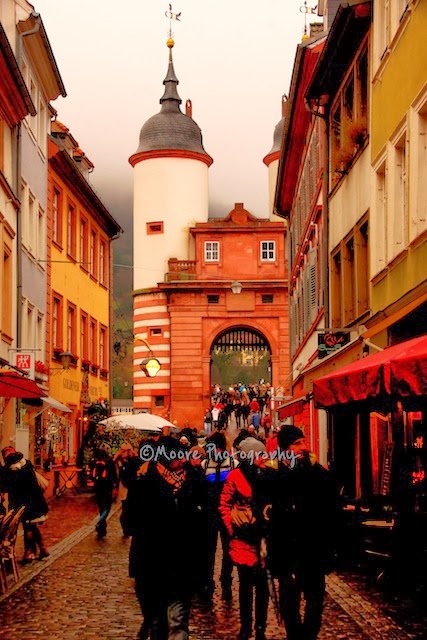
One spot Becky and I were especially determined to see was the Heidelberg Gate. As night began to fall, we walked to the gate among small crowds of people.


The gate is an especially photographic spot. On the other side is a stone bridge (also beautiful), where many people attach their "love locks" in this city (you might remember these from my trip to Budapest). One of these days, I'll buy a lock with the Hubs and we'll toss the key into the river below. We only have to decide which gorgeous city we'll complete this tradition in… suggestions, anyone?

Though I loved my trip to Heidelberg, it just wasn't enough. I'm desperate to go back! So far, this is one of my favorite cities in Germany. Sometime in the spring, I plan to visit again, for a weekend this time. Hopefully the Hubs can come on that trip too.

But for now, Happy New Year, my friends! There will be one more post about some of the local Christmas markets, and then I'll tell you all about my recent trip to Neuschwanstein castle. Plus, some new recipes should be coming soon (now that my dishes are unpacked!).


Thanks for reading, everyone!
Follow me on Facebook @ OurArmyLifeAccordingToTheWife
or on Pinterest, my newest obsession @ ArmyLifeFromTheWife


December 4, 2012

Bosque del Apache

The Hubs and I love to get out and about, exploring our world. We've seen big cities, and will likely see more, but what we really love is the great outdoors.

Now, I'm not exactly an outdoors-woman. I'd be perfectly happy to... ahem... "camp" at the lodge. What I enjoy most is the hiking, and an opportunity to photograph the wildlife. And then I want to sit in front of the fire at my lodge, with a cup of hot cocoa, and a great book. This makes sense to me. 

Sleeping in a tent, with bears and spiders and God knows what out there? Not so much.

There are many places, no matter where you live, to explore the great outdoors. Heck, even if you're in Manhattan, get out and wander Central Park! There are always ways, you just have to look for the opportunity. 

A few hours from our home is a bird sanctuary. The Hubs and I have driven past it on various road trips, but never taken the time to stop. Until, our recent trip to Albuquerque where everything went wrong. Since we couldn't see what we were there for, we adjusted our plans to stop at Bosque del Apache Wildlife Refuge instead. 

We enjoyed our short stop there so much, we decided to go back again during the winter months, when the Bosque is home to thousands of Sandhill cranes, snow geese, and a variety of other wildlife. Although we didn't attend the Festival of the Cranes, there were still thousands of birds to see every day. 

For my first visit back to the Bosque, I made the road trip with my gal pals, Abby and Becky. We left in the middle of the night, hoping to arrive in time for sunrise. 

We made it! 

The Flight Deck

Our journey began at the Flight Deck, just a short distance down the 12-mile tour loop. A thick fog blanketed the water, providing cover for the cranes we could hear, but couldn't see. Dozens of photographers were scattered in various locations around the loop. Avid bird watchers came armed with binoculars and cameras.

Photographers and bird watchers waiting for a glimpse of cranes 

The heavy fog prohibited even the most basic photography. We couldn't see the cranes with the naked eye, but we could certainly hear them calling to each other. Becky, Abby, and I were struggling with our disappointment. We had hoped to see the cranes take flight, a common occurrence at the Bosque.

Just as we were about to give up, shadowy figures emerged from the fog. The sun rose higher, clearing our line of sight.


The cranes! Rather than take flight, the birds were walking across the shallow water, in search of their breakfast.

Our excitement returned. Camera shutters clicked. Our middle-of-the-night, impromptu road trip had been worth it!

The plan was to stay for a few hours only, then return home. Becky was due back at work, and we were all running on very little sleep. Instead, we began the tour loop. How long could 12 miles really take, especially by car?  

Um... it takes a lot longer than you would think!

Every pull-off offered new views and different wildlife. The cranes weren't the only creatures awake. Snow geese, mule deer, hawks, eagles, and coyotes... these are just a few of the species we spotted.

Thousands of snow geese take flight 

Hours later, we finally started the journey home. Becky and I had plans to return later in the week, with the Hubs in tow. This time, I couldn't wait to see sunset at the Bosque!

I wasn't disappointed. Not only did we see sunset, but the sunrise as well. AND, I tried my hand at star photography for the very first time!

Highway 1, leading to Bosque del Apache 


Granted, it's not a perfect picture, but I think it's ok for my first time. The experience was the best part.  Driving into the middle of nowhere, in the dark, and listening to the coyotes howl... quite the adventure!

During the daylight hours, we spent more time photographing the birds. I quickly grew to envy some of my fellow photographers, with their giant lenses that could reach out and touch someone. My 18-250mm lens was a baby in comparison.

Lucky for me, the birds flew overhead so often, I had plenty of opportunity to capture their images.

A Sandhill Crane in flight 

The Hubs (without a camera) was enthralled with the birds too! The binoculars seemed permanently glued to his eyes. Several times, he referred me to The Big Year, a movie we recently watched together. I'm pretty sure he wants to try for a Big Year himself once he retires (If you're wondering what a Big Year is, check out the movie)!

He took a few breaks to film the birds. Their calls pierced the air, soothing at times and annoyed at others. When a coyote (or a stray human) came too close, the birds screeched their displeasure, even taking to the air at times. When not in sight of the birds, you could still sense their mood easily, simply by listening to the pattern of their calls.


The video shows the snow geese flying in at sunrise, a gorgeous sight.

After repeated trips to the Bosque, I can now say it's one of my favorite places we've visited. I might even let the Hubs talk me into that Big Year one of these days!

I'd love to show you all my photos from the trip. If you'd like to see more, be sure to check out the Facebook Photo Album!

As always,


Thanks for reading, everyone!
Follow me on Facebook @ OurArmyLifeAccordingToTheWife
or on Pinterest, my newest obsession @ ArmyLifeFromTheWife


Snow Geese in flight 


September 16, 2012

The Emerald Isle: Part 1 (Dublin)

Becky and I on the River Liffey, Dublin 

At last! I promised you would see an Ireland post, and here is the first of many. This trip is one of my favorites, ever. Ireland is a beautiful country, full of friendly and interesting people. I hope you enjoy the story of my travels as much as I enjoyed the travel itself...

My vacation to the Emerald Isle began with a long weekend in New York. Becky and I spent several days exploring the streets of Manhattan before catching our plane ride across the Atlantic. If you want to catch up on our trip, check out the posts here:


Still My Favorite Place... NYC (Part 1)

Still My Favorite Place... NYC (Part 2) 

Still My Favorite Place... NYC (Part 3)


As you see, we left NY happy, and ready to embark on a new adventure. Our flight departed the United States mid-evening, but was scheduled to arrive in Dublin early the next morning. We were prepared to hit the ground running... all we needed was a little sleep.

The transatlantic flight provided time for some shut-eye, but it was difficult to drift off with excitement humming through my system. If anyone out there has a surefire way to fall asleep on a plane, please share! I need all the help I can get.

I did, eventually, pass out (with my fingers crossed, hoping I wouldn't snore!). When next I opened my eyes, we were landing in Dublin.

My first view of Ireland, out the airplane window


You've seen other views from my window, but now it's time to get off the plane and the tour bus. I couldn't wait to stretch my legs and walk around.

Normally, your first stop would be the hotel; for a change of clothes, maybe a shower, or perhaps a nap. Not us, though! We stepped off the plane and straight into our first tour. After a quick stop at the ATM (The Republic of Ireland uses the Euro, and Northern Ireland uses the Pound Sterling), we boarded the bus and drove to Glasnevin Cemetery.

We were greeted with a traditional Irish breakfast. Thank goodness, because boy oh boy, did I wake up hungry!

The Full Irish

The Full Irish Breakfast traditionally includes rashers of bacon, sausages, fried eggs, blood sausage, potatoes, and fried tomatoes. Also, tea and toast (or soda bread) are served. For us Americans, coffee was also readily available.

Luckily, I'm a HUGE fan of tea, and all of the other items on my plate. Except, ahem... blood sausage. There is only one word to describe it: EWWWWWWWWW! Blood sausage is exactly what it sounds like: sausage made with blood (and other things). Yuck.

However, I did taste it. I'm a big believer in trying new things, and I was hoping I'd like it.

I didn't.

I'm not sure anyone else did either. Maybe it's an acquired taste.

Everything else was delicious to the max! I have a good friend who, over the years, has lectured me on the difference between European bacon and American bacon (you know who you are!). I've been waiting for an opportunity to test the difference for myself, and...

She was right. American bacon is complete rubbish. And now I can't ever go back to my blissful ignorance! The bacon on my plate was thick and meaty, with hardly any fat. Imagine a cross between a ham steak and so-called 'bacon'. Put those together in your mind, and you'll get a better idea of the absolute fabulousness I was eating every morning.

I completely blame the bacon for the 3 pounds I gained on vacation. And the scones. Oh, and the butter....

ANYWAY. Onward.


The tour of Glasnevin is taken on foot. Our guide was not only knowledgable, but entertaining. The tour normally lasts around 90 minutes, so wear your sneakers!

Many famous people are buried in Glasnevin, including Daniel O'Connell, Michael Collins, and Charles Stewart Parnell. The cemetery contains the largest round tower in Ireland, at 51 meters high. Directly beneath the tower is the family crypt of Daniel O'Connell.

Inside the crypt of Daniel O'Connell 
Glasnevin is actually listed on TripAdvisor as the #1 attraction in Dublin, so don't miss out! The tour is inexpensive, and the history lesson is a wonderful introduction to this beautiful country. My favorite thing? Just listening to our guide's amazing accent!

Here's the view (not from a window this time!). For my iPhone and iPad friends, I know you can't see these slideshows since they use flash. I'm working on a solution, but so far I haven't discovered the fix. After each post, I'll be adding the photos to my albums on Facebook. You can follow me there for a look at all the pictures!  


After the tour, we wandered the gift shop for a bit before climbing back aboard our bus. Becky and I were traveling with a group of travel agents and their companions. In our case, Becky is the travel agent and I'm the companion.

Don't you wish you had a Becky?!

We were pals way before she started this cool job, but it's an awesome perk in a great friend. The perks of being friends with me? I do all the cooking! Though I'm not sure it compares to a travel buddy, it's all I've got.

The next stop on our itinerary? Kilmainham Gaol, a.k.a. the prison, #3 on TripAdvisor. What's #2, you ask? Dinner theaters! No worries, I have some great videos from those too, just not yet...

Kilmainham Gaol

Many leaders of Irish rebellions were imprisoned here, even executed on the grounds. One particular story is that of Miss Grace Gifford, eventually to be Mrs. Joseph Plunkett. An Irish artist, she's most known for marrying Joseph Plunkett just hours before his execution (by firing squad) at Kilmainham Gaol. He was executed for his role in an Irish uprising during Easter week of 1916. In 1923, Grace herself was arrested during the Civil War, and spent 3 months incarcerated at Kilmainham Gaol. Inside her cell, she painted a picture of the Virgin Mary.


The tour of Kilmainham Gaol was another great way to steep ourselves in some Irish history before exploring the rest of Dublin city. Many of us were losing our stamina, jet-lag severely kicking our American butts. After the tour, our bus finally dropped us at the hotel, where we had a few hours before a group meal.

What to do with several hours of time in Dublin? Much of the group chose to nap and refresh. This might have been the more intelligent thing to do. But since when have Becky and I ever followed the more practical path? I wasn't about to start in Ireland!

Instead of sleep and a shower, we chose a rambling walk along the city streets and canals of Dublin. We were armed with jackets, umbrellas, and most importantly, our cameras. The hotel provided us with a "map". What else could we possibly need?

Ahem. A sense of direction may have been useful...

Carefree and blissfully unaware of how lost we could become, Becky and I ambled along the city streets, absorbing everything in our path. We snapped hundreds of photos, shopped in a multitude of stores. We worked our way to Grafton Street, popular for shopping and people watching.


We emptied our pockets a bit amongst the shops. We each came equipped with a list of souvenirs to find and purchase, both for ourselves and others. On our first foray, I picked up a t-shirt for the Hubs, and a bit of chocolate for myself (Shhhhh.... the chocolate never made it back stateside!)

The afternoon flew by, and soon our tummies were rumbling. Breakfast was a distant memory. Finding a pub for lunch was no problem. It's easy to find LOTS of pubs, all you have to do is turn your head! We discovered Quays, and bopped in for lunch.

We didn't indulge in a pint, for fear it would make our jet-lagged brains sleepy. At least if we'd sprung for a Guinness, I could have blamed our later troubles on the alcohol...


Lunch was wonderful, and renewed our lagging energy. Though we didn't have much time left for exploring, there were a few spots we wanted to stop at on our way back to the hotel.

Temple Bar is one of the oldest pubs in Dublin, established in 1840, and an item we wanted to scratch from our list. Though we wandered aimlessly for a bit, we did run across the bar eventually. This wandering should have jingled a warning bell in my brain... but it didn't.


The Temple Bar, Dublin 

I blame the awesomeness of city streets for our lack of concern. The pubs of Dublin truly fascinated me. They were all different, yet somehow the same. The atmosphere was welcoming, and provided respite from the occasional rain sprinkles. Live music is common most nights, and the taps flow freely.

Who wouldn't want to see as many pubs as possible? Even when we started back for the hotel, there was no worry. Becky and I calculated our time, and determined there was plenty of it.

Hahahaha. How naive we were!

In a foreign country, with no working cell phone, we assumed an hour was plenty of time to get back to our hotel. And it would have been... if we had any idea where we were going.

My first bit of advice to you: NEVER trust a hotel "map".

The "map" we were given was a joke. Badly labeled, and poorly photocopied. Where we had easily found the city center upon leaving the hotel, now we couldn't find our way back. Streets that seemed familiar simply led us farther in the wrong direction. We tried turning the map upside-down, sideways, and inside out. Nothing made it any easier to read.

My second bit of advice to you: LOOK UP. 

Street signs are not the same in Ireland. Or most of Europe, for that matter. In America, you're used to handy green signs, at eye level, on each street corner. This is not so overseas. The street signs are on buildings for the most part, high above your head. And they are not at every intersection. If you need proof, look back at the photo of Temple Bar (above). The blue sign on the left, above the bar, is the street sign.

My third piece of advice to you: ASK for directions. 

We actually did ask for directions. We're not men, after all. Only problem? I don't think the people we asked knew where they were either! First we walked this way, and then someone else told us to go that way, when what we should have done was gone the other way entirely.

Whew. It was rough; not so rough that I didn't take photos, but rough enough. Obviously, we eventually found our hotel again. However.

We were a good thirty minutes late for dinner. But the important thing is that we made it back! Plus, all the extra walking helped work off some of the bacon I ate at breakfast, right?

Let me live in my fantasy world for a while.

So, our first day in Dublin was quite the adventure! I loved every minute of it, even the parts where we were lost. Becky and I turned in early, right after dinner. Jet-lag had finally caught up to us. We needed our sleep, because our second day in Dublin promised to be just as action-packed as the first. For now, I'll leave you with some pictures from the city streets. I can't wait to share the rest of our adventure with you!  


Thanks for reading, friends! 
Follow me on Facebook @ OurArmyLifeAccordingToTheWife
or on Pinterest, my newest obsession @ ArmyLifeFromTheWife


September 1, 2012

The View From my Window: Dublin, Ireland

I've made many promises that a post about my recent trip to Ireland is coming soon. And... ok. The trip isn't so 'recent' anymore. And truthfully, it's going to be more than one post. BUT, I have been working on it when I can.

See, here's the problem: I have a slight obsession with my camera. This may not seem like a huge deal, but trust me on this... it is. For sure. Any number of my friends and family can attest to this. For example, a normal person may take a few hundred photos on vacation, right?

I, on the other hand, took several thousand.

No worries, I won't be posting them all here. Especially since some of them are pretty awful. However, it takes time to sort the bad from the good. It also takes time to compose those photographs to tell a story along with the blog post.

So, I PROMISE, I'm working on it. Really, really hard.

In the meantime, I thought I'd post some pictures to whet your appetite. Much of our vacation was spent behind windows of one kind or another. The bus window, the window from our hotel, the window of the Guinness Storehouse...

My buddy Becky is almost as obsessive about her camera as I am about mine. So, despite the glass barrier, we were both clicking away. Rain or shine, didn't matter. We were having a fun, girl-vacation, and we didn't want to miss recording a second of it.

So, take a sneak peak at Dublin, Ireland, where we spent the first two days of our vacay. Much, much more on Dublin will be coming soon. I hope you enjoy the view from my windows!

(P.S. You can click on the images to see the full screen version)

Rain was our almost constant companion, but we didn't mind! 


General Post Office of Dublin 

A neighborhood street 


A church we drove past 


A city corner

Dublin canals along the River Liffey 


Pedestrian Signal 


Local bakery


The Papal Cross in Phoenix Park, Dublin 


View from the Gravity Bar at the Guinness Storehouse 

More coming soon to a blog near you... I PROMISE!