Showing posts with label Sandwich. Show all posts

May 13, 2014

Hard Rock Chicken Salad

Several years ago, I ate at the Hard Rock Cafe in Times Square with my pal, Becky. That's right, people… I said years. When it comes to food, I always remember the good stuff.

While there, I chowed down on what I assumed would be a basic chicken salad. Instead, I received a sandwich that has stayed in my memory for so long, I now have to recreate it. Luckily, I was smart enough to take a picture of the menu description, whew! So I had a basic idea of what was needed for this beauty.


The menu description stated, "Poached chicken with celery and green onions, in a light citrus mayo with dijon and dill. Served on a toasted hoagie with spring mix, cranberries, and goat cheese".

I totally got this!

I started with the citrus mayo. Easy peasy, people.

Citrus mayo ingrediente 

Naturally, I forgot one ingredient in the picture above. Pretend there's salt in there, ok?

To make the citrus mayo, mix together ¾ cup mayonnaise with 2 teaspoons fresh lemon juice, 3 tablespoons fresh orange juice, ½ teaspoon orange zest, and ¼ teaspoon each salt and pepper. You could throw in a little lemon zest too, if you wanted. I just like the orange flavor a bit more. Sometimes I zest a little of both.

And that's it! See how simple that was? Now on to the chicken itself.

Start with 3 cups of cooked, diced chicken breast. I poached my chicken in the crockpot, because it is way too hot to turn on my oven right now. You can cook yours any way you like, but I love how moist and juicy poached chicken is.

How to poach chicken in a crockpot

 To your diced chicken, we're going to mix in a few things...


To the chicken, add the citrus mayo, 2 stalks of diced celery, 2 tablespoons minced green onions (just the green part), ¼ cup dried cranberries, and ¼ cup of chopped, honey roasted pecans. Your chicken salad should look a little bit like this:


At this point, chill the salad until you're ready to serve it. When you're ready to make sandwiches, we'll add a few more things.

I really want a sandwich now. Seriously might need to raid my fridge.

So.


Slice your bread roll in half. I prefer a crustier bread roll, definitely not plain sandwich bread. Look for kaiser or onion rolls, or maybe ciabatta bread. Yum. 

Add a little mayo to the top piece of bread. You can also add dijon to the bottom piece, but I found this to be overwhelming. If you want my advice, don't do it. But if you really want to… well, it's your sandwich.

Pile some of the chicken salad on the bottom half of your bread (this should make 4 sandwiches). Sprinkle about 1 ounce of crumbled goat cheese on top, and then about ½ teaspoon of fresh dill. Top with a bit of spring mix and the other side of the bun, and viola! Hard Rock Chicken Salad Sandwich.


Basic, simple, tasty, and perfect for that summer heat. Serve with some fresh fruit or a green salad. Later this week, I'll show you an easy recipe for creamy lemon salad dressing… it would go great with on a side salad for this sandwich!


What are your favorite recipes to beat the heat? Comment below with your favorites, or send me your pins. I love testing out new things.

Until next time, happy cooking!


Thanks for reading, everyone!
Follow me on Facebook @ OurArmyLifeAccordingToTheWife
or on Pinterest, my newest obsession ArmyLifeFromTheWife

Email me: armylifefromthewife@gmail.com


The Standard Form:

Hard Rock Chicken Salad

Ingredients:
3 cups poached chicken, diced
Citrus mayo (recipe below)
2 stalks celery, diced small
2 tablespoons green onion, minced
¼ cup dried cranberries
¼ cup honey roasted pecans, chopped 
4 ounces goat cheese, crumbled
2 teaspoons fresh dill (about 2 sprigs)
Spring mix, for garnish
4 rolls, such as Ciabatta or Kaiser


Directions:

Combine the poached chicken with the citrus mayo, celery, green onion, cranberries, and pecans. Stir until well combined. Chill 1 hour before serving.

To serve, slice the bread rolls in half. Spread one side with a thin layer of additional mayo, or Dijon if desired. Mound chicken salad on the bottom half of the bread. Top the salad with 1 oz. crumbled goat cheese, ½  teaspoon of fresh dill, and spring mix. Add top piece of bread. Serve with a green salad.


For the citrus mayo: Combine ¾ cup mayonnaise with 2 teaspoons fresh lemon juice, 3 tablespoons fresh-squeezed orange juice, ½ teaspoon orange zest, and ¼ teaspoon each salt and pepper.  


May 7, 2014

Crockpot Poached Chicken

As the warmer months approach, I've been on a mission to create recipes that don't require my oven or stovetop. Do you believe it, there's no AC here in Germany?!

Ya, I didn't believe it either. Until we got here, and realized… no AC. Hence the desire for no-heat recipes as often as possible. The oven really warms up the house, but the crockpot is a wonderful alternative. 


I use poached chicken in any number of recipes, but I especially love it for chicken salad (stay tuned this week for my Hard Rock Chicken Salad recipe!). The Hubs would rather I make buffalo chicken dip with it, so I usually poach enough for both recipes. 

The process is relatively simple. Add your chicken breasts to the crockpot, then pour in enough chicken broth to completely cover the breasts. If you don't have chicken broth on hand, you can always use water. Or a combination of both. I prefer chicken stock because it adds a little extra flavor. 

You can also add in various seasonings and spices too! Because I made this especially for my chicken salad, I topped the broth off with 1 lemon (sliced into wedges) and a few sprigs of fresh dill. 

The rest is easy… just put the lid on your crockpot, set the heat to low, and walk away for a few hours! My chicken takes about 2-3 hours to cook, depending on thickness. I suggest you start checking for doneness around the 2 hour mark. When done, remove the chicken from the pot and let rest for 10 minutes before you shred, slice, or dice it. 

Why do we let the chicken rest? Because we don't want all the yummy juices to run out and leave us with tough, dry chicken. Trust me, peeps. 


Poached chicken is great for so many recipes, I couldn't even list them all. But try it with chicken salad, buffalo dip, quesadillas, chopped on green salads… the list could go on and on! And you don't need to heat up your house to do it either, total bonus. 

I'll be back soon with my special chicken salad recipe, Hard Rock style. Until then peeps, happy cooking!


Thanks for reading, everyone!
Follow me on Facebook @ OurArmyLifeAccordingToTheWife
or on Pinterest, my newest obsession ArmyLifeFromTheWife


The Standard Form:


Crockpot Poached Chicken

Ingredients:
3 boneless, skinless chicken breasts
4 cups chicken broth
1 lemon, cut into wedges
4 sprigs fresh dill

Directions:


Add all ingredients to your crock pot. The liquid should completely cover the chicken breasts. If it does not, add enough water until the breasts are covered. Cook on low heat for 2-3 hours, checking after 2 hours to see if the chicken is cooked. Do not let the chicken overcook or it will dry out. Once cooked, remove from pot and allow chicken to rest for 10 minutes before slicing, shredding, or dicing.


February 13, 2014

The Magic Avocado Sandwich

Magic, I say? Yes, yes I do. This open-faced sandwich qualifies in my book. It's simple, fairly nutritious, quick, and best of all… tasty. It's one of my all time, best ever, favorite things to eat.

Anyone who knows me well, knows I usually have an avocado lying about. I love them! I use them in practically everything, from breakfast to desserts. I even managed to make an Avocado Key Lime Pie (so good, by the way. Try it out!). If you've never given the avocado a chance, I beg you to change your mind…

Avocado, Tomato and White Cheddar Sandwich,
topped with a poached egg

I make this open-faced sandwich at least twice week, on average. Most often as a quick lunch (or breakfast), or an easy dinner when the Hubs is away. This hits the spot any time, I promise. I add variety with different cheeses or breads. Sometimes I add a poached egg. Or a fried egg. It all depend on my mood of the moment. 

To get started, you need: 


An avocado, of course! Also, your bread of choice. This time, I was using a local roll called a semmel, which I picked up at our bakery. You can just as easily use an English muffin, biscuit, wheat bread, anything really. Add a tomato to your pile, along with your favorite mustard (please use Dijon, pretty please?!). Oh, and some mayonnaise if you like. And an egg, though that's totally optional. And cheese! 

    
I vary my cheese choice based on what's in my fridge. This time I chose the white cheddar, but any kind of cheese is fine. 

The process is simple: 


1. Toast your bread

2. Spread bread with mustard / mayonnaise (Confession: I sometimes use both!)

3. Slice your avocado, and place a single layer on the bread 

4. Thinly slice your tomato, and place in a single layer on top of the avocado

5. Salt and pepper your tomato, if desired (trust me, you definitely desire this)

6. Top tomato with slices of your favorite cheese

7. Place the open-faced sandwich underneath your broiler until the cheese is melted

8. Eat! 

9. Thank ArmyLife for introducing the magic avocado sandwich to you

10. Repeat steps 1-9 as often as needed (I find twice a week to be my perfect number!)


Of course, you can also customize this recipe as needed. If I'm having a breakfast sandwich, I add poached egg. Want to know a secret? I sometimes add the egg for lunch and dinner too. It's nom nom, yum yum, goooooooood...

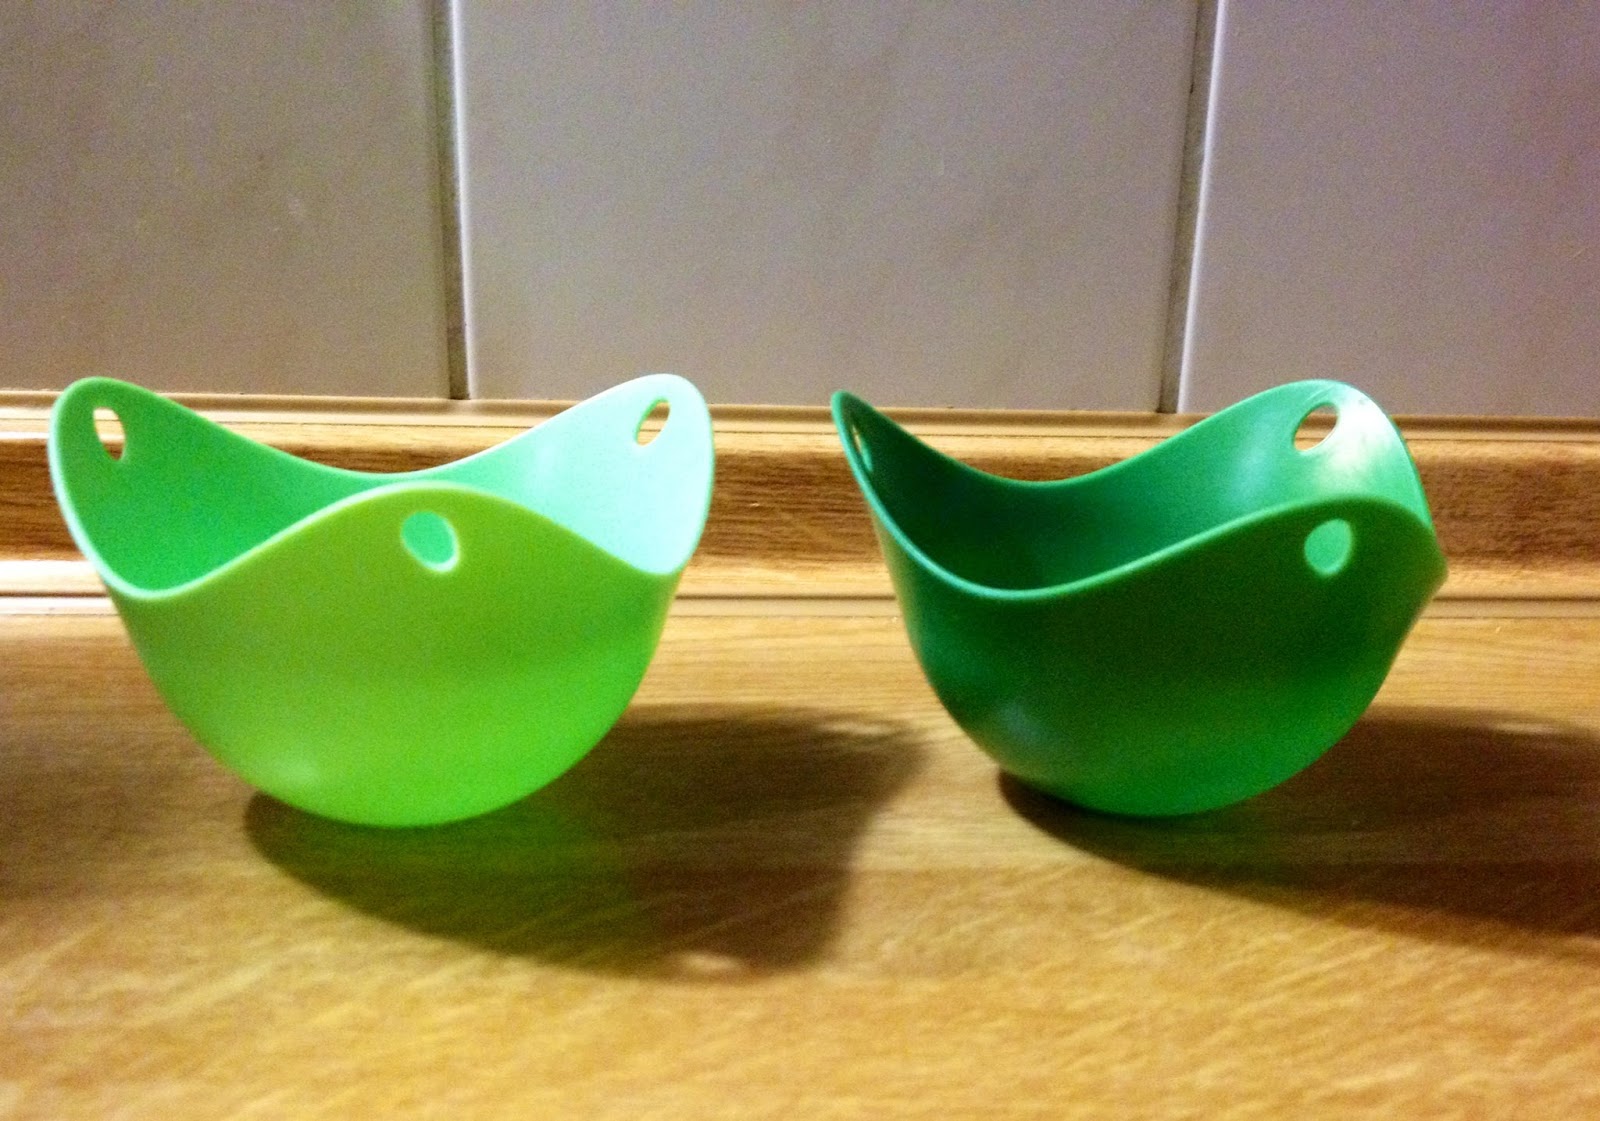
But because poaching an egg is a pain in the you-know-what, I use these simple cups from Amazon:


The egg poaches perfect every time with no muss, no fuss. Of course, you can always do this the old fashioned way as well. I've had varying degrees of success with this method, but I have high hopes that one day I'll get it just right. Or not. Hence the cups.

With the egg, your sandwich should look a bit like this:


So, slice into your awesome, magical avocado sandwich! Once you've eaten it, it's hard to go back to a regular sandwich. I LOVE how simple this is, and how filling. Try it out, people!! Listen to ArmyLife.

Until next time, happy cooking! I'll be back soon with more recipes.


Thanks for reading, everyone!
Follow me on Facebook @ OurArmyLifeAccordingToTheWife
or on Pinterest, my newest obsession ArmyLifeFromTheWife


March 11, 2013

Blackberry Basil Grilled Cheese

Yep, you read the title correctly. Sounds a little weird, I know.

But weird or no, it's also DELICIOUS. Trust me here, peeps. Have I ever steered you wrong?

I found this excellent flavor combination on Pinterest. And then I started experimenting to see if I could re-create the fabulous picture which set my mouth watering.

Turns out, I can.


And so can you!

The ingredients are basic, and the method simple. Even the Hubs could make this yummy grilled cheese (not that he actually will, but he could. In theory). This was so good I, ahem... tested it several times, with different variations.

Let's get stated with the ingredients:


I know this doesn't look like my regular ingredients photo, but it's because I tried this several times. The first time, I used Italian bread, Monterey Jack cheese, blackberries, basil, and butter (for the bread). The second time around, I changed the cheese and bread. And the butter. (But I only changed the butter because our commissary started stocking Kerrygold, which is pretty much the best tasting butter you can get here in the States... that I've tried so far).

The word you're looking for is... ANYWAY.

Ahem. Back to the recipe.

What I've discovered is, this recipe is highly versatile. Naturally I have a few tips for you. But for the most part, this dish is pretty impossible to screw up.

SO. The bread. You can pick your favorite, but choose a thicker cut. You definitely don't want a skinny mini bread. The blackberry juice and gooey cheese will disintegrate a bread that is too thinly sliced. I found that I prefer to thickly slice my own French bread (Quick tip: If using French bread, you often find air pockets in the slices. Try to avoid them so your cheese doesn't melt through).

Next, the cheese. Again, choose your favorite. I found the Monterey Jack was quite good, but the white cheddar was a-maz-ing. I really like the zing and the sharp kick from the white cheddar. I might try this again with Asiago or Stilton. Oooh, or Brie. Have fun with it!

Now that you've got your cheese and bread (both essential to a grilled cheese), let's deal with the blackberries. Place the blackberries (6 oz) in a bowl with high sides. Why the high sides? Because we're going to squish those babies, and they splatter!

Use your fork to mash the blackberries, like so:


Don't completely pulverize the berries, but squish them up so they're not too chunky. I'm way technical, right? Ha.

Now it's time for the basil. Here again, you have choices. I prefer to chop my basil (about 15 leaves) and stir them into the blackberries:


You could also leave the basil leaves whole, and simply layer them on your sandwich later. This will still taste yummy and look pretty, but I find it harder to eat the grilled cheese with whole basil leaves.

With all the prep work done, this grilled cheese comes together in a snap!

Butter your bread, and warm your skillet over medium-low heat. Place two slices of bread in the skillet, butter side down. Add a single layer of cheese, and then top with a few tablespoons of the blackberry mixture. If you chose to leave your basil whole, then top the blackberries with a few basil leaves:

Blackberries with basil mixed in, and blackberries with whole basil leaves

Add another thin layer of cheese, then top with a piece of bread (Without the additional layer of cheese, the blackberries will soak your bread. Make sure there is something between your fruit and the bread!).

Do you want to know the best way to get a perfectly toasted grilled cheese sandwich?

Leave it alone!

I know you may be tempted to move your sandwich around in the pan, or smash it down with your spatula. But please, please resist those urges. Your bread may stick a bit at first, but it will loosen... I PROMISE.

As the bread toasts, it will unstick from the pan. And that's when you know it's time for the flip. Wait patiently as the other side toasts as well. Don't turn up the heat, or any other crazy thing. The sandwich will cook about 3-5 minutes per side.

And, viola!

Enjoy the ooey gooey deliciousness that is Blackberry Basil Grilled Cheese.


Yes, it really is that simple. Like I said, so simple even the Hubs could do it.

Happy cooking, my friends! Please let me know if you try this with other cheeses or fruits, and how it turns out. As always, the traditional recipe is below.


UPDATE: Recently, I made this grilled cheese again, substituting the blackberries for blueberries. The result? YUM! 


Thanks for reading, everyone!
Follow me on Facebook @ OurArmyLifeAccordingToTheWife
or on Pinterest, my newest obsession ArmyLifeFromTheWife


Blackberry Basil Grilled Cheese

Ingredients:

6 slices of your favorite bread (I prefer French)
6 ounces fresh blackberries
15 basil leaves (either chopped or whole)
10 ounces cheese, thinly sliced  (your favorite, I prefer white cheddar)
Softened butter

Directions:

Butter one side of your bread slices, then set aside. Smash the blackberries with a fork. Stir the basil (if chopped) into the blackberries.

Warm a skillet over medium-low heat. Place 3 slices of the bread, butter side down, in the skillet. Add a thin layer of cheese on each piece of bread. Top with 2 tablespoons of the blackberry mixture. If leaving the basil whole, add several leaves on top of the blackberries. Finish with another layer of cheese, then top with the remaining bread slices.

Cook for 3-5 minutes per side, until the bread is golden brown and the cheese is melted.

Enjoy!