February 28, 2014

Asian Dragon Market, Czech

This week, some of the ladies and I took a random road trip to Cheb, in the Czech Republic. This may sound like a ridiculously long road trip, but in reality, the border is only about 90 minutes away. I was so surprised to arrive in Germany and find that countries are really the size of a US state. Lucky for us, we're very centrally located, so it's easy to visit many countries whilst here.

Our Cheb trip was all about shopping, with a bit of sightseeing thrown in. We specifically wanted to tour the Asian Dragon Bazar, have a little lunch, wander town, and then be home before dinner.

Have I mentioned that I LOVE living in Europe??

Of course, I was a little nervous driving into a new country. Who wouldn't be? But it turned out to be simple. Driving from Hohenfels, our car didn't even require a vignette. Plus, the market was so close, we got there and back again with less than ½ tank of gas.

The ladies, with their purchases, at the Asian Dragon Bazar

For those of you who wish to visit, this is the GPS address for the market: 

Svatý Kříž
350 02 Cheb
Czech Republic

After crossing the border (the sign is quite small, we almost didn't see it!), the market is just a short distance down on your right hand side, perhaps a mile or less. 

We arrived early in the day, around 10:30 a.m., and many of the vendors were just setting up. Upon parking, we noticed the vehicle next to ours could use, ahem, a little work.

As my pal, Jen the Baker, quickly pointed out… we shouldn't park next to that vehicle. Seriously. We moved several spots over, and then… we were ready to shop!

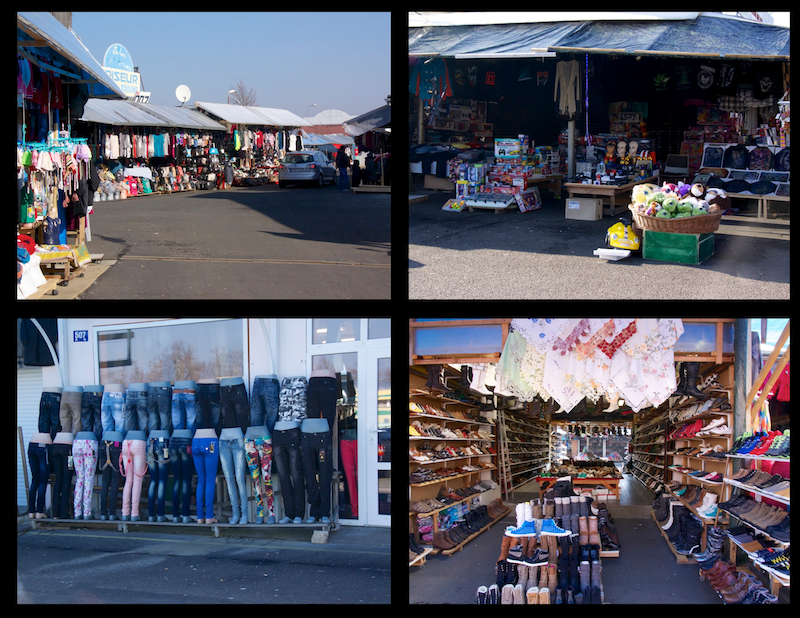
Some of the vendors at the Asian Dragon Bazar

Fair warning: If you're the type of person who's used to sparkling shopping malls, perfect displays, and polite sales clerks (not that there's anything wrong with that!), then this is not the place for you.

As our group wandered down the first aisle, I instantly felt at home. Come on, we all know my favorite place in the world is NYC! This collection of stalls was simply Manhattan's Chinatown in Czech. Shopkeepers whisper to you, "Louis Vuitton? Prada? Gucci?" as you walk past. (Take careful note, however. Knockoffs are strictly illegal, so I don't suggest attempting to purchase these). Bargaining is fully expected when you buy anything here. In fact, if you don't bargain, you're a fool. 

For example… several members of our group walked away with woven picnic baskets. The initial asking price was around 24 euros. By the time they finished, they had two baskets for the price of one! Don't be afraid. Bargain.

I'm even going to give you a good tip: Before you even ask what the price of your item is, decide what you're willing to pay for it. If the vendor won't lower to that price, then walk away. You must be capable of walking away, peeps. I swear, these shopkeepers can smell a sucker a mile away.


Next topic! Receiving an honorable mention on our market tour was the restrooms (pictured above). This was definitely the most interesting bathroom I've used in Europe so far (that's the nicest thing I can say). Like many restrooms here, there was a charge for use. What wasn't expected, however, was the few stingy squares of paper you are handed as you walk in and provide payment.

I'm not even kidding here. And I wish I was.

So, I don't suggest using these if you've really gotta go, if you catch my drift. Another note, most of the doors didn't lock or even shut properly. Engage the buddy system people! I wouldn't want to be in those bathrooms alone. It's better safe than sorry.


Despite the bathroom adventure, our shopping was a blast! We bargained well, and everyone found a good deal. Some of the items for sale at the stalls included: wooden bird houses, Christmas decorations, scarves (hundreds of scarves!), jeans, sweatshirts, shoes, purses, wallets, luggage, linens, china, crystal, rugs, picnic baskets, hats, gloves, children's' toys… the list could go on and on!

The best thing for sale, however, was this: Dirty garden gnomes! I definitely regret not purchasing a few of those. Next time, I'm getting several. There were mooners and flashers (of both sexes, haha), and a variety of other hilarious (and totally inappropriate) positions. I can't believe I resisted purchasing. I want a gnome!

From the market, we made our way to the town center of Cheb. 


Cute, isn't it? This town was great, we loved wandering the city streets. I'll be back later this weekend with all the pictures and deets about the rest of our day.

Until then, happy traveling, my friends!


Thanks for reading, everyone!
Follow me on Facebook @ OurArmyLifeAccordingToTheWife
or on Pinterest, my newest obsession ArmyLifeFromTheWife


February 26, 2014

Mental Health Day

At least once a week, I need what I like to call a "mental health" day. This is a day where I can do anything I want, even if it means hanging out in my pjs and nothing else.

I often find that people feel guilty over doing nothing. As if we're awful people for not checking off a certain number of items from our to-do list. We shouldn't feel that way! Everyone needs time to decompress. I seriously don't function well when my schedule is run, run, run and do, do, do. Somewhere in the middle of all that, I need a little time for… well, whatever I want.

To be honest, I usually don't just sit and do nothing. I can accomplish stuff on my mental health day, if I choose to. That's the key. 

So today, I did a lot of what some people might consider nothing. I slept in, and cuddled with my dog a bit. 


Ain't she cute? She's a terrific smuggler too. 

I took my time making breakfast, which I actually ate around lunch time (I made my magic avocado sandwich!). I checked my email, cleaned up the kitchen, and then spent an hour with a good book and a cup of coffee. 

I did manage two loads of laundry today. And I called a travel agent about some of our summer plans. And then I spent 3 hours on the phone, most of it chatting with my stateside pal, Abby. Miss her like crazy! 

I even warmed up leftovers for dinner. I'm, like, SuperWoman. 

I know it sounds like I'm a lazy bum, but this is what a mental health day is for. To relax and organize your brain, so it's ready to tackle the big stuff. Every other day this week, I've been running around. I'm out all day, taking care of business and enjoying the hustle and bustle of living in Europe. This weekend will be busy too. So today was my scheduled chill day. 

Yes, I schedule these things. It's ok. You can do it too, it's cool. 

I'm about to hit the sack, so I get a full eight hours before the crazy starts again. See, tomorrow I'm heading to a Fasching festival with ACS. Yesterday, I was in the Czech republic. Friday, I'm grocery shopping and paying bills and all sorts of menial tasks. The weekend is already packed with two full days of fun.

My brain needed to catch up. 

I'll be back soon with a great post about my trip into Czech. I sorted a few of the photographs this evening, but mental health took over and I'm done for the night. Here's a quick sneak peak:


Do you take days for some rest and relaxation, or is that just me? I'll catch ya on the flip side, keep a lookout for my next post about Cheb, the cute little town you see in the photograph above. 


Thanks for reading, everyone!
Follow me on Facebook @ OurArmyLifeAccordingToTheWife
or on Pinterest, my newest obsession ArmyLifeFromTheWife

February 25, 2014

Dark Chocolate and Gouda Puffs

A few weeks ago, my friend Becky was visiting me from the other side of Germany for a girls' weekend. This generally involves lots of shopping, perhaps some photo taking (we're both obsessed), chick flicks, plus food and wine.

We spent plenty of time at my favorite place, Ikea (the happiest place on earth!), and we also managed some time to shop in downtown Neumarkt in der Oberpfalz.

Downtown Neumarkt in der Oberpflaz

We noshed at a few cafes during her stay, but the best part of the weekend (food-wise) was a new recipe I've been dying to test out. You see, I love chocolate. And I love cheese. And, of course, wine.

I thought, why not pair these things together? So I did. And it was magic.

Dark Chocolate and Gouda Puffs

Nom.

Nom nom nom nom nom.

Seriously.

Pair these puffs with a glass of red wine, and suddenly you've got a perfect dessert or appetizer. You can add variety with different cheeses and various toppings. Our favorite was gouda cheese and dark chocolate topped with slivered almonds and some sea salt. But I'm going to show you a multitude of ways to put your own spin on this recipe.

Ready? Good.


Here's what you need to get started: 1 box of puff pastry, 8 ounces of cheese, 1 bar of dark chocolate (at least 65% cacao), an egg, 1 tablespoon water, slivered almonds, plus some sea salt and raw sugar.

These are the basics. But you have so many options. For example, Becky and I tried 3 types of cheese, including Gouda, Brie, and Camembert. We also tried several types of chocolate, though they were all dark. We varied our toppings as well. Some puffs were topped with almonds, some were not. Some were sprinkled with sea salt, others with sugar. Options, people!

Ingredient choices

Begin with your puff pastry. Allow the box to thaw on your counter for about 30 minutes. You want the pastry to be workable, but not so soft it's falling apart everywhere. While it's thawing, line 2 baking sheets with parchment paper.

Remove both sheets of pastry from the box and unfold gently. The pastry has several fold lines in it, but that's ok, we're going to use them to our advantage.

Puff pastry. Notice the fold lines?

Each sheet of pastry will yield 12 squares. Cut along the fold lines to begin. Then cut each length into 4 even pieces. Do this for both sheets of pastry.

Puff pastry after cutting

The picture above picture is what your pastry should look like after you've cut it. 24 squares will equal 12 total puffs when finished.

Next, enjoy a sip of wine to reward yourself for a job well done.

Now it's time to add the chocolate. When choosing your chocolate, pick a dark, bittersweet bar, at least 65% cacao. You could try milk chocolate as well, but I think this would be too sweet to pair with the cheese. Most chocolate bars are divided into squares. I chose one with at least 12 squares, as this made dividing among my pastry easy.


Lay 12 pieces of the puff pastry onto your cookie sheets. I originally began with one cookie sheet, but realized I needed two once I started sealing the pastry edges. Don't be like me, peeps! Start with two cookie sheets, 6 puffs per sheet.

On top of each square of pastry, place a piece of chocolate, and then a piece of cheese.


A note about your cheese choice: I tested several varieties. All of my choices worked well and tasted great. But the Gouda was, by far, the best. I believe this was related to the texture of Gouda as it melts. The Brie and Camembert liquify more when they melt, and the chocolate slightly overpowered them.

If you're using shredded Gouda like we did, then place the cheese on the bottom of the chocolate. This isn't necessary, it just makes your life a  bit easier, as the chocolate helps anchor the cheese when you seal the pastry.

On top of the chocolate and cheese, place another square of the puff pastry. Line up the edges of the pastry pieces and use a fork to seal, like so:

Sealed puffs

If your edges aren't sealed well, then chocolate and cheese will leak out during baking. Not cool, peeps. If you notice any tears in the pastry, seal it back together before baking. You may need to stretch the top piece of puff pastry a bit, to help it fit over the chocolate and cheese. This is ok! The pastry will be very pliable at this point, so it's not difficult to stretch it to fit.

You're almost done now!

In a small dish, whisk together an egg with one tablespoon of water. This is an egg wash. Brush this over your puffs. Why do we do this, you wonder? Because the egg wash will make the top of your puff pastry golden and delicious during baking. It also helps the toppings stick better.

Trust me here, peeps.

After the egg wash, sprinkle on the toppings. I like using slivered almond pieces, because I think the dish needs a crunch factor. But you can easily leave these off if you don't like nuts. I left them off some of my puffs for Becky.

On top of the almonds, you can also sprinkle either some raw sugar or sea salt. I personally liked both. I think with a saltier cheese, I would choose the sugar. And with a milder cheese, I would choose the sea salt. Up to you! Another option would be to leave out the salt and sugar entirely, then dust the pastries with powdered sugar after they have cooked and cooled.

Puffs sprinkled with almonds, sugar and/or salt
Pop these babies into a preheated 375 degree oven for about 14-20 minutes. Check them often, ok? Ovens vary quite a bit, and you wouldn't want yours to burn. You'll know they are done when the pastry if puffy, golden brown, and delicious looking. Cool slightly before serving, the filling will be hot!

Dark Chocolate and Gouda Puffs with slivered almonds and sea salt

These are perfect for dessert or even as an appetizer. You could make them even smaller by cutting the squares in half again and halving your filling as well. I served mine with a glass of red wine and a side of green grapes. The grapes were the perfect palate cleanser between bites.

Becky and I enjoyed trying the different varieties, and they were all delicious. Here is a list of our combinations:

Brie and dark chocolate with sea salt (both with and without almonds)
Brie and dark chocolate with raw sugar (both with and without almonds)
Gouda and dark chocolate with sea salt (both with and without almonds)
Gouda and dark chocolate with raw sugar (both with and without almonds)
Camembert and dark chocolate with sea salt (both with and without almonds)
Camembert and dark chocolate with raw sugar (both with and without almonds)

As always, I've included the standard recipe below! Experiment and see what combos you like best, and then send me your photos and tips. I'll be back again soon with some new recipes.

Until then, happy cooking, peeps!


Thanks for reading, everyone!
Follow me on Facebook @ OurArmyLifeAccordingToTheWife
or on Pinterest, my newest obsession ArmyLifeFromTheWife


The Standard Form:

Dark Chocolate and Gouda Puffs

Ingredients:
1 box of frozen puff pastry
1 bar of dark chocolate (divided into 12 squares)
8 ounces Gouda cheese, cut into 12 pieces
1 egg
1 tablespoon water
Slivered almonds, for garnish
Sea salt, for garnish
Raw sugar, for garnish

Directions:

Preheat oven to 375 degrees. Line two cookie sheets with parchment paper.

Thaw puff pastry for 30 minutes. Remove from packaging and slice each sheet into 12 even squares (do this by cutting along the 3 fold lines, then cutting each of those strips into 4 even pieces).

Place 6 pieces of pastry on each cookie sheet, a few inches apart. Place 1 piece of cheese onto each piece of pastry. Top with one square of chocolate per pastry piece. Top with another piece of puff pastry, and seal the edges with a fork.

In a small dish, whisk together the egg and one tablespoon of water. Evenly brush this egg wash over the pastry squares (12 total). Sprinkle with almonds, and either sea salt or raw sugar.


Bake in preheated oven for 14 – 20 minutes, until puffy and golden brown. Cool a few minutes before serving.   


February 24, 2014

Catching Up: Natural Bridge & Other Fun Stuff

Before our PCS to Germany, the Hubs and I spent several weeks visiting with family and friends across the country. With this move, we knew the visits home would be few and far between, so we needed to take advantage of the time we had before leaving the States.

That was such a busy time, I'm just now getting around to telling you about it! (Yes, I also know that I haven't finished telling you about Ireland, or that trip to the Caribbean either. I promise I'll get it all done, someday!).

We started this journey in Dallas, where we attended the Giants vs. Cowboys football game! As you know, I'm a huge Giants fan, but this game (heck, this season) didn't go very well for me or my team.

Almost game time! 
I was pretty excited, until…

Well, let's not talk about that. Let's just say the game didn't go as I'd hoped. Despite that, I had a great time. And, football wasn't the only thing Dallas had to offer. We also managed to sneak in a visit to one of my favorite places, C.A.R.E.

A refuge for exotic animals, the staff here is so friendly and informative. The tour really offers you an opportunity to get to know these beautiful animals. You can even "adopt" one of them if you choose!

One of C.A.R.E.'s residents 


After our family visit, we continued the journey across the country to Virginia. Whilst here, I was determined to fulfill a Bucket List item of mine. And I wanted to take my kid sister with me.

Have you ever ridden an elephant? No?? You must do it! Such a cool adventure, and if you try it out at the Natural Bridge Zoo, it's also super inexpensive. Seriously, peeps, it was $5 per person! You can't miss out on a ride.

Elephant ride! 

The zoo also offers you the chance to hold and feed a baby tiger. Naturally, we did this too! I was soaking up the fun with the Fam before we headed out on our European adventure.

Just down the road from the zoo is Natural Bridge itself. The "bridge" is a natural arch, 215 feet high, with George Washington's supposed initials carved into the rock. There is plenty to see and do in the area, so I highly recommend checking it out. If you'd like a cool little lunch spot, diner-style, be sure to check out the Pink Cadillac.

Natural Bridge

From Virginia, Hubs and I took off again, and spent an excellent weekend in one of my favorite places, the Outer Banks. Fresh seafood, fishing off the pier, walking the beach… LOVE IT! Me and my Dad have travelled here so many times together as I was growing up. I'm so glad we could enjoy the tradition one more time before we moved again.

Sunrise in the Outer Banks

Gorgeous, isn't it? If you've never been, you should go. The beautiful stretches of beach offer commercialized areas, as well as more naturally preserved spots. The best of both worlds!

After nearly 4 weeks of travel, the Hubs and I were pretty pooped. One long plane ride (and bus ride!) later, and we found ourselves suddenly living in Germany. The adventure has been great so far, but I'm especially happy we reserved some time with family prior to our departure.

Do you visit with your family in between PCS moves? What were some of your Bucket List items?

Ciao for now, peeps!


Thanks for reading, everyone!
Follow me on Facebook @ OurArmyLifeAccordingToTheWife
or on Pinterest, my newest obsession ArmyLifeFromTheWife


February 23, 2014

Back to the "Broken" Castle

I love Germany!

Let me just say that again… I LOVE Germany!

I love that there are walking paths all around our town. I love that I can walk into town anytime I want, and go grocery shopping or out to dinner or whatever. I love the food. I love the scenery. I love the people. I really love the travel opportunities.

And I absolutely love the fact that we have our very own broken castle. Since today was sunny and warm and absolutely gorgeous, Hubs and I (and my bread baker, Jen!) took a stroll up the paths and enjoyed a picnic at the top.


Beautiful, isn't it?

I thought so too.

This was a perfect way to spend my Sunday afternoon. Now the Hubs is enjoying a nap, and I'm about to start cooking dinner (my creamy onion soup, so delish!). We'll share our meal, some conversation, maybe watch a show or walk the dog…

We are truly blessed.

I hope you're having a fabulous Sunday too! I'm also working on a new recipe post I think you're really going to like… stay tuned, it will be here this week!


Thanks for reading, everyone!
Follow me on Facebook @ OurArmyLifeAccordingToTheWife
or on Pinterest, my newest obsession ArmyLifeFromTheWife

February 22, 2014

Linda Vu: Self Defense Seminar

A few weeks ago, we were lucky to have Linda Vu visit our post and teach a self-defense seminar. She was conducting a series of these classes at military posts all over Europe, and we were her last stop.


I've met an excellent group of ladies here so far, and we decided to attend the class together. Personally, I've never been to a self defense class, but I always thought I should go.

Now, I'm convinced all women should attend whenever they can!

Granted, the class doesn't teach you to be a kung fu fighter in 2 hours. You probably won't be able to go home and kick your husband's butt. However, you DO learn to respond in a frightening situation. You learn to take a breath, think, and react appropriately. You learn several basic moves that might someday save your life and/or your virtue. The class helped me build confidence, so I (hopefully) don't freeze in a precarious situation.

By the end of our time, we were pumped and ready to take on the world!


Have you taken a self defense class before? Keep an eye on your ACS Facebook page, and MWR page… I think you'll be surprised by how many interesting things are offered!


UPDATE: Here's the article from army.mil about our seminar… yours truly was quoted!


Thanks for reading, everyone!
Follow me on Facebook @ OurArmyLifeAccordingToTheWife
or on Pinterest, my newest obsession ArmyLifeFromTheWife


February 21, 2014

Pinterest Tested: Brown Sugar Scrub

I've been curious about making my own bath products for quite a while now, but never seemed to have the time. I mean, first you need to find a recipe, then buy the ingredients, then make it, then test it…

But I found that this process was totally worth it!

After some recent medical issues, I started doing a little research. Your skin absorbs so much of what you put on it everyday - deodorants, lotions, creams, makeup, bath soap, etc. Most of these products contain harmful chemicals, and we don't even realize it! I could give you my long spiel here, about organic foods and natural cleaning products, and a whole host of other things… but I won't.

Just know that chemicals are bad, peeps. By making different choices, one simple choice at a time, we can decrease our exposure to these chemicals and hopefully make the world a better place for future generations. I've started my own journey down this path, picking one item to change at a time.

With that in mind, I was hard at work looking for a homemade bath scrub, minus as many chemicals as possible. And eureka, I finally came up with my perfect combo!

Brown Sugar Scrub


I scoured Pinterest for weeks, tried a few scrubs, but eventually created my own combination. Here are some of the people I took inspiration from:

The Pinterest Project

Simply Southern Mom

Homemade Ginger


To get started, this is what you need:


Brown sugar, white sugar, coconut oil, olive oil, Vitamin E, and vanilla. The basic recipe is quite simple: 2 parts sugar to 1 part oil.

Start by mixing together your oil and sugars. I use ½ cup coconut oil and ½ cup olive oil. The coconut oil is much more solid at room temperature. I like the contrast in consistency, I think it creates a nice scrub texture.


Oils

I use 1 cup EACH of brown sugar and white sugar. You can use all of one type of sugar, but I prefer the combo. You might also try raw sugar, as well. I think this would make the scrub extra exfoliating, and I may test it one of these days (*see my update below! Thanks to Abigail Austin Photography, this combo has now been tested). If you try this yourself, please comment below and let us know how it goes.

Once the sugar and oils are combined, you could definitely stop right there and have a great scrub. However, I also add a teaspoon of vanilla (smells delicious!) and 4 capsules of Vitamin E (just cut the capsule open and squeeze the liquid into your mix). You could also purchase straight Vitamin E oil, which wouldn't require the additional task of opening the capsules.


That's it! The recipe makes about 2 medium-size jars (this greatly depends on the type of jar you are using). I've been using the scrub for a while now, and I LOVE it. Your skin feels so soft after stepping out of the shower. I especially like how well it helps the dry skin on my feet and hands.

I've also added raw honey to the scrub before (about ¼ cup), and this makes a nice addition. Play around with the recipe, and discover what works best for you.


This also makes an excellent gift for birthdays or Christmas, or any occasion. Decorate your jar with ribbon and a label for a polished look. Heck, decorate the bag to match (credit for the decorations here go to my pal, Becky!).

I hope you enjoy the recipe. Please comment below with any tips you may have for fellow readers. I'll be back with more posts soon, my friends! I've included the full recipe below.


UPDATE: A fellow blogger and great friend of mine, Abigail Austin Photography, tried this scrub at home and was nice enough to share her results with us. This is what she had to say:

"I just finished trying your Brown Sugar Scrub, and I loved it! My skin feels soft, and I smell pretty.

I tried the recipe spontaneously without a trip to the grocery store, so I substituted brown sugar with raw sugar. The grains did not absorb the oil, so my texture was different than yours. I added more white sugar and the oils. As a scrub, the larger granules of the raw sugar did well exfoliating, but they were harsh in the ratio I used. A tablespoon of raw sugar would give the extra exfoliation power.

I'm very happy with this recipe, and I can't wait to make it again. A natural, chemical free scrub that leaves skin this moist is a must-have for any beauty queen in the north where heaters zap all the moisture. Thanks for this great recipe, Our Army Life!"


Brown sugar scrub with raw sugar

From Abby's test, I suggest only adding raw sugar for a little exfoliating boost, perhaps a tablespoon. Stick with either brown or white sugar for the main portion of your base. Thanks for the tips, Abby!


Thanks for reading, everyone!
Follow me on Facebook @ OurArmyLifeAccordingToTheWife
or on Pinterest, my newest obsession ArmyLifeFromTheWife


The Standard Form:


Brown Sugar Scrub

1 cup white sugar
1 cup brown sugar
½ cup coconut oil
½ cup olive oil
1 teaspoon pure vanilla extract
4 capsules Vitamin E 

Directions: Combine all ingredients in a bowl (open the vitamin E capsules and squeeze out the oil). Mix well. Store at room temperature. 


February 20, 2014

Pinterest Tested: Dutch Oven Bread

Today, I spent some time with one of my new neighbors (all day actually!), and we tried out several bread recipes. You see, Jen (my neighbor) offered to teach the rest of us plebeians how to make real bread.

Like, from scratch.

Obviously, I couldn't resist!

Especially when I saw how simple some of the recipes can be. We made several loaves of French bread  (from one of Jen's recipe books), and we also made an artisan Dutch oven loaf. You can find the recipe at FrugalLivingNW.

Artisan, dutch oven bread 

This was the easiest bread, ever! Yesterday, Jen mixed the dough and left it to rise for 18 hours. Yes, you read that correctly. 18 hours. I know that sounds like forever, but let's be honest, peeps… it's not like you actually have to do anything to the bread during that 18 hours. You just let it sit and work it's magic.

When I arrived at her place this morning, the bread was already done with the first rise:

Bread after first rise

Jen quickly shaped the dough into a ball (no kneading!), and left it to rise for a few more hours. Then, we simply plopped it into the dutch oven and baked.

Seriously, peeps. That's it.


Viola! Jen shows off our bread baby


So simple, so easy, and soooooo delicious! This loaf was HUGE, even after we split it in half. We snacked on it for a while, dipping it in various oils, slathering it with butter, and using it as a base for bruschetta mix.


The crust is crunchy, but not too thick. The inside is a fabulous texture, both light and moist (we used bread flour instead of all-purpose, so this likely helped). I sliced my half into sandwich bread for the Hubs, and we ate the remainder with our dinner.

If you've always wanted to make bread, but you were afraid to try, then this is the recipe for you. I've already started looking into a Dutch oven for myself, just so I can make this, ha!


Hopefully, I can convince Jen to guest blog some of her other bread recipes for us soon. Until then, happy baking, my friends!


Thanks for reading, everyone!
Follow me on Facebook @ OurArmyLifeAccordingToTheWife
or on Pinterest, my newest obsession ArmyLifeFromTheWife


February 17, 2014

Valentine's Day Debacle

As military spouses, we know we won't always spend the holidays with our loved ones. Last year, the Hubs was deployed, and our sentiments were sent via care package. This year, I thought, would be perfect.

Ha. Hahaha. HAHAHAHAHAHAHAHAHAHA. What's that saying? Oh yes, the best laid plans… 

Valentine's was a disaster. Almost from start to finish.

See, we began ok. Hubs handed me a small gift bag, and I knew he'd taken my rather obvious hints. Normally, we don't exchange gifts for these occasions (instead, we save and travel somewhere together, make a few memories), but this year we decided to be different. Sure enough, the bag contained two of my favorite pieces from FreedomBirdsJewelry. I LOVE HER STUFF! Seriously peeps, if you haven't checked her out, doooooooooooo it…      

This was the also the last thing that was good about Valentine's Day. 

I had a whole meal planned, including appetizer, entree, and dessert. I began with a Roasted Cauliflower and Aged Cheddar dip. It sounded delicious, looked delicious… 

It was not delicious. Also, a total pain in the buttocks to make. 


First, I struggled as I tried to figure out my new food processor. Then, I started the cooking quite a bit late. Then, it tasted… not good. 

AND THEN. Hubs and I had an argument.

It happens.

By the time we resolved the issue (something silly, of course), it was too late to think of cooking the rest of the meal. So, we ate peanut butter and jelly. And argued some more.

BUT! Instead of letting one crappy night ruin our weekend, we slept on it and moved forward. Stuff like this happens to everyone. Plus, Valentine's Day comes with so much pressure to get everything just right. It's silly really. We should be showing our love for each other all the time. 

So, the next morning, we boarded a train to Munich (awesome surprise from the Hubs!), and spent the day wandering with some of our fantastic neighbors. 


We saw the sights, laughed, ate, and drank… no pressure, no schedule. 

It was awesome.

Then on Sunday, we stayed home, slept in, walked our dog, and finally cooked the dessert we should have had on Valentine's. 


These Chocolate Raspberry tarts turned out fantastic! I didn't manage a picture of the final product because we ate them too fast, ha. As soon as I perfect this recipe 100%, you'll be seeing it here, of course. 

Let me end by saying this: Lesson learned. Valentine's shouldn't be about perfection, and getting it all right. Simply, it should be about enjoying time with your loved ones all the time, not just a couple days out of the year. 

Next year, we're going back to our tradition. No required gifts or dinners. No required anything! I plan to show my love for the Hubs any chance I get. 

And I'm happy about it. 

Show your love whenever you can, peeps! You never know when it's your last chance. I'll be back soon, but right now I've got a movie date on the couch with my Hubs. 


Thanks for reading, everyone!
Follow me on Facebook @ OurArmyLifeAccordingToTheWife
or on Pinterest, my newest obsession ArmyLifeFromTheWife


February 13, 2014

The Magic Avocado Sandwich

Magic, I say? Yes, yes I do. This open-faced sandwich qualifies in my book. It's simple, fairly nutritious, quick, and best of all… tasty. It's one of my all time, best ever, favorite things to eat.

Anyone who knows me well, knows I usually have an avocado lying about. I love them! I use them in practically everything, from breakfast to desserts. I even managed to make an Avocado Key Lime Pie (so good, by the way. Try it out!). If you've never given the avocado a chance, I beg you to change your mind…

Avocado, Tomato and White Cheddar Sandwich,
topped with a poached egg

I make this open-faced sandwich at least twice week, on average. Most often as a quick lunch (or breakfast), or an easy dinner when the Hubs is away. This hits the spot any time, I promise. I add variety with different cheeses or breads. Sometimes I add a poached egg. Or a fried egg. It all depend on my mood of the moment. 

To get started, you need: 


An avocado, of course! Also, your bread of choice. This time, I was using a local roll called a semmel, which I picked up at our bakery. You can just as easily use an English muffin, biscuit, wheat bread, anything really. Add a tomato to your pile, along with your favorite mustard (please use Dijon, pretty please?!). Oh, and some mayonnaise if you like. And an egg, though that's totally optional. And cheese! 

    
I vary my cheese choice based on what's in my fridge. This time I chose the white cheddar, but any kind of cheese is fine. 

The process is simple: 


1. Toast your bread

2. Spread bread with mustard / mayonnaise (Confession: I sometimes use both!)

3. Slice your avocado, and place a single layer on the bread 

4. Thinly slice your tomato, and place in a single layer on top of the avocado

5. Salt and pepper your tomato, if desired (trust me, you definitely desire this)

6. Top tomato with slices of your favorite cheese

7. Place the open-faced sandwich underneath your broiler until the cheese is melted

8. Eat! 

9. Thank ArmyLife for introducing the magic avocado sandwich to you

10. Repeat steps 1-9 as often as needed (I find twice a week to be my perfect number!)


Of course, you can also customize this recipe as needed. If I'm having a breakfast sandwich, I add poached egg. Want to know a secret? I sometimes add the egg for lunch and dinner too. It's nom nom, yum yum, goooooooood...

But because poaching an egg is a pain in the you-know-what, I use these simple cups from Amazon:


The egg poaches perfect every time with no muss, no fuss. Of course, you can always do this the old fashioned way as well. I've had varying degrees of success with this method, but I have high hopes that one day I'll get it just right. Or not. Hence the cups.

With the egg, your sandwich should look a bit like this:


So, slice into your awesome, magical avocado sandwich! Once you've eaten it, it's hard to go back to a regular sandwich. I LOVE how simple this is, and how filling. Try it out, people!! Listen to ArmyLife.

Until next time, happy cooking! I'll be back soon with more recipes.


Thanks for reading, everyone!
Follow me on Facebook @ OurArmyLifeAccordingToTheWife
or on Pinterest, my newest obsession ArmyLifeFromTheWife