Showing posts with label Blog It. Show all posts

December 24, 2014

Christmas Traditions: Twas The Night Before Christmas

For as long as I can remember, I've always read The Night Before Christmas on Christmas Eve. Do y'all do that too?

When my sisters were little, we would all snuggle together in bed and read the story. After I moved away, I still made a point of reading it with The Hubs. In fact, one year my family recorded themselves reading the storybook, so now I can listen to it as well!

Record your own storybook

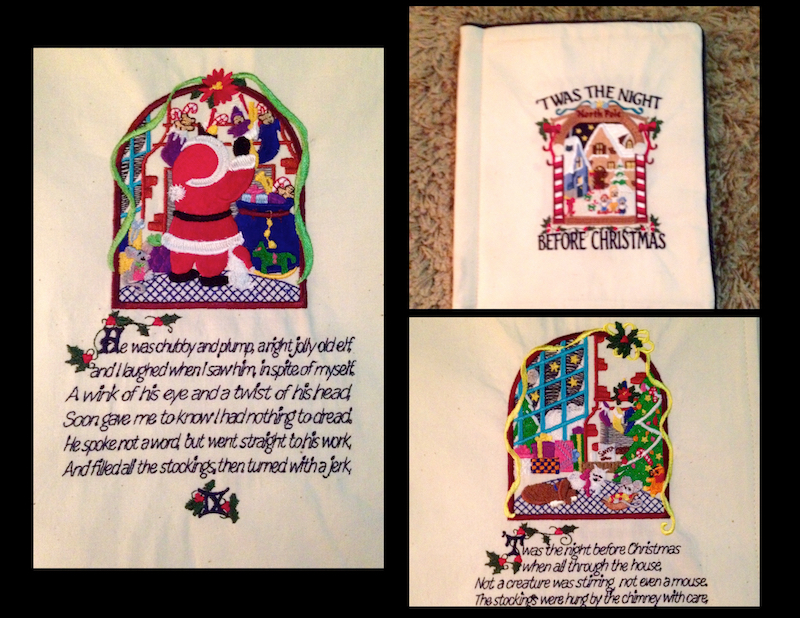
One of our most treasured possessions though, is a gift we received for our very first Christmas together. My sister-in-law is a very talented embroiderer, and she made us this book:


Isn't it beautiful work???

Now, every Christmas, we look though our gorgeous, handmade copy of Twas The Night Before Christmas whilst we listen to my family read the story out loud from the other book.

Do you have any traditions like this? Comment below, peeps!


Thanks for reading, everyone!
Follow me on Facebook @ OurArmyLifeAccordingToTheWife
or on Instagram @ ArmyLifeFromTheWife
or on Pinterest, my newest obsession ArmyLifeFromTheWife

December 23, 2014

Christmas Traditions: Trimming the Tree

When do you decorate your Christmas tree? I know many people like putting theirs up the day after Thanksgiving. The Hubs and I vary from year to year. Circumstances are always different. Heck, last year we didn't even have our house unpacked so there was no tree!

But this year, I am completely caught up in the holiday season. Our tree went up the weekend before Thanksgiving (no judgement, peeps!). There really is no place like Germany when it comes to Christmas. The spirit here has fully infected us, and I love it.


I'm determined to have a completely "German" Christmas tree by the time we move again. Meaning, I want all my ornaments to be purchased and from Germany. The Christmas markets are a perfect place to find my decorations. Here are a few of my favorites from this year:

Lace and ball

Crocheted Santa


From Rothenburg, Germany

I like picking things up wherever I go, and I'm leaning a bit more traditional in my tastes this year. I've also purchased many, many wooden ornaments, I'm obsessed!

I have one other new favorite 'ornament' this year, I wonder if you've seen them before? These cones are designed to hang on your tree, but they can be filled with candy and small gifts. The Hubs has already emptied the treats out of several of these on our tree!


What kind of ornaments do you like on your tree? Homemade, flashy, traditional? Comment below, my friends!


Thanks for reading, everyone!
Follow me on Facebook @ OurArmyLifeAccordingToTheWife
or on Instagram @ ArmyLifeFromTheWife
or on Pinterest, my newest obsession ArmyLifeFromTheWife


December 3, 2014

Christmas Traditions: Stockings

Stockings have always been one of my favorite parts of Christmas! You can ask my mom, I always say Christmas wouldn't be the same without a stocking over the fireplace.

Here in Bavaria, they celebrate Saint Nikolaus Day on December 6th. On December 5th, children place a boot outside their doors and hope they've been good enough to receive gifts and candy from Saint Nikolaus. If they haven't, then a tree root will be placed in their boot instead. If they are particularly naughty, then the children will be punished by Krampus, or carried away in his sack!


Krampus in Neumarkt, Germany

Holy cow, I would be too scared to misbehave if that guy was coming to my door!!

Hubs and I won't be placing boots outside our day, but we'll be observing Saint Nikolaus Day. Since there are no kids in our house, our Lucy dog reaps all the benefits...


Yes, my dog has two stockings. What of it?  I mean, there is Saint Nikolaus Day and Christmas to think about!

Do you celebrate Saint Nikolaus Day or put your stockings out on Christmas Eve? Comment below, peeps. Until next time!


Thanks for reading, everyone!
Follow me on Facebook @ OurArmyLifeAccordingToTheWife
or on Instagram @ ArmyLifeFromTheWife
or on Pinterest, my newest obsession ArmyLifeFromTheWife

November 24, 2014

Homemade Caramel Sauce

I adore caramel! I like it in sauce, as a chewy candy, as a hard candy... you name it, I love it. Of course, many of the commercial products contain all sorts of chemicals and preservatives that I don't particularly want to eat. So I thought, why not make my own?


I knew the basics, like what was in caramel sauce (mostly sugar and cream), and how to cook it (until boiling and a light amber color). This is a quick process. So one lazy day, I figured I'd take 20 minutes and test it out.

I've made this recipe several times now, and I've learned a few things. No worries, I plan to share all those tips with you. And I plan to continue making this, with some new variations (salted caramel, anyone?), and of course I'll share that when the time comes too!

Ready to try for yourself? Here's what you need to get started:


Ignore that lemon! In my first batch, I tried adding a bit of lemon juice to help prevent crystallization, but I decided it wasn't worth the odd flavor it added to the caramel. In addition to the items above, you need a large stainless steel pot. Mine is 5 liters, a good soup pot size. You'll understand why you need such a large pot soon. 

The first rule of this recipe is to have all your ingredients measured and prepped before you begin. This sauce goes fast, so you need to be ready. Gather together:

1 cup of white granulated sugar
¼ cup of water 
1 cup of heavy cream, warmed on the stove over very low heat 
2 tablespoons of salted butter, cut into pieces
A pinch of salt
Optional: ½ teaspoon of vanilla extract

You also need a wooden spoon, your large cooking pot, a pastry brush, and a small ramekin of extra water.

Let's get busy!

Add your sugar and ¼ cup of water to the pot. Turn your heat to medium/medium-high (I leave my stove around 6 out of 10). As the mixture warms, the sugar will first dissolve into the water and then it will begin to boil. DO NO STIR!! Instead, gently swirl the pan occasionally, and then use your pastry brush (and the extra water) to wet down the sides of the pan where any sugar crystals may gather. Boiling sugar is extremely hot so be careful not to get any fingers in there.

Once the sugar is boiling, the color will slowly begin to change and brown. This is the sugar caramelizing. The darker your color, the more caramel-y and bitter the flavor will become. However, sugar also burns quite easily, so don't let it get too dark! A light to medium amber color is best.

Stages of sugar boiling

Again, NO STIRRING! If "hot" spots develop (an area where the sugar is darker than others), then gently swirl your pot to distribute.

When you've reached the desired color, pull your pot off the heat and stir in your cream. The mixture will bubble fairly violently... this is why you need such a large pot for such a small amount of caramel. See:


I know, that's a terrible picture! But you get the idea.

As soon as you add your cream, start stirring immediately with your wooden spoon. Yay, you can stir now!! Also add in the two tablespoons of butter and the salt (and vanilla, if you like). Keep stirring! The mixture will be thin at first, but it thickens as it cools.


And that's it, seriously. Easy, right?? However...

I've learned from some of my mistakes, and I want to share that with you:

1. Knowing when to pull the sugar from the heat is a bit tricky. The first time I cooked too long, and the second time I cooked too little. On my stove, it takes about 6 minutes from the time the sugar begins to boil to when it is the perfect color. But that could be different for you. This is a quick recipe with basic ingredients, so if you mess up the first time just toss it and start again. You'll figure the timing out, no worries.

2. Make sure you use full fat heavy cream, none of this wimpy half-n-half stuff. The less fat, the less rich. Also, your sauce will be thinner.

3. Make sure your vanilla hasn't gone bad, or your caramel will taste like yucky alcohol (yes, this happened to me). I like the caramel both with and without vanilla, so you don't even need to use it. I'm going to test some real vanilla beans soon, and also a sea salt caramel. I'll let you know how it goes!

4. If your sugar seizes up a bit when you add the cream, don't worry! Just place your pot back over medium heat and keep stirring until it all dissolves again. This also works if your caramel is a bit too thin after adding the cream. Warm it up a little more and it will thicken. Don't forget though... this sauce thickens as it cools, so play around with it a bit first. If your sauce is too thick, you can re-warm the mix with some additional cream to thin it out.

5. Always use a wooden spoon or spatula, no plastic or metal for stirring! I do this because the cooking gods of the internet say that I should. And so far it has worked at preventing the crystallization of my sugar.

6. Cool your caramel at room temperature before covering and placing in your fridge. You don't want any condensation in your caramel. The sauce will keep in your fridge for several weeks. 


I know caramel can be a bit intimidating, but try it just once and you'll be hooked by how easy it really is! And I bet you won't be buying anymore of those chemical-laden sauces from the store anymore either. Not when you can make your own in just a few minutes. And have it taste ten times as good! I've already converted one of my friends, now I'm out to convert the world, mwahahaha.

Stay tuned this week for an awesome, quickie "apple pie" recipe that uses this caramel. It's a great recipe for Thanksgiving, especially if you like simple recipes. You're going to love it! Until then, happy cooking!


Thanks for reading, everyone!
Follow me on Facebook @ OurArmyLifeAccordingToTheWife
or on Instagram @ ArmyLifeFromTheWife
or on Pinterest, my newest obsession ArmyLifeFromTheWife

Email me: armylifefromthewife@gmail.com


The Standard Form: 

Homemade Caramel Sauce

Ingredients:

1 cup white, granulated sugar
¼ cup water
1 cup heavy cream
2 tablespoons salted butter, cut into pieces
Pinch salt
Optional: ½ teaspoon vanilla extract

Other equipment: A wooden spoon, a large stainless steel pot (5 liters), a pastry brush, and a small ramekin of water

Directions:

Have all your ingredients ready before beginning the cooking process. This goes quickly, so you need to be ready.

Add the sugar and ¼ cup of water to your pot. Cook over medium to medium-high heat until the sugar begins to boil. DO NOT STIR! Let the sugar boil and change color. Gently swirl your pan to “stir”, occasionally. One the sugar turns a golden amber color, remove from heat.

Immediately stir in your cream with a wooden spoon. The mixture will bubble violently, so be careful! (This is also why we use a large pot). Stir in the butter, salt, and vanilla next.

The caramel will be a little thin, but thickens upon standing. If the sugar seized at all when the cream is added, you can return the pot to medium heat and continue stirring until all the sugar dissolves. Cool the caramel sauce to room temperature, and then refrigerate up to two weeks.

November 20, 2014

Christmas Traditions: Tree Raising

I know I'm early based on conventional traditions, but when have I ever been conventional??? The holiday spirit hit me quick this year, so yesterday I decided to put up my tree.


My neighbor helps with the tree


If you know me at all, then know this... I am not mechanically inclined. Like, at all. So when my tree came up with missing parts, I wasn't well equipped to handle it. That's why I called in reinforcements.

What was the problem, you wonder? Well, I bought my pre-lit tree used this year from someone moving back to the States. The 220V plug is handy to have. But when I opened the box, I realized there were no directions or diagrams or anything.

I can hear you laughing, you know.

With only 4 parts in total, you would think I could do it without directions. I thought I could. Then, I couldn't figure out which piece was the bottom tier. Then I realized the base was obviously missing a few screws. Then I finally figured out the bottom tier, but it immediately fell over due to the lack of parts.

Help!! Lucky me, my neighbor came over to laugh at me.

I mean, she came over to help me. And she did. But we pretty much redneck-ified my tree (this is an official word now).

Tree base, plus zip ties

We searched my tool box for screws that would fit the tree base. No luck. However, I did have quite a few zip ties! These are like duct tape, they fix all sorts of ills. As you can see from the pic above, I zip-tied the first tier of branches to the base.

Problem solved.

All of this took several hours of thought, a few trips back and forth to my basement and the neighbors house, 1 cup of coffee, 2 bags worth of zip ties, and a lot of laughter. But in the end...


Eureka! Let there be light... which is a whole other story and took another 30 minutes of plugging in, unplugging, and rearranging of cables. Not to mention the time it took to move all my living room furniture and find the perfect spot for my zip-tied Christmas tree.

Needless to say, I didn't get around to actually trimming the tree. That comes this weekend! Wish me luck, fingers crossed that my jerry-rigged stand holds, kay? Until next time, my friends...


Thanks for reading, everyone!
Follow me on Facebook @ OurArmyLifeAccordingToTheWife
or on Instagram @ ArmyLifeFromTheWife
or on Pinterest, my newest obsession ArmyLifeFromTheWife

November 16, 2014

Christmas Traditions: Advent Calendars

I'll just put this out there while I can, and get it said... I LOVE CHRISTMAS! I probably inherited this from my mom, who is an absolute Christmas nut. Our home was always decorated to the max. We had several trees (all with different themes), garland everywhere, plus lights, candles, candy dishes, little Christmas villages... and that's just the first floor!

Living in Germany is a Christmas fantasy come true. Not only are the Christmas markets absolutely fantastic, but many of our Christmas traditions originated here. For example, the advent calendar...


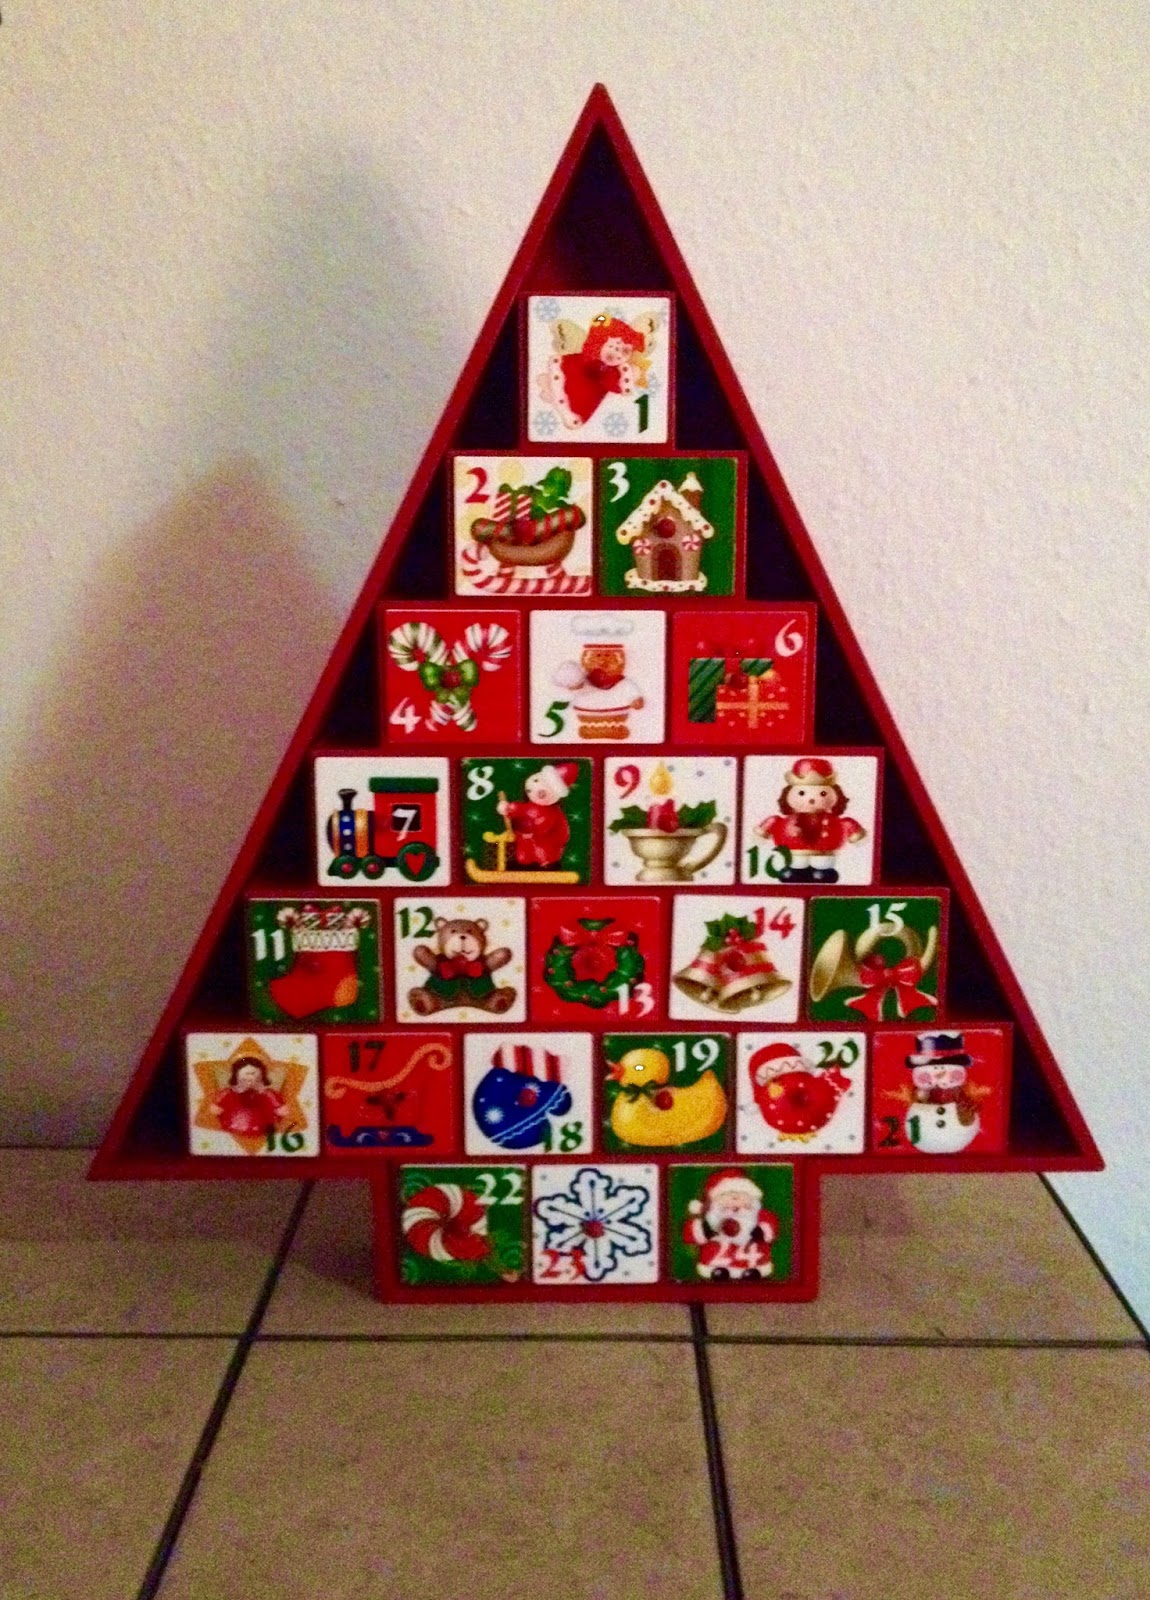
My advent calendar (a gift from grandma)

This is such a fun tradition! I mean, who doesn't like getting a surprise everyday for the 24 days before Christmas??

There are so many styles of these calendars. Some are cardboard and contain chocolates or prizes. Some are paper and each window opens to a bible verse. Some are little bags that can be filled with whatever you want. I've even seen people purchase tiny, wrapped chocolate boxes that hang on the tree. Personally, I've always wanted one of the wooden calendars. And this year I got one!

You see, whilst my grandma was visiting I took her to Rothenburg ob der Tauber (I take everyone here, it's a beautiful German town!). In the town center is one of the world-renowned Käthe Wohlfahrt Christmas shops.

Outside Käthe Wohlfahrt

Inside Käthe Wohlfahrt


During our shopping spree, my Nana managed to buy me the wooden calendar you see above and sneak it home, all without my knowledge. She presented it to me before she left, as a present. Isn't she the sweetest??!! So this year, the Hubs and I are continuing the tradition of Christmas advent calendars in style.

And though I was the one who filled the wooden drawers with sweets, I'm guessing the Hubs will eat most of the prizes... anyone else want to take that bet? I didn't think so. Total sucker bet, ha.

Do you use an advent calendar? What are some of your favorite Christmas traditions? Comment below, peeps! Until next time...


Thanks for reading, everyone!
Follow me on Facebook @ OurArmyLifeAccordingToTheWife
or on Instagram @ ArmyLifeFromTheWife
or on Pinterest, my newest obsession ArmyLifeFromTheWife

November 14, 2014

Pinterest Tested: Bacon Wrapped Tater Tot Bombs

Oh boy, I was so excited to try out this recipe!! The original link had amazing photos, and the recipe looked fairly simple. And the flavor combination was definitely intriguing.

I mean, come on... tater tots topped with cheese then wrapped in brown sugar bacon?? HECK YES!

However (insert sad face here)... I don't think I'll ever be making this particular recipe again. Total Pinterest fail.

Tater tots before going in oven

To start, the tater tots are messy to put together, so be prepared for sticky fingers. The cheese square also tends to pop out from its bacon wrapper. Once the tots are placed on the cookie sheet, they look a bit neater and I had higher hopes that despite the long prep process, this dish would be worth it.

Tater tots after cooking
I was so, so wrong. Totally not worth it.

The cheese melted and oozed out from the bacon wrapper. So not only was there no cheese, but it melted across my pan and burned. The brown sugar combined with the bacon fat created a sticky, caramel-like substance that also melted and oozed across my pan and burned. When attempting to remove the tater tots, most of them crumbled into pieces. Only a few came off the pan looking even remotely like the original picture I saw.

Never, ever again. I actually had to throw my cookie sheet away, it was such a mess. And while I really love the idea of this flavor combination, I think the recipe would be much better served nacho-style. Perhaps cooking the tots, then topping with cheddar cheese, a bit of maple bacon, maybe even a drizzle of bbq sauce.

Hey, maybe I'll try it sometime!

But for now, test this recipe at your own risk. If you do try it yourself, let me know in the comments how it went for you. Until next time, happy cooking!


Thanks for reading, everyone!
Follow me on Facebook @ OurArmyLifeAccordingToTheWife
or on Instagram @ ArmyLifeFromTheWife
or on Pinterest, my newest obsession ArmyLifeFromTheWife


November 5, 2014

10 Stages of Being Sick

Nobody likes to be sick, am I right? But it happens to the best of us. Being sick is a battle. My autoimmune system is already compromised because of MS, and I often take a lot longer than normal to recover from even a basic cold.

It's so dang annoying!!!

I was sick pretty recently, and it totally knocked me for a loop. Hence why there haven't been any new posts from me for a while. Sorry about that, peeps. I have a ton of fun ideas lined up though, so don't despair. While ill I started thinking about all the stages of being sick, and I began to wonder if it's the same for all of us. So this is me!


Stage 1 (Denial) - I'm not sick, I'm not sick, I'm not sick...  the weather is changing, I have allergies, something. But I am not sick.

Meanwhile, my fever spikes, I lose my voice, and my nose might as well be a running faucet. But I'm totally not sick.


Stage 2 (Power Through ) - This stage usually goes a bit like this...

Hubs: "Honey, you should lie down and get some rest"

Me: "Are you mad? I'm fine! I need to cook dinner"

Hubs: "Honey, no one wants to eat anything you're cooking. It could be contaminated"

Me: "I'm not that sick! I have things to do. Go away!"

At this point, the Hubs usually lets me fall on my face from sheer exhaustion because I am completely delirious. Not to mention unreasonable. I can't say I blame him.


Stage 3 (Acceptance) - OH MY GOD, I'M REALLY SICK!


Stage 4 (Panic, with a dose of self pity thrown in) - At this point, hypochondria sets in. I could have typhoid fever! I need juice, I need vitamins, I need to binge watch Dance Moms. Bring me my favorite blanket, I want to cuddle with the dog, do we have Nyquil?

The fun never ends, people. Poor Hubs deserves better.


Stage 5 (Coma of Indifference) - I want to be unconscious, but I'm not. I want to watch random, trashy TV shows... but I can focus on nothing. Rather, I stare at the wall for hours at a time, bundled a foot deep in blankets, and bemoan my existence. More self pity ensues.


Stage 6 (Denial. Again.) - I'm better, I'm better, I'm better!

Or not.

I discover this by attempting to walk downstairs on my own, and then realize I am too weak to walk back up. Cue the whining and sniveling.


Stage 7 (Relapse) - Due to the second bout of denial, repeat stages 3 - 5.


Stage 8 (Shower Time) - I've been wearing the same pajamas for days on end. My hair is a bad imitation of Johnny Depp's in Edward Scissorhands. Professional help may be needed. A shower is all I accomplish at this phase before I fall back into the coma of indifference.


Stage 9 (Finally! Recovery) - Recovery for me doesn't mean I'm ready to dive back into work or anything. It means I can actually dress myself and walk down the stairs. I may be capable of cooking my own breakfast. This lasts for several days while my body finds its rhythm again. I spend most of this phase profusely apologizing to the Hubs for being a general pain in the you-know-what.


Stage 10 (The After Party) - Oh, if only this was an actual party! That would be way better than the grueling reality of Stage 10. Ya see, this phase involves lots and lots of laundry. And grocery shopping. Disinfecting the sick room comes into play.

It's not fun, my friends. Not fun at all. But the end of this stage marks the end of illness. Of course, that's until the Hubs starts sniffling as he's come down with whatever I've just recovered from. Repeat stages 1 - 10, only louder and with more whining involved (if that's even possible).

Sigh.


So, what are your stages of being ill? Do you recover quick, or are you more like me? I'm happy to be back in the saddle again, blogging away and getting back to what qualifies as 'normal' around here. Stay tuned, there are lots of new recipes coming and all sorts of other fun things.

Until next time!


Thanks for reading, everyone!
Follow me on Facebook @ OurArmyLifeAccordingToTheWife
or on Instagram @ ArmyLifeFromTheWife
or on Pinterest, my newest obsession ArmyLifeFromTheWife


October 16, 2014

Recipes on the Brain

As a food blogger and cooking enthusiast, I often get asked how I 'come up with' my recipes. This is sort of like asking a writer where their ideas come from. There is just no good answer.

But an awesome friend of mine (you know who you are!) mentioned that her husband had asked her this same question about me… just how do I come up with these recipes?? So I actually sat down and thought about it. And today you're going to get a peak into my twisted, recipe-creating brain.

Remember, I warned you.


The picture above is what my Kürbiscremesuppe recipe looked like before I blogged it for you. There are even more scribbles on the back of the page, but you get the idea. This is the God's honest truth:

I am a messy recipe creator.

Sometimes I cross out so many items, and add new ones in, that I have to re-write the recipe just to read my own handwriting. I begin by picking out what new taste I really want to try. Sometimes I choose a dish because it's a favorite of the Hubs, like Zuppa Toscana. I'm also into learning how to make things from scratch so I don't need to buy convenience items anymore, like my taco seasoning. Pumpkin cream soup came about because I've eaten it here in Bavaria at so many restaurants, and I totally fell in love with it.

DIY taco seasoning


I understand the basic mechanics of cooking. I've followed enough recipes, and watched enough YouTube. I've even taken a few classes. If there is a technique I don't understand, then I look it up. Makes sense, yes? Google is my friend. So I start by picking out what main ingredients I think should go in the recipe. For pumpkin soup? Um, hello… it's gotta have pumpkin in it. Probably some onion too, maybe some carrot. Definitely need broth of some type to make it soup. Could use water too. Maybe a combination??

What kind of seasonings do I feel like? Do I want to mix the cream in, or whip it and serve on top? I like the melty goodness of the cream on top, and I've seen several restaurants serve it that way as well. Yep, definitely need cream on top. And pumpkin oil. Gotta have the pumpkin oil.

This is seriously the type of stuff that goes through my brain. And I write it all down. The 'recipe' starts out all neat and tidy, a list of basic ingredients and a quick directional guide.

Somehow, from that comes this:


As I start cooking, I'm scratching out amounts. Sometimes I scratch out whole ingredients that I decide not to use. I'm drawing arrows between various steps, re-arranging as I go. I search through my spice cabinet and pull out new things.

I'm a mad scientist. Love it!

By the time it's all said and done, I still don't have a recipe. What I have is a tangled mess of scribbles that I then have to translate into a working recipe. If the flavor is off, even just a little, I start over again. I re-write the 'recipe' so I can actually read it. And then I get to work again making changes, taking out things that didn't work, and adding in things I think will.

I'm really lucky when I get it right the first time. Heck, when I get it right the second time! Sometimes it takes 5 or 6 tries before I'm really happy with the final product. Even with my tried and true recipes I make changes over the years as I learn more. This is an addiction, and a never-ending process.

So.

Did you survive your walk through my recipe-crazed brain?? I hope so! There are several new recipes on the horizon, including one to make your own caramel sauce at home. I've already tested it twice, and I think the third time will be the charm! It makes a great Christmas gift…

Until next time my friends, happy cooking!


Thanks for reading, everyone!
Follow me on Facebook @ OurArmyLifeAccordingToTheWife
or on Instagram @ ArmyLifeFromTheWife
or on Pinterest, my newest obsession ArmyLifeFromTheWife


October 13, 2014

Back in the Saddle (Again)…

HI!!!!

I've really missed you guys! The past few months have been quite stressful around here, with me running here and there and everywhere. Hubs and I had more company than we knew what to do with. We've travelled to so many new places, and seen a lot of things, but I've had no time to tell you about them. 


That makes me super sad, seriously. 

But no worries, I'm back! And I plan to be blogging again regularly. I've learned a lot about having company, and what changes the Hubs and I need to make in our life so we're not consumed with this seemingly constant "vacation". Naturally I'll be making a helpful list for you soon! 

I've also created some new recipes that I can't wait to share with you. And I have several others lined up to test out, yum. Plus DIY Christmas gifts and much, much more! I'm ready to kick off fall and get this holiday season started. How about you, are you ready?? 

Comment below with your favorite fall traditions, peeps! And keep your eyes open this week for my kürbiscremesuppe recipe (a.k.a. pumpkin cream soup). This is one of my favorite new German recipes. It's so delicious, the Hubs ate the whole pot by himself and I was forced to make it again. And again. And I'm making it again this week just so I can freeze some for later. 

Obsession! 

Thanks for reading, everyone!
Follow me on Facebook @ OurArmyLifeAccordingToTheWife
or on Instagram @ ArmyLifeFromTheWife
or on Pinterest, my newest obsession ArmyLifeFromTheWife


September 24, 2014

The Devil's Footprint - Munich, Germany

One place I take all my family and friends when they visit us is Munich. I love the hustle and bustle, I love the history, and I love the free walking tour! I've actually taken this tour three times now.

I know what you're thinking… why would I take the same tour three times???

Well, it's never been the same twice! Some of the stops have repeated, of course. But my guide has always been different, and they each have a unique perspective and various stories. Plus people really like that it's free (you should tip your guide at the end, however).

On this last visit to Munich, our guide took us somewhere I'd never been before, and told the coolest story about a time when Satan visited Munich… and he left behind a footprint!

Devil's footprint!! 
Do you wanna hear the story? If you don't, then stop reading, ha!

So, for those of you still here…

Legend says that when the Frauenkirche was being built (the large church where this footprint is contained), the devil did not want any more churches built in Munich. He went to see this new church, and mistakenly thought there were not any windows inside of it. He found the interior to be so dark and dreary, he thought it would be easy to lure souls away from the church.

Rather than destroy the church (which was his original intention), the devil instead made a deal with the builder. If no more windows were added to the church, he would add speed for the church to be built and not destroy it. Years later, the devil returned to see the completed church….

… Imagine his surprise to find windows along the entire outside of the church!! He called for the builder, and was quite angry with him. He demanded the builder's soul for breaking their deal. BUT, the builder hadn't actually welched on their agreement. You see, the windows had always been there. They were blocked by columns that line the church, so the devil had not seen them from the inside.

The builder told Satan to come look inside, and he would see that the windows were hidden and he had been tricked. Sure enough, the windows were not visible from the inside. The devil was so angry, he stamped his foot into the ground and turned into an angry whirlwind. To this day, the footprint remains and Munich is said to have an evil wind that blows around and causes headaches in the people.

Grandma and Auntie at the Hofbrauhaus

I doubt the availability of beer has anything to do with those headaches, what do you think?? (I better say, so I don't get fussed at, that beer isn't my grandma's… I stuck mine in front of her and told her I wanted a pic! She doesn't really drink).

So, the next time you're in Munich, check out the devil's footprint and perhaps the free walking tour. Our day was loads of fun! I'll be back soon, I only have a week left to visit with my grandma before she returns to the States. Until then, happy travels!


Thanks for reading, everyone!
Follow me on Facebook @ OurArmyLifeAccordingToTheWife
or on Instagram @ ArmyLifeFromTheWife
or on Pinterest, my newest obsession ArmyLifeFromTheWife


September 23, 2014

Not Yo' Mama's Spaghetti Sauce

Ok, so your mom could totally make a spaghetti sauce like this. But mine doesn't, so hence the title! One day I'll post my recipe for a basic tomato sauce (from actual tomatoes), but I know that most of you will find this recipe more in your comfort zone.


Top three reasons why I love this recipe?

1. The Hubs likes lots of meat in his spaghetti sauce.
2. The house smells ah-maze-ing while this is simmering!
3. This sauce freezes easy for later use.

I make this and freeze in advance whenever we have family visiting. This way, I look awesome for making my own spaghetti sauce, but I don't have to waste precious visit time with cooking. Win win!

Freezing the sauce


Here's what you need to get started:


You also need 1 pound each of ground beef and ground, mild Italian sausage (somehow, they didn't make it into the picture).

I'm going to tell you all my secrets for making awesome spaghetti sauce… simmer, simmer, simmer and always allow your sauce to rest overnight before using. Seriously, my friends, trust me! These two things alone can make or break your sauce. Really wonderful sauce allows plenty of time for those delicious flavors to meld.

Let's get busy!

Add your ground beef and sausage to a large pot, along with ½ of a diced onion and 2 cloves of minced garlic. Brown the meat, and then drain the fat from this mix.


Next, we add in all our tomato products - 28 ounces of crushed tomatoes, 16 ounces of tomato sauce, and 12 ounces of tomato paste. Also add in a ½ cup of warm water (this keeps the sauce moist during all the simmering). Combine well with the meat, and let the mixture warm up a bit because we're going to add in all the yummy spices next.

For the seasoning mix, I use: 1 teaspoon of fennel seed, 1 tablespoon of fresh basil (chopped), 2 tablespoons of fresh parsley (chopped), 1 teaspoon of oregano, 1 teaspoon salt, ½ teaspoon fresh ground black pepper, and… 2-3 tablespoons of white sugar.

Yep, you heard me right! SUGAR. This is of major importance, peeps. The sugar helps reduce the sharp acidic flavor of the tomatoes. You can add as much or as little as you like, but taste as you go. The sauce will become sweeter as it simmers, so don't add too much. Then, you just wait for the magic to happen! Let your sauce bubble and blend over low heat for at least 90 minutes. Stir it occasionally. Once in a while, sneak a taste. Relish in the joy that is spaghetti sauce.

At the end of 90 minutes, turn off the burner and allow your sauce to come to room temperature before you refrigerate it. This prevents too much condensation on your finished product. Cover and refrigerate overnight before using.

I particularly like to use this sauce in my lasagna recipe, which will hopefully be coming to the blog soon! But it's just as awesome on plain old spaghetti noodles with some garlic bread on the side.


Nom!

I'll be back soon, my friends. I've missed you during this family visit, and I can't wait to be back to blogging. As always, the standard recipe is below.

Until next time, happy cooking!


Thanks for reading, everyone!
Follow me on Facebook @ OurArmyLifeAccordingToTheWife
or on Instagram @ ArmyLifeFromTheWife
or on Pinterest, my newest obsession ArmyLifeFromTheWife

The Standard Form:

Not Yo’ Mama’s Spaghetti Sauce
Ingredients:

1 lb. Italian sausage
1 lb. ground beef
½ - 1 cup chopped onions
2 cloves garlic, chopped
1 can (28 oz) crushed tomatoes
2 cans (8 oz. each) tomato sauce
2 cans (6 oz. each) tomato paste
½ cup water
2 - 3 tablespoons white granulated sugar
1 teaspoon fennel seed
1 tablespoon fresh basil, chopped
2 tablespoons fresh parsley, chopped
1 teaspoon salt
1 teaspoon oregano
½ teaspoon fresh ground black pepper

Directions:

Begin by browning the sausage, ground beef, onion, and garlic together in a large skillet or pot over medium heat until the meat is no longer pink. Drain the fat.

To the cooked meat, add the crushed tomatoes, tomato sauce, tomato paste, and the water. Stir well to combine. Stir all of the seasonings into the mixture. Simmer at least 90 minutes over low heat.


Remove sauce from heat and cool to room temperature. Cover and refrigerate overnight before using. Perfect for lasagna recipes or a spaghetti dinner.