June 29, 2014

Dachau Concentration Camp

The Fam and I visited Dachau Concentration Camp today. Our original plans were a drive to Karlovy Vary, but the rainy weather changed our minds. I'm so glad it did, because we had quite an experience on our new adventure.

Today we immersed ourselves in history, led by an amazing guide who actually had family that served during WWII. Dachau is well known for being the first concentration camp formed in Germany. It was the basis for all the other camps that spread across Europe during WWII. Ironically, though it was open for 12 years, the camp had one of the best survival rates and was not known as an extermination camp (unlike the infamous Auschwitz in Poland). Still, nearly 42,000 perished here.

The prisoners at Dachau were widely varied and included not just a Jewish population, but also Russians, Italians, German politicians and "traitors", Catholic priests, Jehovah's witnesses, and many, many more.

We were very impressed with our guided tour (at a cost of only 3 euros each), and I highly recommend it if you visit yourself.  An audio guide was also offered, but the human experience couldn't be topped. I liked being able to ask questions and engage in lively discussion.

Here are some of my cell phone images from today. I captured many more with my DSLR, which I plan to sort through soon. Feel free to comment below and share your experience at this memorial, or any of the other camps you may have visited around Europe.


Main gate entrance to the camp
The main yard
Sculpture by Nandor Glid. It symbolizes and
commemorates those prisoners which commmited
suicide by throwing themselves against the electric fence
"Never Again"


Marking system for prisoners. Different groups were
color-coded with different triangles

Ovens in the crematorium
Jewish memorial, "Grave of Thousands Unknown"
"May the example of those who were exterminated here
between 1933-1945 because they resisted Nazism, help to unite
the living for the defense of peace and freedom and respect for their fellow men"

Until next time, my friends.


Thanks for reading, everyone!
Follow me on Facebook @ OurArmyLifeAccordingToTheWife
or on Pinterest, my newest obsession ArmyLifeFromTheWife

June 28, 2014

The Past Few Days…

The past few days have been pretty busy in this ArmyLife household. You see, every summer my mum and my littlest sis come to visit me, wherever I happen to be. They're pretty awesome. This year, of course, they've come to stay with us a while in Germany! They arrived two days ago.


Day 1: Spaghetti Eis

We have many, many, many travel plans whilst they're here. I was very worried I wouldn't be able to blog as much as I usually do. I know, the problems of a blogger…

But I've come up with a solution! When I can, I'll keep posting army life tips, and recipes, and all the good stuff you're used to. And when I'm super busy, I'll simply post some captioned photos that follow our summer traveling adventures.

What do you think?! You like it, right? Ok good. I'm glad we're in agreement.

Here's your first post of summer fun! I hope you're out adventuring as well, and making the most of free time with your families.

DAY 1: Jet Lag


Jet lag… 


The Kid wakes up long enough to help me cook dinner


DAY 2: Jewish Tour of Regensburg

Stolperstein, or "stumbling blocks" commemorate
victims of the holocaust at their place of residence or work 


Document Neupfarrplatz
Regensburg Wirtshaus for lunch

Regensburg Cathedral
Oskar Schindler House

DAY 3: Hike to the "Broken Castle"


I look a little over-excited, ha! 
The broken castle


Butterfly on trail


The view from the top


Proof, we made it up there! 


Tomorrow is another day, and we're off for another adventure, this time to Karlovy Vary! I'll be back soon, my friends (I hope!). Until next time, happy travels!


Thanks for reading, everyone!
Follow me on Facebook @ OurArmyLifeAccordingToTheWife
or on Pinterest, my newest obsession ArmyLifeFromTheWife

June 23, 2014

Fried Egg Pizza

I know what you're thinking… whhhhhaaaaatt? Fried egg on a pizza? Well, you gotta tryst me here, peeps. This is fantastic.


See what I mean? This pizza takes a little extra effort, but it's worth every minute. You could choose any toppings you want, but I really liked this combination as a starting point: Dijon roasted onions, prosciutto, ricotta, and of course the fried egg.

You really want a slice of this right now, I can tell. Let's get started!

Roasted onion marinade
Preheat your oven to 400 degrees, peeps.

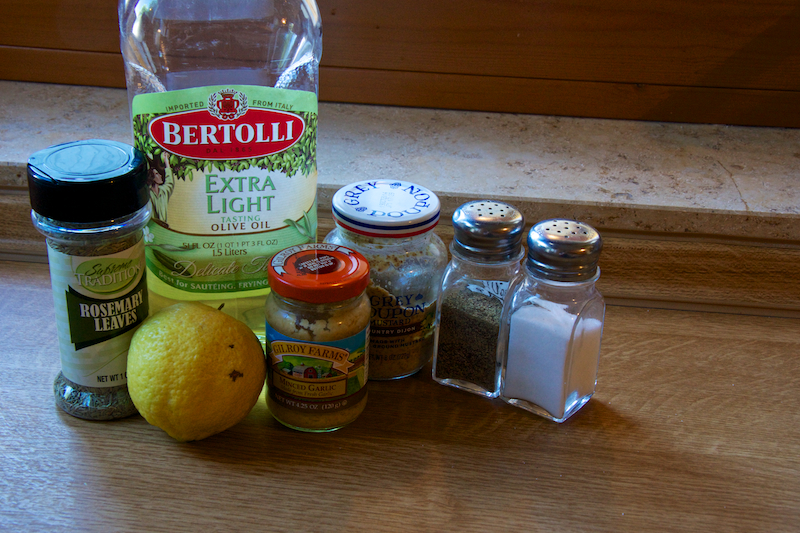
I chose to roast my onions in this yummy dijon marinade. If you're in a rush, you can always skip this step and have sautéed onions (or mushrooms, nom) instead. Begin by slicing a yellow onion into thick wedges. Then in a medium bowl whisk together ½ tablespoon lemon juice, 1 teaspoon dijon mustard (I like country style), 1 clove of minced garlic (I had the stuff in the jar, so used that), a dash of rosemary, 2 tablespoons olive oil, and some salt and pepper to taste.

Once the marinade is well-combined, add your onion wedges to the bowl and toss to coat. Spread onto a cookie sheet and roast in the oven for 30-40 minutes, tossing about halfway through. You want your onions to brown a little, but not too much. Mine were a little over, but they were still delicious.

Roasting the onions

Now for the pizza part! I buy my dough fresh at our local grocer and slice it into personal sized portions. This recipe makes two personal pizzas. If you'd like a whole pizza, you can easily multiply the ingredients.

Ingredients

As per the usual, I forgot an ingredient in the picture, whoops. I added a bit of ricotta cheese to my pizza, but this is totally optional. See, that must be why I didn't include it in the pic! I know... excuses, excuses.

Spray your pizza pan and dust it with a bit of cornmeal. Pre-bake your dough for about 5 minutes if it's quite thick. If you're making a thinner crust you may not need this step. Spread your favorite sauce over the top of the dough. My dough comes with a sauce, so we use that, about 3 ounces total.

Layer your pizza with a few slices of shredded prosciutto, a few teaspoons of ricotta (optional), then some fresh mozzarella (sliced thin), the roasted onions, and a sprinkle of parmesan cheese.


Put the pizza back in the oven for 10-15 minutes, until the crust is golden brown and the cheese is bubbly. While your pizza is baking, fry up two eggs. I crack mine into a shallow ramekin first, but you can crack directly in the pan if you want to.

To fry your egg: Warm a skillet over medium heat. Add 1 tablespoon butter to the pan and swirl to melt. Gently add two eggs to the pan, and then let them alone. Seriously peeps, the best way to make a good sunny-side up egg is to let it be. You can spoon some of the melted butter over the whites only to help them cook. The eggs are done when the whites are cooked, but the yolks are still runny. I fry the egg on one side (sunny-side up), but you can flip yours to fry the other side if you want and let it cook for a minute. The yolk will not be as runny, but it's still good.

Top your cooked pizza with the fried egg. Then eat it, and know you are awesome.


Seriously, peeps… this pizza is da bomb. Try it once, give it a chance. I doubt you'll regret it!

Until next time my friends, happy cooking! As usual, the standard recipe is below.


Thanks for reading, everyone!
Follow me on Facebook @ OurArmyLifeAccordingToTheWife
or on Pinterest, my newest obsession ArmyLifeFromTheWife

Email me: armylifefromthewife@gmail.com


The Standard Form:


Individual Fried Egg Pizza
Ingredients:

2 personal-sized pizza crusts
3 ounces pizza sauce
1 medium yellow onions, cut into wedges
½ tablespoon fresh lemon juice
1 teaspoons Dijon mustard
1 cloves garlic, minced
Dash rosemary
2 tablespoon olive oil
4 slices prosciutto
¼ cup ricotta cheese, optional
8 ounces fresh mozzarella, thinly sliced
¼ cup freshly grated Parmesan
2 eggs
1 tablespoons butter
Salt and pepper, to taste
Cornmeal, for dusting

Directions:

Pre-heat your oven to 400 degrees.

In a medium bowl, mix together the lemon juice, Dijon mustard, minced garlic, rosemary, and olive oil. Season with salt and pepper to taste. Add the onions to the bowl and stir until well coated. Spread the onions in a single layer on a cookie sheet, and roast for 30-40 minutes, just until the edges start to brown. Toss onions halfway through cooking time.

Spray a pizza pan and sprinkle with a bit of cornmeal. Place your pizza crusts on the prepared pan and bake for 5 minutes (this may vary based on the type of crust you use). Remove from oven and divide the sauce between the two pizzas, spreading evenly.

Shred the prosciutto with your hands and divide between the two crusts. If desired, add a few teaspoonfuls of ricotta to each pizza now. Top with the mozzarella, then the roasted onions, and the parmesan cheese. Return pizza to the oven and  bake an additional 10-15 minutes, until crust is golden and cheese is melted and bubbly.

While the pizza is baking, fry your eggs in a skillet on the stovetop.  Crack your eggs into a shallow dish or ramekin. Warm the skillet over medium heat, then add the butter. Swirl to melt the butter, then gently add your eggs to the skillet. Let the eggs sit, don’t move them around too much. Gently spoon some of the butter over the egg white to help it cook. I prefer a sunny-side up egg, which is only fried on one side. Once the whites are cooked, remove them from the pan.

Top each pizza with an egg, and enjoy!

June 22, 2014

Pinterest Tested: Manual Binder

Yep, it's that time again! Time for another Pinterest Tested moment…


This time, I tested out an organizational tip from Desiring Virtue. I've been organizing my office, which is full of papers and binders and all kinds of junk, everywhere. I had stacks of paper manuals that were particularly annoying. You know the ones I'm talking about… the pamphlet that comes with your crockpot, and the how-to manual that came with your printer.

You don't want to throw these items away, because you use them occasionally. But they are also a pain in the butt to store.


Solution! Take an old binder (or buy a new one if you don't have nay), and fill that binder with document protectors. Slide your manuals into the protectors, and viola! Instant organization, I love it.

I even separated mine into categories within the binder. For example, all my manuals for kitchen appliances are together. All my office equipment pamphlets are together. Etc, etc. You get my point, yes?

This pin was a rousing success! The binder of manuals now sits on a bookshelf in my office, easy to access any time I need it. I'm sure I'll be testing out more organizational tips over the next year or so. If you want to try some for yourself before I do it, check out my Pinterest board called Organize My Life. There are lots of ideas there.

Until next time my friends, happy organizing!  


Thanks for reading, everyone!
Follow me on Facebook @ OurArmyLifeAccordingToTheWife
or on Pinterest, my newest obsession ArmyLifeFromTheWife

June 20, 2014

Welcome Basket for Guests

Next week, my mum and littlest sis are visiting me from the States… I AM SO EXCITED!!!!! 

Can you tell?

This is the first time out of the country for both of them. They visit me every summer, and we always find the best stuff to do. We've been parasailing and indoor skydiving. We've walked the Grand Canyon, and played at Legoland. We watch movies, and snuggle, and order take-out, and generally have an awesome time.

And now I get to show them Europe. How cool is that?

We have a long list of destinations this summer, including stops in Germany, Italy, and France. I'll keep you up as best I can while we're traveling, of course. In the meantime, I want to share some idea with you for when you have guests visit at your overseas duty station. I think a welcome basket is such a great idea, and I was determined to make one for my family. But what to include?


Naturally, I asked for your suggestions, added some of my own, and created a handy, dandy list for you. Check it out:

1. Toiletries - Especially for an extended visit, these items take up unnecessary room and add weight in suitcases. Ask your guest what products they use, then provide them on their arrival. Common items are: shampoo, conditioner, deodorant, hairspray and other hair products, hairbrushes, baby powder, sunscreen, toothpaste and toothbrushes, dental floss, razors, face wash, loofahs, lotions, body wash. If you're especially ambitious, you can provide them with their own, handmade Brown Sugar Scrub. I love that stuff!

2. Small Appliances - This sounds weird, but think about it. You are living overseas. The electric is definitely not the same. No adapter in the world is going to help an American blow dryer in a European outlet. Keeping a few of these extra items around for guests is a great idea, don't you think? Have a spare hair dryer, straightener, curling iron, etc.

3. Adapters - while smaller appliances are unable to convert the electricity, some devices can. For example, most smartphones, tablets, and laptops are capable of converting the energy. Keep extra adapter plugs handy in your guest room so they can charge their electronic devices.

4. First Aid and Medication - Hopefully you won't need these things, but stock your guests' bathroom with basic first aid supplies, like bandaids. Also include a small bottle of pain reliever, allergy medication, tissues, etc. It's better to be prepared than searching for these items while you're on vacation.

5.  Bottled Water - I know not everyone likes to buy bottles, but it's very convenient for your guests to have some in their room. I purchased both the flat and the fizzy kind, so my Fam could get a taste of what is commonly served here in Europe before being surprised by it at a meal.

6. Snacks - Some small snacks are a great idea. Jet leg will likely hit your visitors, and they may wake up at 3am a little hungry. With snacks in their basket, they won't need to wander around an unfamiliar house in the middle of the night to search out food.

My complete welcome basket


7. Local candy or treats - Being that we're in Germany, I filled my family's basket with lots of Kinder chocolate! I mean, it is the best. I also included a small bag of wafer cookies and a bag of Haribo gummies (another German specialty).

8. Entertainment - in the age of electronic devices, people seem to have less need of books and magazines. But these are still a great idea to include in the basket. I suggest purchasing some travel magazines, or putting a Rick Steves travel guide in the basket. This is something they likely wouldn't have purchased for themselves, but also something they would love to look at.

9. Comfort Items - There are some items I use at home everyday, but wouldn't pack to take with me on a long trip because of suitcase space. Consider having an extra bathrobe for guests, or house slippers. Fuzzy house socks.  Maybe even an eye mask. These are small comforts that can make a big difference.

10. House Keys - I don't know about the rest of you, but our door automatically locks behind us. If your guests will be traveling alone at any time, or in your home by themselves, I suggest having a spare house key for them. Perhaps put it on a keychain that includes the ever-useful, fake Euro for shopping carts. Like this:


11. Local Information - I included a recycling guide in my basket, along with a local map and a small phrasebook. Add a list with emergency phone numbers (911 is not the same here), your wifi password, and any other pertinent information. We still had our welcome packet from when we arrived, so I added that as well.

12. Gift - a small gift is a nice way to commemorate a trip, and a fun way to say 'welcome'. Think about magnets, Christmas ornaments, or bottles of wine. Be creative!

13. Re-Useable Bag - This are oh so handy to have around! I like to purchase the small bags that fold up right into your purse. These are great for your guests as they purchase souvenirs on their trip. So many places don't offer a bag at all, and others only have them available for purchase. Take the guess work out of it, and let your guests keep one handy! I found some for less than a euro at Ikea, totally perfect.  


So, what would you put in a welcome basket for your guests? Feel free to comment below, and I'll add your ideas to the post. Until next time, my friends!


Thanks for reading, everyone!
Follow me on Facebook @ OurArmyLifeAccordingToTheWife
or on Pinterest, my newest obsession ArmyLifeFromTheWife


June 18, 2014

French Press Iced Coffee

Remember a few months ago, when I was all excited about my new French press? Well… I still totally love it! Of course, now that summer has come to Germany, I'm not much in the mood for hot coffee in the mornings. But I still like that little caffeine hit. Dilemma, dilemma.

I spend a lot of my mornings at our local Java Cafe, hard at work blogging and editing photos. Like many places in Germany, there is no air-conditioning only fans. On a whim, I ordered an iced coffee one morning, and that's when it struck me.

Why couldn't I do this myself at home??

If you know me at all, then you know what happened next.


Iced coffee happened, peeps! But not just any iced coffee. This is a cold-brewed, French press version of iced coffee.

I know, I'm pretty awesome.

This chilly beverage was so yummy, even Lucy was begging for it (I accidentally spilled a little, which she quickly gobbled up).


The only catch to this recipe is the amount of time it takes to cold-brew the coffee. This isn't something you can prepare last minute, unless you keep some of the coffee 'concentrate's your fridge (which I am!). Basically, the coffee needs at east 12 hours to brew, but it's super easy. Here is what you need to get started:


French press and your favorite ground coffee, that's it. I gotta be straight up with you, my friends. Dunkin' Donuts is the best coffee ever. I will assume you agree.

To your French press, add ½ cup ground coffee (I'll pretend you are all using Dunkin') and 3 cups of COLD water. The water must be cold, no hot-brewing for us! While the cold-brew technique takes longer, I find it produces a much smoother coffee base, which I like. Gently stir things around, then replace the lid on your French press. But don't push down the plunger yet!!!!

Just so you understand the importance of this, let me repeat myself. Don't push down the plunger, people, I mean it!  Things should look a little bit like this:


Notice the position of the plunger, ok?

Now, you just walk away. That's right, walk away. For at least twelve hours. I like to mix this at night, then I'm all set for iced coffee in the morning.

Technically, iced coffee would simply be coffee served over ice. You can totally wake up in the morning, press down the plunger, and pour your cold-brewed coffee over ice. OR, you can make this sweeter, flavored version that I think is awesome. Completely up to you.


Here's what you do: Fill 4 glasses to the rim with ice (or one glass, or two. This recipe makes 4 servings, but you can store your extra cold-brewed coffee in the fridge for a week or so). Pour ¼ cup of half-n-half in each glass, and ½ - 1 tablespoon of the flavoring of your choice. I chose vanilla (and used ½ tablespoon), but you could easily use caramel, hazelnut, peppermint… anything really.

Then, top each glass with ¾ cup of the cold-brewed coffee. Stir, and enjoy your awesomeness.


As usual, the standard recipe is below. This is a basic recipe, with lots of options for customizing. Try different coffees, flavored creamers, various syrups or spices. I love the idea of a caramel and sea salt creation! In fact, I think I'll try that next.

Until next time, my friends!


Thanks for reading, everyone!
Follow me on Facebook @ OurArmyLifeAccordingToTheWife
or on Pinterest, my newest obsession ArmyLifeFromTheWife

Email me: armylifefromthewife@gmail.com


Basic Iced Coffee
(Cold-Brewed)

Ingredients:

½ cup ground coffee
3 cups cold water
1 cup half-half
up to 4 tablespoons of vanilla syrup

Directions:

To begin, cold brew your coffee. Add the ground coffee to your French press, then top with the 3 cups of cold water. Gently stir the mixture, then place the lid on your French press but DO NOT press the plunger down. Allow the coffee to sit 12 hours or overnight.

After the coffee has time to brew, press down the plunger on your French press, gently. This will create your coffee “concentrate”, about 3 cups

To make the iced coffee: Fill 4 glass to the rim with ice. (use ice cubes made from coffee if you want to be really creative!). Pour ¼ cup half-n-half in the bottom of each glass, and up to 1 tablespoon of vanilla syrup (or syrup flavor of your choice). Top with ¾ cup coffee. Stir and enjoy!

Other mix-in ideas: flavored syrups (hazelnut, caramel, vanilla, peppermint), chocolate syrup, sugar, sea salt, fudge, and cinnamon  

June 15, 2014

For My Dad…

I gotta say it… I have the best dad in the entire world! I know a lot of people probably think that about their dads, but in my case it's actually true.

Since it's Father's Day, and since my dad is so awesome, I thought I'd list some of the reasons why I think he's the bomb. And wish all the rest of the dads out there a Happy Father's Day too!

My Dad and I at the Charlotte race many moons ago

1. My Dad took me fishing, even when I scared away all the fish by jumping in the water.

2. He tried to teach me to play golf, but I'm really, really terrible.

3. Ha taught me to play poker and how to kick guys' butts in billiards. This is very important, people.

4. He also took me to my first casino, haha.

5. We used to have tanning contests when I was a kid (as in, who had a better tan by the end of the summer). I'm pretty sure I never won.

6. One Christmas, my Dad covered all the walls in our den in wrapping paper.

7. On another Christmas, he built a tree completely out of lights, and the presents went on the inside. So dang cool.

Father daughter dance on my wedding day

8. Though I live in Germany now, my Dad still texts me almost every day to say good morning. He's so dependable, my friends here (who have never met him), know who it is when I get that text around noon.

9. My dad always came up with these crazy learning games… like, if I could guess how much our grocery trip was at the register (including tax), then I could have all the money in his front two pockets. That could have been 50 cents, or 20 bucks. You just never knew!

10. Dad let me drive his pretty, cherry red corvette to prom. Any teenager will understand how awesome that is.

11. When my car broke down, Dad and I fixed it together. This happened a lot more than once.

12. When it was time for college, my dad went to every orientation, bought me some awesome school spirit clothes, and helped pack all my stuff and haul it to my dorm. And he didn't say a word about the fact that I cried the whole way there.

13. My dad is an amazing poet, and he wrote me one all my own. I still keep that poem hanging on the mirror in my bedroom.

14. A couple years ago, I stopped in NY on my way to Ireland. My Dad surprised me by showing up at the airport, even though we could only hang out for a day or two.


Surprise visit from my Dad

15. The first meal I ever cooked was Italian stuffed shells, and it was my Dad who taught me to make it. So you can thank him for all the recipes you get on here!

16. When I was little, there were times my dad had longer hair than me! And he always wanted me to trim it up for him… needless to say, I'm sure there was many a time he walked out of the house with crooked hair.

17. I inherited my love of the Giants from my dad. The first Superbowl I remember them going to, my dad let me play in the football pool. And I won. This solidified my team loyalty forever.

18.  Whenever I visit home (now that I'm older and no longer live there), Dad stocks the fridge with all my favorite stuff, even though he doesn't eat most of it.

19. When I told my dad I was marrying a guy in the military, which would mean moving all over the world for many years to come, he didn't freak out. Instead, he welcomed the Hubs with open arms, took him fishing and hunting, and taught him to play golf. He never made him feel like an outsider.

20. When Hubs was deployed, Dad sent nearly as many care packages as I did... including a set of golf clubs, so the guys had something fun to do if they ever got a break!

Random moment… what the heck am I wearing?! 


Now for the really mushy stuff…

My dad is fun, and playful, and has never let me down. He taught me that no what happens in life, I always have a place to go home to. He's generous and kind. He taught me to treat people with respect even if they don't always deserve it. He leads by example, always. I learned that no matter my struggles or physical limitations, you don't let anything hold you back. You keep pushing and trying, and if you really want something, then you go for it.

More important than anything else, my dad taught me how to love unconditionally, because that's how he loves me. I've never once doubted that love, ever. It's one of the biggest blessings in my life, and I'm so grateful for him.

I love you, Dad! If God had told me I could have anyone as my dad, I would have picked you. I guess that makes me pretty dang lucky.


Thanks for reading, everyone!
Follow me on Facebook @ OurArmyLifeAccordingToTheWife
or on Pinterest, my newest obsession ArmyLifeFromTheWife

Bell Pepper and Potato Frittata

With the summer months heating up, I've become really interested in recipes I can make and then freeze in individual portions. For breakfast, frittatas are a great solution. The combinations are endless, providing plenty of variety. And they warm up easy in the microwave. You might remember I shared my Bacon, Basil, and Feta Frittata recipe a while back, yes? It's so yum.

This is my newest combo. The potato adds some heartiness for those mornings when you just want a little something more.

Bell Pepper and Potato Frittata

Ready to get started, peeps? Ok, here goes:

The ingredients
Preheat your oven to 400 degrees. Then, in a large bowl, whisk together 8 eggs with ½ cup of half-n-half, 1 cup of pepper jack cheese and some salt and pepper (to taste). Set this mixture aside for now and pull out your cast iron skillet (10").

Warm the skillet over medium heat and add 8 slices of chopped bacon, like so:


* Note: I often prepare my filling the evening before, then cook the frittata in my cast iron the next morning. You can do this too if you want to save some time in the morning *

When the bacon is cooked through, remove it from the skillet with a slotted spoon and set aside to drain. To the bacon grease left in the skillet, add 1 diced yellow onion, 1 diced bell pepper (any color or combination of colors), 2 cloves of minced garlic, and 1 grated potato (I used a yellow one, but I think a red potato would be awesome too). Potatoes grate easy using a regular cheese grater.


Cook this over medium heat until the potatoes are tender and browned, about 15 minutes. Then stir in an ⅛ cup of fresh parsley.

Pour your egg mixture over the potato mixture in the skillet.


Cook in the skillet over medium heat, without stirring, for 5 minutes. Sprinkle an extra ½ cup of pepper jack cheese over the top and then transfer your cast iron to the pre-heated oven for another 10 - 15 minutes,  or until the center of the frittata is set. Cool at least 5 minutes before slicing.


As always, the standard recipe is below. Until next time, happy cooking!


Thanks for reading, everyone!
Follow me on Facebook @ OurArmyLifeAccordingToTheWife
or on Pinterest, my newest obsession ArmyLifeFromTheWife

Email me: armylifefromthewife@gmail.com


Bell Pepper and Potato Frittata

Ingredients:
8 eggs
½ cup half-n-half
1 small yellow onion, diced
8 slices bacon, cut into 1” pieces
1 ½ cups pepper Jack cheese, freshly grated
1 bell pepper (any color or combination), diced
2 cloves garlic, minced
1/8 cup chopped parsley
Black pepper and salt, to taste
1 small potato (either red or yellow), grated

Directions:

Preheat oven to 400 degrees.

Whisk together the eggs and the half-n-half in a large bowl. Add salt and pepper to taste, and 1 cup of the pepper Jack cheese. Set aside.

Cook the bacon pieces in a 10” cast iron skillet over medium heat until cooked through. Remove from the skillet with a slotted spoon and set aside to drain. Add the onion, potato, bell pepper, and garlic to the skillet with the bacon grease (if necessary you can add 1 tablespoon of butter to the skillet). Cook over medium heat until the potatoes are tender and browned, about 15 minutes. Stir in the parsley.

Pour the egg mixture into the skillet. Cook over medium heat, without stirring, for 5 minutes.  Sprinkle the remaining  ½ cup of pepper Jack cheese over the top of the egg mixture. Transfer the skillet to the preheated oven.

Cook 10-15 minutes or until the center of the frittata is set. Cool 5 minutes before slicing and serving.