Showing posts with label Cooking for One. Show all posts

November 30, 2014

Onion & Ham Frittata

After Thanksgiving (and Christmas), I always have so many leftovers I don't know what to do with them all! I'm not the only one with that problem either, I bet. We have a tendency to cook excessively during the holidays. No one wants guests going hungry, right? But then the after holiday dilemma begins...

How do I use up all these leftovers in a new and interesting way?

I have a few tricks up my sleeve, and today I want to share one with you. I particularly like using my leftovers to create breakfast.

Onion and ham frittata

One of the easiest breakfasts around is frittata. Not only do I get to use my cast iron skillet, which I adore, but these recipes are quick and satisfying. Perfect for feeding those out of town guests, and using up a bit of your leftovers in an interesting way. Pair this with some potato pancakes (using your leftover mashed potatoes!), and you'll have a hit.

After this Thanksgiving, I used some of my leftover ham to create this Onion and Ham Frittata. Ready to make one yourself? Awesome! You can also use some of your leftover herbs in this, and any odds and ends that didn't get used in your holiday cooking. I had a block of cheese that didn't make it into any recipes, some cream, and an onion as well. Waste not, want not!

Ingredients

To get started, preheat your oven to 400 degrees. In a large bowl whisk together 8 eggs, ½ cup half-n-half, ½ teaspoon salt, and ½ teaspoon pepper. Add in about a tablespoon of any fresh herbs you like, or a teaspoon of dried. I didn't have any fresh herbs left, but I used a bit of this mushroom blend I picked up at Target a while back:


To the egg mixture, stir in 1 cup of white cheddar cheese, or any other cheese of your choice. Always shred cheese fresh, my friends! Those bags of pre-shredded cheese usually contain cornstarch or other additives to prevent the cheese from sticking and to preserve them longer. You'll notice a difference with fresh grated cheese, I promise.

Enough of my soap box. Back to the recipe.

Set aside your egg mixture for now. Warm your 10-inch cast iron skillet over medium heat, and melt 1 tablespoon of butter in the bottom. Add a diced onion to the skillet and cook for 5 minutes, then add 1 ½ cups of leftover ham (diced) and 2 cloves of minced garlic, if you have it on hand. Cook another few minutes, just until the ham is warmed through and the onion begins to brown.

Pour your egg mixture into the skillet, but do not stir. Let this cook over medium heat for 5 minutes, and then put your skillet into the oven for another 10-15 minutes. You want the center of your frittata to just set before removing it. Cool on the counter about 5 minutes before slicing the frittata. Serve with fresh fruit, and perhaps some potato pancakes.


Yum!

Hubs and I love frittata in the morning. You can individually wrap the slices and freeze them as well. To warm them up, cover with a damp paper towel and microwave for a minute or two. Delish!

What do you do with all your holiday leftovers? Comment below, peeps. And until next time, happy cooking!


Thanks for reading, everyone!
Follow me on Facebook @ OurArmyLifeAccordingToTheWife
or on Instagram @ ArmyLifeFromTheWife
or on Pinterest, my newest obsession @ ArmyLifeFromTheWife

Email me: armylifefromthewife@gmail.com


The Standard Form:

Onion and Ham Frittata

Ingredients:

1 ½ cups leftover ham, diced
1 yellow onion, diced
8 large eggs
½ cup half-n-half
½ teaspoon salt
½ teaspoon pepper
2 cloves garlic, minced
1 tablespoon fresh herbs of your choice, or 1 teaspoon dried (suggestions: basil, tarragon, chives, mushroom blend)
1 cup white cheddar cheese, shredded (Or cheese of your choice. Suggestions: pepper jack, Monterey jack, Gouda)
1 tablespoon butter

Directions:

Preheat oven to 400 degrees. Whisk together the eggs, half-n-half, salt, pepper, and herbs of your choice. Stir in the cheese and set mixture aside.

In a 10-inch cast iron skillet over medium heat, melt the butter. Add the onions to the skillet and cook for 5 minutes, then add the ham and minced garlic. Continue cooking until the ham is warmed through and the onions begin to brown. Pour the egg mixture over the top of the onions/ham. DO NOT STIR. Continue cooking over medium heat for 5 minutes.

Place the cast iron skillet in the preheated oven. Cook the frittata for 10-15 minutes, or until the c enter is set. Cool 5 minutes before slicing and serving.


November 25, 2014

Quickie Apple Pie

A friend of mine introduced me to a fun blog (The A to B of Cooking) that had the most awesome looking apple pie on it. The recipe was simple, and easy to adjust to your own tastes. So naturally, I did just that...


Mmmmm..... you want one now, don't you? Confession: So do I!

Why do I call this the Quickie Apple Pie? This cooka in the oven anywhere from 30-40 minutes, so you won't have instant results. But, putting it together is a snap, hence the 'quickie' part of this recipe. I personally love apple pie, but I don't like all the effort I have to put into it. This dish solved that problem for me. Plus, you can make one of these at a time or you can make a dozen. That means I won't make a whole pie and then feel obligated to eat it!

Ready to make your own? I thought so.


Ingredients

Let's start this with the most important ingredient, the apples. Not all apples are good for cooking, so choose well. I prefer the Granny Smith variety. They may be tart when raw, but they cook down to yummy, sweet goodness.

Peel and core your apples (two of them), then slice into thin wedges.


Set the apple wedges aside for now. In a small ramekin, combine 2 tablespoons of white sugar with 2 tablespoons of light brown sugar, a dash of cinnamon, and a dash of nutmeg.


Next, prepare your baking sheet. Line it with parchment paper, because you don't want these babies to stick! No one wants to waste all the apple goodness. Divide a sheet of puff pastry into 6 rectangles and lay them on the parchment-lined baking sheet.

It's pretty easy to evenly cut your puff pastry, because of the way it is folded in the box. See:


Simply unfold your sheet of pastry and cut where the natural lines are, then cut each piece in half. Viola!


Now all you have to do is layer your apple slices down the center of each piece, sprinkle with your sugar mixture, and dot with a bit of butter (4 tablespoons). Like so:


Make sure you leave enough gap around your apples so the puff pastry can rise around them. I needed a bit more room on my edges, so don't be like me!

Pop these into a 350 degree oven for about 30 - 40 minutes. Pull them out when the pastry is puffy and a light, golden brown. Drizzle immediately with a bit of homemade caramel, then top with vanilla ice cream and some whipped cream.

Go ahead... sit back, enjoy, and make those yummy noises. You've earned it!


I especially like these on holidays when it's me and the Hubs on our own. Or, you know, on Wednesdays. That's an apple pie kind of day, right?

As always my friends, the standard recipe is below. Until next time, happy cooking!


Thanks for reading, everyone!
Follow me on Facebook @ OurArmyLifeAccordingToTheWife
or on Instagram @ ArmyLifeFromTheWife
or on Pinterest, my newest obsession @ ArmyLifeFromTheWife

Email me: armylifefromthewife@gmail.com


The Standard Form:

Quickie Apple Pie

Ingredients:

1 sheet of puff pastry, cut into 6 pieces
2 Granny Smith apples, cored, peeled, and sliced into thin wedges
2 tablespoons white sugar
2 tablespoons light brown sugar
Dash cinnamon
Dash nutmeg
4 tablespoons cold butter, cut into chunks
6 tablespoons caramel sauce, more or less to taste
Ice cream, for serving
Whipped cream, for serving

Directions:

Preheat oven to 350 degrees. Line a baking sheet with parchment paper.

Place the pieces of puff pastry on the parchment-lined baking sheet, about an inch apart. Fan the apple slice in the center of the puff pastry, making sure to leave a border around the edges.

Mix together the sugars, cinnamon, and nutmeg. Sprinkle each ‘pie’ with the sugar mix, then dot evenly with the butter.

Bake 30-40 minutes, or until the edges of the pastry are lightly brown and golden. Remove from oven and immediately drizzle the pies with caramel sauce. Top with vanilla ice cream and whipped cream if desired.


June 23, 2014

Fried Egg Pizza

I know what you're thinking… whhhhhaaaaatt? Fried egg on a pizza? Well, you gotta tryst me here, peeps. This is fantastic.


See what I mean? This pizza takes a little extra effort, but it's worth every minute. You could choose any toppings you want, but I really liked this combination as a starting point: Dijon roasted onions, prosciutto, ricotta, and of course the fried egg.

You really want a slice of this right now, I can tell. Let's get started!

Roasted onion marinade
Preheat your oven to 400 degrees, peeps.

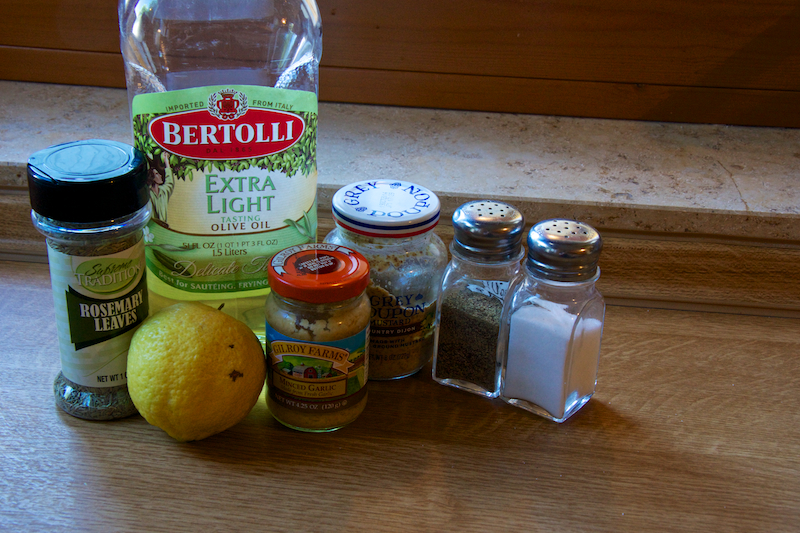
I chose to roast my onions in this yummy dijon marinade. If you're in a rush, you can always skip this step and have sautéed onions (or mushrooms, nom) instead. Begin by slicing a yellow onion into thick wedges. Then in a medium bowl whisk together ½ tablespoon lemon juice, 1 teaspoon dijon mustard (I like country style), 1 clove of minced garlic (I had the stuff in the jar, so used that), a dash of rosemary, 2 tablespoons olive oil, and some salt and pepper to taste.

Once the marinade is well-combined, add your onion wedges to the bowl and toss to coat. Spread onto a cookie sheet and roast in the oven for 30-40 minutes, tossing about halfway through. You want your onions to brown a little, but not too much. Mine were a little over, but they were still delicious.

Roasting the onions

Now for the pizza part! I buy my dough fresh at our local grocer and slice it into personal sized portions. This recipe makes two personal pizzas. If you'd like a whole pizza, you can easily multiply the ingredients.

Ingredients

As per the usual, I forgot an ingredient in the picture, whoops. I added a bit of ricotta cheese to my pizza, but this is totally optional. See, that must be why I didn't include it in the pic! I know... excuses, excuses.

Spray your pizza pan and dust it with a bit of cornmeal. Pre-bake your dough for about 5 minutes if it's quite thick. If you're making a thinner crust you may not need this step. Spread your favorite sauce over the top of the dough. My dough comes with a sauce, so we use that, about 3 ounces total.

Layer your pizza with a few slices of shredded prosciutto, a few teaspoons of ricotta (optional), then some fresh mozzarella (sliced thin), the roasted onions, and a sprinkle of parmesan cheese.


Put the pizza back in the oven for 10-15 minutes, until the crust is golden brown and the cheese is bubbly. While your pizza is baking, fry up two eggs. I crack mine into a shallow ramekin first, but you can crack directly in the pan if you want to.

To fry your egg: Warm a skillet over medium heat. Add 1 tablespoon butter to the pan and swirl to melt. Gently add two eggs to the pan, and then let them alone. Seriously peeps, the best way to make a good sunny-side up egg is to let it be. You can spoon some of the melted butter over the whites only to help them cook. The eggs are done when the whites are cooked, but the yolks are still runny. I fry the egg on one side (sunny-side up), but you can flip yours to fry the other side if you want and let it cook for a minute. The yolk will not be as runny, but it's still good.

Top your cooked pizza with the fried egg. Then eat it, and know you are awesome.


Seriously, peeps… this pizza is da bomb. Try it once, give it a chance. I doubt you'll regret it!

Until next time my friends, happy cooking! As usual, the standard recipe is below.


Thanks for reading, everyone!
Follow me on Facebook @ OurArmyLifeAccordingToTheWife
or on Pinterest, my newest obsession @ ArmyLifeFromTheWife

Email me: armylifefromthewife@gmail.com


The Standard Form:


Individual Fried Egg Pizza
Ingredients:

2 personal-sized pizza crusts
3 ounces pizza sauce
1 medium yellow onions, cut into wedges
½ tablespoon fresh lemon juice
1 teaspoons Dijon mustard
1 cloves garlic, minced
Dash rosemary
2 tablespoon olive oil
4 slices prosciutto
¼ cup ricotta cheese, optional
8 ounces fresh mozzarella, thinly sliced
¼ cup freshly grated Parmesan
2 eggs
1 tablespoons butter
Salt and pepper, to taste
Cornmeal, for dusting

Directions:

Pre-heat your oven to 400 degrees.

In a medium bowl, mix together the lemon juice, Dijon mustard, minced garlic, rosemary, and olive oil. Season with salt and pepper to taste. Add the onions to the bowl and stir until well coated. Spread the onions in a single layer on a cookie sheet, and roast for 30-40 minutes, just until the edges start to brown. Toss onions halfway through cooking time.

Spray a pizza pan and sprinkle with a bit of cornmeal. Place your pizza crusts on the prepared pan and bake for 5 minutes (this may vary based on the type of crust you use). Remove from oven and divide the sauce between the two pizzas, spreading evenly.

Shred the prosciutto with your hands and divide between the two crusts. If desired, add a few teaspoonfuls of ricotta to each pizza now. Top with the mozzarella, then the roasted onions, and the parmesan cheese. Return pizza to the oven and  bake an additional 10-15 minutes, until crust is golden and cheese is melted and bubbly.

While the pizza is baking, fry your eggs in a skillet on the stovetop.  Crack your eggs into a shallow dish or ramekin. Warm the skillet over medium heat, then add the butter. Swirl to melt the butter, then gently add your eggs to the skillet. Let the eggs sit, don’t move them around too much. Gently spoon some of the butter over the egg white to help it cook. I prefer a sunny-side up egg, which is only fried on one side. Once the whites are cooked, remove them from the pan.

Top each pizza with an egg, and enjoy!

June 15, 2014

Bell Pepper and Potato Frittata

With the summer months heating up, I've become really interested in recipes I can make and then freeze in individual portions. For breakfast, frittatas are a great solution. The combinations are endless, providing plenty of variety. And they warm up easy in the microwave. You might remember I shared my Bacon, Basil, and Feta Frittata recipe a while back, yes? It's so yum.

This is my newest combo. The potato adds some heartiness for those mornings when you just want a little something more.

Bell Pepper and Potato Frittata

Ready to get started, peeps? Ok, here goes:

The ingredients
Preheat your oven to 400 degrees. Then, in a large bowl, whisk together 8 eggs with ½ cup of half-n-half, 1 cup of pepper jack cheese and some salt and pepper (to taste). Set this mixture aside for now and pull out your cast iron skillet (10").

Warm the skillet over medium heat and add 8 slices of chopped bacon, like so:


* Note: I often prepare my filling the evening before, then cook the frittata in my cast iron the next morning. You can do this too if you want to save some time in the morning *

When the bacon is cooked through, remove it from the skillet with a slotted spoon and set aside to drain. To the bacon grease left in the skillet, add 1 diced yellow onion, 1 diced bell pepper (any color or combination of colors), 2 cloves of minced garlic, and 1 grated potato (I used a yellow one, but I think a red potato would be awesome too). Potatoes grate easy using a regular cheese grater.


Cook this over medium heat until the potatoes are tender and browned, about 15 minutes. Then stir in an ⅛ cup of fresh parsley.

Pour your egg mixture over the potato mixture in the skillet.


Cook in the skillet over medium heat, without stirring, for 5 minutes. Sprinkle an extra ½ cup of pepper jack cheese over the top and then transfer your cast iron to the pre-heated oven for another 10 - 15 minutes,  or until the center of the frittata is set. Cool at least 5 minutes before slicing.


As always, the standard recipe is below. Until next time, happy cooking!


Thanks for reading, everyone!
Follow me on Facebook @ OurArmyLifeAccordingToTheWife
or on Pinterest, my newest obsession @ ArmyLifeFromTheWife

Email me: armylifefromthewife@gmail.com


Bell Pepper and Potato Frittata

Ingredients:
8 eggs
½ cup half-n-half
1 small yellow onion, diced
8 slices bacon, cut into 1” pieces
1 ½ cups pepper Jack cheese, freshly grated
1 bell pepper (any color or combination), diced
2 cloves garlic, minced
1/8 cup chopped parsley
Black pepper and salt, to taste
1 small potato (either red or yellow), grated

Directions:

Preheat oven to 400 degrees.

Whisk together the eggs and the half-n-half in a large bowl. Add salt and pepper to taste, and 1 cup of the pepper Jack cheese. Set aside.

Cook the bacon pieces in a 10” cast iron skillet over medium heat until cooked through. Remove from the skillet with a slotted spoon and set aside to drain. Add the onion, potato, bell pepper, and garlic to the skillet with the bacon grease (if necessary you can add 1 tablespoon of butter to the skillet). Cook over medium heat until the potatoes are tender and browned, about 15 minutes. Stir in the parsley.

Pour the egg mixture into the skillet. Cook over medium heat, without stirring, for 5 minutes.  Sprinkle the remaining  ½ cup of pepper Jack cheese over the top of the egg mixture. Transfer the skillet to the preheated oven.

Cook 10-15 minutes or until the center of the frittata is set. Cool 5 minutes before slicing and serving.

June 5, 2014

Insalata Caprese

Whenever the Hubs is away, I revert back to simple comfort recipes like Welsh Rarebit or my Magic Avocado Sandwich. This Insalata Caprese is another of my quick, go-to dishes.


With the ingredients on hand, I can be eating in just a few minutes, that's how easy this is! This is what you need to get started: 


A couple Roma tomatoes, fresh basil, balsamic glaze (or reduction), olive oil, salt and pepper, and most importantly… you need fresh mozzarella. Please, please, please don't buy that vacuum sealed stuff. Fresh mozzarella is stored in water, and it is oh so delicious. 

You gotta trust me here, peeps. Without the fresh mozzarella there is no point in making this dish. It wouldn't even be close to the same. 

So, now that I've given you my standard mozzarella lecture, let's get to it! 

This dish is all about layers. Start with a layer of sliced Roma tomatoes, then top each tomato slice with a layer of basil leaves. On top of that, place a slice of fresh mozzarella (see how I sneak that in again?). Sprinkle the fresh mozzarella with some salt and pepper. Then sprtiz with a little extra virgin olive oil (I use my handy Misto for this). Drizzle it all with some balsamic glaze, and then you're ready to eat… 


How easy is that?! 

While I often have this as my lunch, this is also a great appetizer. I always whip up a batch for girls' night or when I have family visiting. No muss, no fuss. And the flavors are fantastic! 


As always, the standard recipe is below. Until next time, happy cooking!


Thanks for reading, everyone!
Follow me on Facebook @ OurArmyLifeAccordingToTheWife
or on Pinterest, my newest obsession @ ArmyLifeFromTheWife

Email me: armylifefromthewife@gmail.com


The Standard Form: 

Insalata Caprese

Ingredients:

2 Roma tomatoes, evenly sliced into 8 pieces
8 fresh mozzarella medallions or slices (1, 8 ounce fresh ball, sliced)
Fresh basil leaves
Olive oil
Balsamic glaze
Fresh ground black pepper
Salt

Directions:
  
Place the tomato slices on the plate, arranged in whatever pattern you prefer. Place one or two basil leaves over each tomato slice. Top each piece with a slice of fresh mozzarella. Sprinkle with salt and pepper, then spritz with a bit of olive oil. Drizzle with balsamic glaze.

Serve and enjoy

April 1, 2014

Bacon, Feta, & Basil Frittata

I love breakfast food. I mean, like I could eat it for every meal and be totally happy. The Hubs on the other hand, he thinks breakfast is a turkey sandwich.

I've been trying to break him of this habit, but it's no easy task. You see, the Hubs grew up with what I like to call "food prejudice". Certain foods are simply not eaten, and others are disregarded even if they've never been tasted. He also has an annoying habit of claiming he doesn't like something, when in reality, he has no reason for this assumption. Or he doesn't like a particular item because once, many moons ago, someone (not me) made said item for him and did a bad job. 

Sometimes I think I live with a 10 year old. I love him like mad, though, I really do. 

Anyway, the Hubs is prejudiced against breakfast food for the variety of reasons named above. My mission for several years has been to prove him wrong. Slowly but surely, I've been changing his mind. We have breakfast on weekends, and he actually eats it. And enjoys it! We sometimes even have breakfast for dinner. 

My latest attempt to convert him resulted in this wickedly good fritatta, inspired by my pal Jen the Baker. 

Bacon, Basil, and Feta Frittata 

If you're wondering, the Hubs is a fan! I froze a few slices, but he ate the whole fritatta in a couple days. Since he's been telling me for years that he doesn't like eggs (?!?!?!?), this is a minor miracle. 

I love frittata because it's fancier than scrambled eggs, but really doesn't take any time at all to whip up. Plus, this can be made in advance and then frozen. The wedges thaw and heat quickly in the microwave (about 2 minutes), so this is great when guests are visiting too, or for a grab and go breakfast. 

Ready to make your own? Let's do this! 

The ingredients,
but ignore the Parmesan! 

Sorry about the Parmesan in the picture above. I thought I might use some in the dish, but it turns out the frittata didn't need it. You could always add a little if you want, but I didn't. 

To get started, slice 8 pieces of bacon into 1" pieces. Cook in a skillet until done (you can make this entire recipe in your cast iron skillet and have only one pan to cleanup!). I prefer my bacon to be less chewy and more crispy. Remove the cooked bacon from the pan with a slotted spoon and set aside to drain. Discard all but 1 tablespoon of the grease. Why? Because everything is better with bacon and/or bacon grease.

Add a diced yellow onion to the skillet with that last tablespoon of bacon grease. Trust me peeps, this makes the onion delicious. Sauté over medium heat until the onions are tender and begin to caramelize, about 10-12 minutes. 

At this point, preheat your oven to 400 degrees. In a medium mixing bowl, whisk together 8 eggs, ½ cup half-n-half, ½ teaspoon salt, and ½ teaspoon pepper. Once combined, stir in the bacon and onion, along with 10-12 large basil leaves cut in chiffonade style. Also add about 3 ounces of crumbled feta cheese. 

Now, if you weren't already using it, pull out your cast iron skillet (10 inch) and warm up a tablespoon of olive oil in the bottom. 


Swirl the oil around so it coats the bottom of the pan. Then, simply pour the egg mixture in.

This is very important… do NOT stir. Leave your skillet over medium-low heat for 5 or 6 minutes without stirring. This gives the bottom of your frittata time to set before we move it into the oven.  


Transfer the skillet to your preheated oven, and let cook an additional 10-12 minutes. If your skillet is smaller or larger, adjust your cook time to reflect that difference. Smaller skillets will require more time, larger skillets less. 

The frittata is done when the center is set and no longer jiggles. Remove from oven and let rest 5 minutes before slicing into wedges. 


If you'd like to freeze the wedges, the process is simple. Wrap each piece in plastic wrap, then freeze in the container of your choice. To thaw and warm up, remove from the plastic wrap and cover with a damp paper towel. Heat in microwave 2-4 minutes, until hot. 

Easy peasy, right? 

The Hubs liked this frittata so much, we have plans to make it again this weekend. I'm so excited we can finally share breakfast together.

That's all for now, but I'll be back again soon. As always, the standard recipe is below. Until next time, happy cooking! 


Thanks for reading, everyone!
Follow me on Facebook @ OurArmyLifeAccordingToTheWife
or on Pinterest, my newest obsession @ ArmyLifeFromTheWife


The Standard Form:


Bacon, Basil, & Feta Frittata

Ingredients:
8 slices bacon, sliced into 1” pieces
1 small yellow onion, diced
10-12 large basil leaves, cut chiffonade
8 eggs
½ cup half-n-half
½ teaspoon salt
½ teaspoon pepper
3 ounces crumbled feta cheese
1 tablespoon olive oil

Directions:

Cook the bacon in a skillet until done. Remove from pan with a slotted spoon and set aside to drain. Remove all but 1 tablespoon of grease from the skillet. Add the diced onion to the reserved bacon fat in the skillet. Sauté over medium heat until the onions are tender and begin to caramelize, about 10-12 minutes.

Preheat oven to 400 degrees. In a medium mixing bowl whisk together the eggs, half-n-half, salt, and pepper. To this, add the cooked bacon, basil, onions, and the feta cheese.

Warm the olive oil in a 10” cast iron skillet over medium–low heat. Pour the egg mixture into the skillet and let cook, without stirring, for 5 minutes, to set the bottom of the frittata. Transfer the skillet to the pre-heated oven, and cook an additional 10-12 minutes, or until the center is set. Remove from oven and let rest for 5 minutes before slicing in wedges.

Note: This recipe freezes quite well. Wrap each individual wedge with plastic wrap, then freeze in the container of your choice. To warm, remove plastic wrap and cover with a damp paper towel. Heat in microwave 2-4 minutes, until hot.


February 13, 2014

The Magic Avocado Sandwich

Magic, I say? Yes, yes I do. This open-faced sandwich qualifies in my book. It's simple, fairly nutritious, quick, and best of all… tasty. It's one of my all time, best ever, favorite things to eat.

Anyone who knows me well, knows I usually have an avocado lying about. I love them! I use them in practically everything, from breakfast to desserts. I even managed to make an Avocado Key Lime Pie (so good, by the way. Try it out!). If you've never given the avocado a chance, I beg you to change your mind…

Avocado, Tomato and White Cheddar Sandwich,
topped with a poached egg

I make this open-faced sandwich at least twice week, on average. Most often as a quick lunch (or breakfast), or an easy dinner when the Hubs is away. This hits the spot any time, I promise. I add variety with different cheeses or breads. Sometimes I add a poached egg. Or a fried egg. It all depend on my mood of the moment. 

To get started, you need: 


An avocado, of course! Also, your bread of choice. This time, I was using a local roll called a semmel, which I picked up at our bakery. You can just as easily use an English muffin, biscuit, wheat bread, anything really. Add a tomato to your pile, along with your favorite mustard (please use Dijon, pretty please?!). Oh, and some mayonnaise if you like. And an egg, though that's totally optional. And cheese! 

    
I vary my cheese choice based on what's in my fridge. This time I chose the white cheddar, but any kind of cheese is fine. 

The process is simple: 


1. Toast your bread

2. Spread bread with mustard / mayonnaise (Confession: I sometimes use both!)

3. Slice your avocado, and place a single layer on the bread 

4. Thinly slice your tomato, and place in a single layer on top of the avocado

5. Salt and pepper your tomato, if desired (trust me, you definitely desire this)

6. Top tomato with slices of your favorite cheese

7. Place the open-faced sandwich underneath your broiler until the cheese is melted

8. Eat! 

9. Thank ArmyLife for introducing the magic avocado sandwich to you

10. Repeat steps 1-9 as often as needed (I find twice a week to be my perfect number!)


Of course, you can also customize this recipe as needed. If I'm having a breakfast sandwich, I add poached egg. Want to know a secret? I sometimes add the egg for lunch and dinner too. It's nom nom, yum yum, goooooooood...

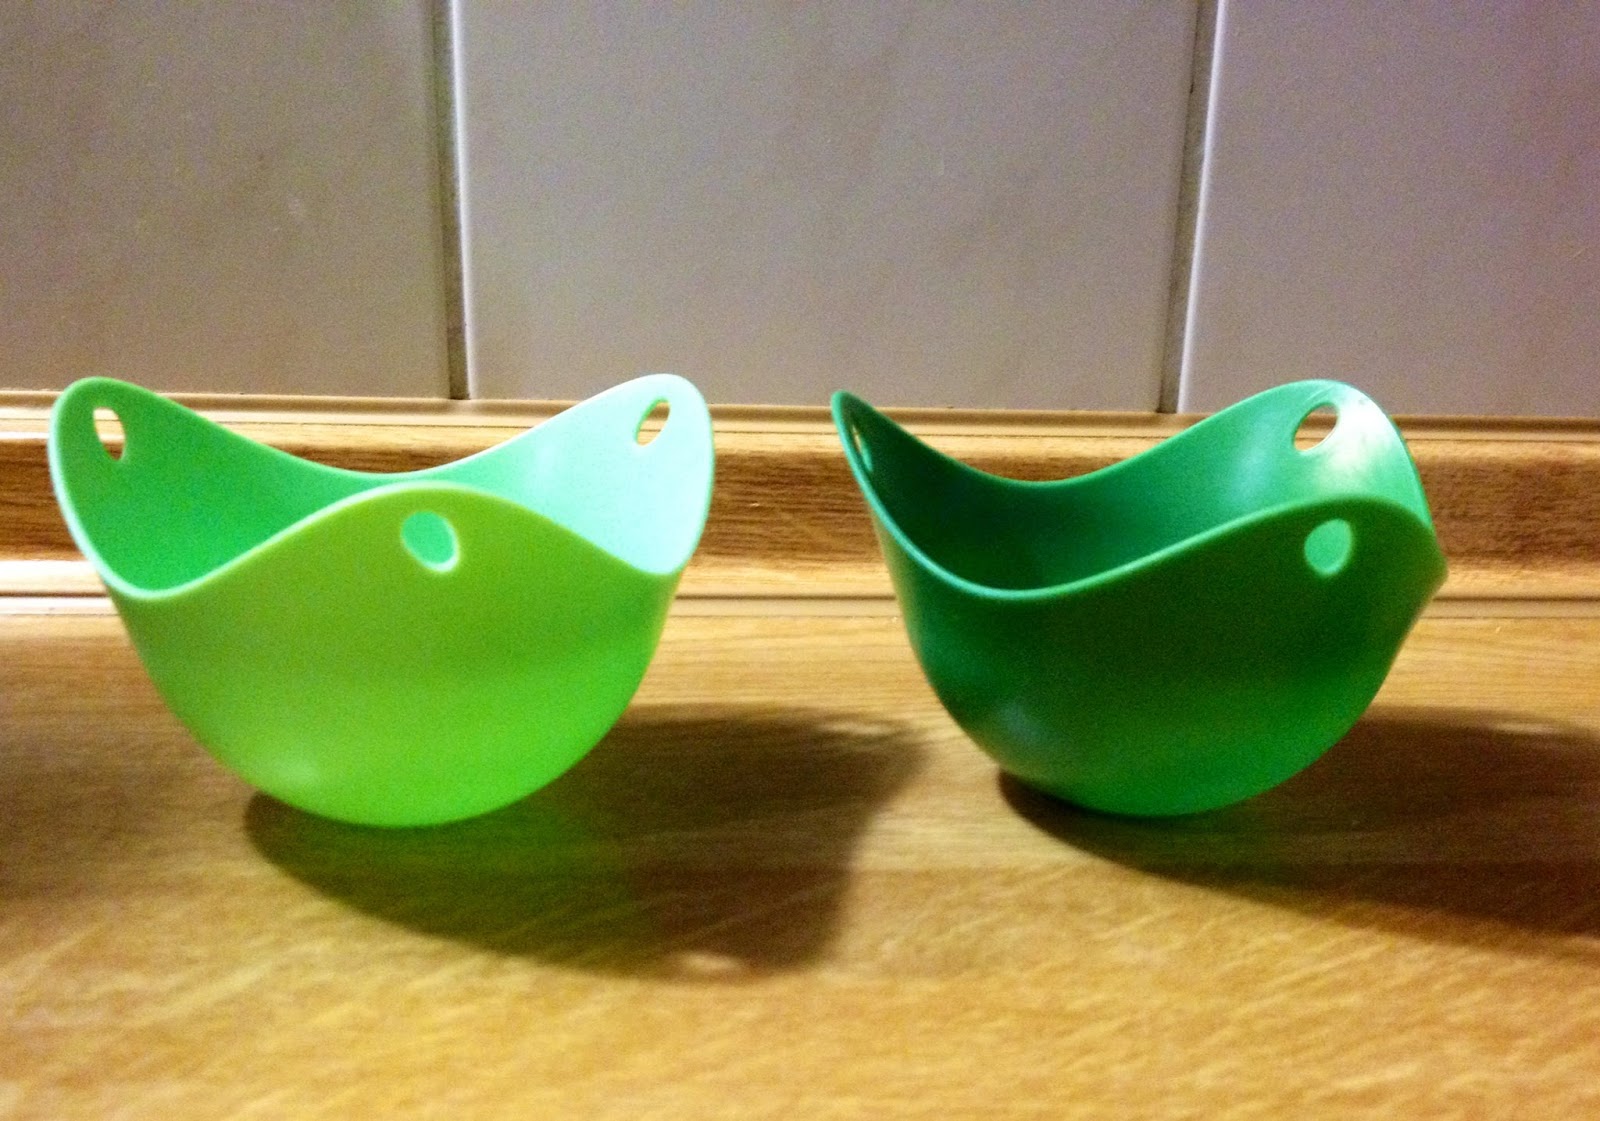
But because poaching an egg is a pain in the you-know-what, I use these simple cups from Amazon:


The egg poaches perfect every time with no muss, no fuss. Of course, you can always do this the old fashioned way as well. I've had varying degrees of success with this method, but I have high hopes that one day I'll get it just right. Or not. Hence the cups.

With the egg, your sandwich should look a bit like this:


So, slice into your awesome, magical avocado sandwich! Once you've eaten it, it's hard to go back to a regular sandwich. I LOVE how simple this is, and how filling. Try it out, people!! Listen to ArmyLife.

Until next time, happy cooking! I'll be back soon with more recipes.


Thanks for reading, everyone!
Follow me on Facebook @ OurArmyLifeAccordingToTheWife
or on Pinterest, my newest obsession @ ArmyLifeFromTheWife