Showing posts with label Pizza. Show all posts

July 1, 2014

Cooking with The Kid

I love having someone to share the kitchen with when The Kid visits. She's a total natural… though she does complain about touching raw chicken. Apparently, this is icky.

The Kid in my chef hat
We're traveling a lot whilst she's visiting, but there is downtime in between. We fill that time with food and games, and other fun stuff. So far, The Kid has learned to make an amazing grilled cheese (ham and gouda on brioche bread), how to fry an egg, and last night we tackled my BBQ Chicken Pizza recipe

Raw chicken is icky

We even made a family breakfast one morning (with some help from the Hubs), that included a blueberry compote for our pancakes! The Kid kicks some serious butt in the kitchen. 


I know this might seem like a weird kind of happy to some, especially for those who hate cooking. But for me, the kitchen is the heart of the home. I always helped my dad in the kitchen, and it was so much fun. Meals (and the time it took to prepare them) were family time. Food brought everyone together at the same time and the same place, for at least an hour. We talked, we laughed…. we were involved in each other's lives. The rest of the day we might be working or running errands or whatever. But at dinner, we were together. 

I love carrying on this tradition with The Kid. She picks the music, I pick the food. We joke. We laugh. We occasionally throw food. It's fantastic.

We also take bizarre kitchen selfies as a form of entertainment.

The Kid

Me and The Fam are leaving for Rome in a few days, so keep up with our adventures on the Army Life Facebook page! I'll keep posting here as well, when I can. In the meantime, enjoy your own summer holiday, and maybe cook a meal together….

Until next time my friends, happy cooking!  


Thanks for reading, everyone!
Follow me on Facebook @ OurArmyLifeAccordingToTheWife
or on Pinterest, my newest obsession ArmyLifeFromTheWife

June 23, 2014

Fried Egg Pizza

I know what you're thinking… whhhhhaaaaatt? Fried egg on a pizza? Well, you gotta tryst me here, peeps. This is fantastic.


See what I mean? This pizza takes a little extra effort, but it's worth every minute. You could choose any toppings you want, but I really liked this combination as a starting point: Dijon roasted onions, prosciutto, ricotta, and of course the fried egg.

You really want a slice of this right now, I can tell. Let's get started!

Roasted onion marinade
Preheat your oven to 400 degrees, peeps.

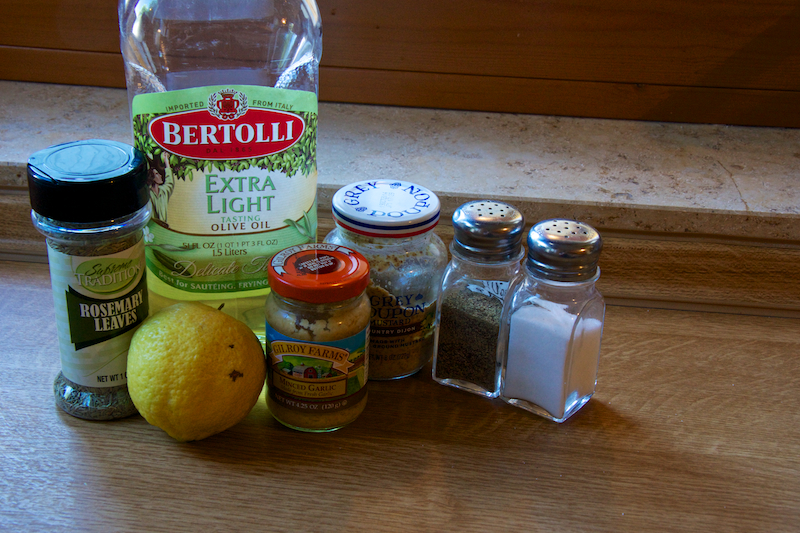
I chose to roast my onions in this yummy dijon marinade. If you're in a rush, you can always skip this step and have sautéed onions (or mushrooms, nom) instead. Begin by slicing a yellow onion into thick wedges. Then in a medium bowl whisk together ½ tablespoon lemon juice, 1 teaspoon dijon mustard (I like country style), 1 clove of minced garlic (I had the stuff in the jar, so used that), a dash of rosemary, 2 tablespoons olive oil, and some salt and pepper to taste.

Once the marinade is well-combined, add your onion wedges to the bowl and toss to coat. Spread onto a cookie sheet and roast in the oven for 30-40 minutes, tossing about halfway through. You want your onions to brown a little, but not too much. Mine were a little over, but they were still delicious.

Roasting the onions

Now for the pizza part! I buy my dough fresh at our local grocer and slice it into personal sized portions. This recipe makes two personal pizzas. If you'd like a whole pizza, you can easily multiply the ingredients.

Ingredients

As per the usual, I forgot an ingredient in the picture, whoops. I added a bit of ricotta cheese to my pizza, but this is totally optional. See, that must be why I didn't include it in the pic! I know... excuses, excuses.

Spray your pizza pan and dust it with a bit of cornmeal. Pre-bake your dough for about 5 minutes if it's quite thick. If you're making a thinner crust you may not need this step. Spread your favorite sauce over the top of the dough. My dough comes with a sauce, so we use that, about 3 ounces total.

Layer your pizza with a few slices of shredded prosciutto, a few teaspoons of ricotta (optional), then some fresh mozzarella (sliced thin), the roasted onions, and a sprinkle of parmesan cheese.


Put the pizza back in the oven for 10-15 minutes, until the crust is golden brown and the cheese is bubbly. While your pizza is baking, fry up two eggs. I crack mine into a shallow ramekin first, but you can crack directly in the pan if you want to.

To fry your egg: Warm a skillet over medium heat. Add 1 tablespoon butter to the pan and swirl to melt. Gently add two eggs to the pan, and then let them alone. Seriously peeps, the best way to make a good sunny-side up egg is to let it be. You can spoon some of the melted butter over the whites only to help them cook. The eggs are done when the whites are cooked, but the yolks are still runny. I fry the egg on one side (sunny-side up), but you can flip yours to fry the other side if you want and let it cook for a minute. The yolk will not be as runny, but it's still good.

Top your cooked pizza with the fried egg. Then eat it, and know you are awesome.


Seriously, peeps… this pizza is da bomb. Try it once, give it a chance. I doubt you'll regret it!

Until next time my friends, happy cooking! As usual, the standard recipe is below.


Thanks for reading, everyone!
Follow me on Facebook @ OurArmyLifeAccordingToTheWife
or on Pinterest, my newest obsession ArmyLifeFromTheWife

Email me: armylifefromthewife@gmail.com


The Standard Form:


Individual Fried Egg Pizza
Ingredients:

2 personal-sized pizza crusts
3 ounces pizza sauce
1 medium yellow onions, cut into wedges
½ tablespoon fresh lemon juice
1 teaspoons Dijon mustard
1 cloves garlic, minced
Dash rosemary
2 tablespoon olive oil
4 slices prosciutto
¼ cup ricotta cheese, optional
8 ounces fresh mozzarella, thinly sliced
¼ cup freshly grated Parmesan
2 eggs
1 tablespoons butter
Salt and pepper, to taste
Cornmeal, for dusting

Directions:

Pre-heat your oven to 400 degrees.

In a medium bowl, mix together the lemon juice, Dijon mustard, minced garlic, rosemary, and olive oil. Season with salt and pepper to taste. Add the onions to the bowl and stir until well coated. Spread the onions in a single layer on a cookie sheet, and roast for 30-40 minutes, just until the edges start to brown. Toss onions halfway through cooking time.

Spray a pizza pan and sprinkle with a bit of cornmeal. Place your pizza crusts on the prepared pan and bake for 5 minutes (this may vary based on the type of crust you use). Remove from oven and divide the sauce between the two pizzas, spreading evenly.

Shred the prosciutto with your hands and divide between the two crusts. If desired, add a few teaspoonfuls of ricotta to each pizza now. Top with the mozzarella, then the roasted onions, and the parmesan cheese. Return pizza to the oven and  bake an additional 10-15 minutes, until crust is golden and cheese is melted and bubbly.

While the pizza is baking, fry your eggs in a skillet on the stovetop.  Crack your eggs into a shallow dish or ramekin. Warm the skillet over medium heat, then add the butter. Swirl to melt the butter, then gently add your eggs to the skillet. Let the eggs sit, don’t move them around too much. Gently spoon some of the butter over the egg white to help it cook. I prefer a sunny-side up egg, which is only fried on one side. Once the whites are cooked, remove them from the pan.

Top each pizza with an egg, and enjoy!

June 28, 2013

Guest Post! Primitive RVing: Skunk Pizza


One of the advantages to this military lifestyle is making fabulous friends wherever you go. On the other hand, one of the biggest disadvantages is that we also say 'see ya later' more often than we wish. The Hubs and I have so many wonderful friends, all of us scattered to different points around the globe. The hope is always that we'll be stationed together again, and if not... well, we visit whenever we can! 

One of my best pals (and her hubs), transitioned back to civilian life not too long ago. They've embarked on a fabulous new adventure as RV enthusiasts and military retirees. Totally living the dream!

Abby is my blogging inspiration, my photog buddy, and an excellent confidant. We still 'yak' when the opportunity arises, and share our lives with each other. True friends aren't separated by distance, they just find ways around it. I'm so glad I found such an excellent friend in my Abby.

Today, she agreed to guest post for me, sharing one of her RVing recipes for the rest of us. I am always in awe of how easily Abby adjusted to life in an RV. And how many delicious meals she can make in such a confined space! Keep reading for a peek into Abby's world, and her post-military life:    


Skunk Pizza


When I think culinary, I picture a huge kitchen with many beautiful appliances, delicious aromas, fresh herbs for seasoning, and graters for a sprinkle of parmesan. Heck, I picture Allison’s house. I don’t picture the miniature kitchenette inside an RV.


My RV kitchenette (don’t blink or you’ll miss it)

 But I’m a full-time RVer. I traded in the luxuries of a house to explore America in a 28-foot Class C motorhome. The amenities of full kitchens are in the past. My place to play chef is this: TINY.

So that must mean for delectable food, I’d have to raid Allie’s house (believe me, I have) because otherwise my dinner menu would center around s’mores and tinfoil packages of freeze dried food found in the camping section of retail stores, right? Nope! I can make it all in my kitchenette. When I’m craving a certain something-or-other, with a little creativity, I can make it.

Pizza was on the menu tonight. While out hiking in the Ouachita National Forest, my husband, Paul, took a pretty good tumble, so he deserved some comfort food. After all, he had done the same for me after I’d sprained my ankle and had to hobble back down Elk Mountain. Pizza really is great comfort food, isn’t it?

First thing was first to make pizza: The crust. Allison has mentioned before that I had made pizza dough for her and the Hubs back in El Paso, but the secret to that dough had been that I used a bread maker. Primitively camped there in the Ouachita National Forest in Arkansas, we didn’t have electricity, so using my bread maker wasn’t an option unless I started up the noisy generator. So I opted to make the concoction with my own two hands.

Making pizza dough


My crust would be an “artisan crust” (my lingo), which would have texture and consistency of something between a thin crust (my favorite) and a traditional crust (Paul’s preference). Marriage is about compromise, right? First I mixed my dry ingredients: One cup of flour, a quarter cup of grated parmesan cheese, a teaspoon of baking powder, and a pinch of sea salt. After blending the mix, I added the wet ingredients: Two tablespoons of olive oil, two tablespoons of sour cream and a quarter cup of hot water (with a little extra on hand if the mix seemed too dry). With the world-traveled tea kettle and my propane stove, boiling water was a cinch. No cavewoman fire-lighting skills needed.

While I mixed my ingredients and kneaded the dough, my dogs, George and Emma, who were tied outside, let out a few barks. I appreciated our seclusion in the Ouachita National Forest. We were the only campers at Knoppers Ford, so no one would be bothered by barking dogs, and our “backyard” was the beautiful, wide open forest.

Emma and George outside our campsite at Knoppers Ford Recreation Area


When my dough was ready, it was moist to the touch, but not sticky. I plopped the ball onto my pizza pan and began to spread it. In an RV many essentials take on a mini form. My rolling pin is one of them (though I do miss my marble pin for home defense!). After spreading it, I poked the dough with a fork to so that it wouldn’t get bubbles in the crust, and I pre-baked it for three minutes at 425 degrees Fahrenheit so the dough looked as though it was just beginning to dry.

Now it was on to the topping. Instead of traditional pizza sauce, I wanted something a little “foo-foo” (that’s a Paul term) like pesto. Confession: I’m not that awesome. My pesto would only be an illusion. To create it, I mixed two ingredients, dried basil and olive oil. Cool, huh? Okay, not so much, but it would still be tasty, even if it was actually non-pesto.

 
Pesto illusion


Here’s the deal about full-time RVing. An RV is short on space, which isn’t conducive to lugging kitchen appliances. We  agreed only two appliances could move into the RV with us: Paul chose the coffee maker and I chose my bread maker. The food processor went into storage. Food storage is also limited, so I make shortcuts (dried seasoning is easier to store than fresh, for example) and keep only the essentials around. By leaving the land of housing and suburbia, I’ve also forfeited my quick access to grocery stores when I have a craving. Way out in the American backcountry, the stars were bright, the air was fresh, the coyotes howled, and we were next to nature. To me that’s an okay trade for pesto.

As I spread the "pesto" on my crust with a rubber brush, the dogs’ barking escalated to full-blown carrying-on. Obviously, cooking is a horribly inconvenient time to be interrupted by boisterous dogs—unless the said cooking has an interruption that smells like…

Skunk!

This next step in pizza making is very important. Save the dogs. I hauled out into the dark and shoved the dogs back into the RV after two quick sniff tests. Lucky for me, the skunk had only fired a warning shot out of reach of the dogs’ ties. So that’s why this is called “skunk pizza.”

 
Somebody tell Emma and George that an RV isn’t really big enough for horse play


Excited, the dogs wrestled on the floor shaking the RV like there was an earthquake while I went on preparing the toppings…until the skunk fume dissipated and the aroma of bacon frying filled the camper. Then I had their full interest. “Sorry doggies. Bacon is for people.”

The pizza toppings I chose were thin sliced tomato, diced onion, chopped bacon and kale. The kale might sound crazy, but I promise it’s yummy, kind of like spinach on pizza is. I used only light, leafy pieces, which gave an extra pizazz of flavor, but wouldn’t be overpowered by crunch (that’s the bacon’s job) or fiber of the stems.

Toppings


The next step was my favorite part, grating cheese. I am a cheese freak, so it’s a wonder how any actually made onto the pizza itself! Allison has taught me a lot when it comes to skills in the kitchen, and I put to use some of her advice making this pizza: Grate your own cheese. Cheese that comes pre-grated and packaged is kept separated and loose by corn starch, which takes away from the moisture in the cheese. Trust me, Allie is right that a pizza with freshly grated is better. Not a little better. All the way better.

Grating cheese

 As you can guess by my rolling pin, the cheese grater I have for RVing is also compact; it’s a handheld grater. Handheld graters are intended to be used for a sprinkle of parmesan, not an entire block of mozzarella, so my job was time consuming, but well worth it. Once grated, I sprinkled it over my toppings. I added a little bit of dried seasoning, garlic, red pepper and cilantro, and the pizza was ready to bake.

My little RV oven was just the right size for a pizza big enough for two. I baked it on the top rack at 425. Because not all ovens are created equal, the cooking time can vary, and my recipe needed between twenty and thirty minutes. I pulled mine out closer to thirty when the cheese was beginning to golden. I confirmed the crust was ready by using a spatula to test. It lifted on the side without sticking to the pan and without seeming floppy. Time to serve and gobble.

And there you have it: Cooking in an RV isn’t much different than in a house! And it tastes just as delicious. Dishwashing on the other hand…well, just appreciate your dishwasher for me when you clean up after dinner. Happy travels!


The finished product

I'm sure you enjoyed this fun recipe for cooking in a small space, and adapting your needs to suit the environment. If you'd like to keep up with Abby and all her RVing adventures, please check out her blog at 1,000 Miles On My Own Two Feet. You won't be disappointed!

As always, happy cooking my friends! Though I'm crazy busy planning our current PCS move to Germany, I'll be back soon with plenty more recipes and adventures to share.


Thanks for reading, everyone!
Follow me on Facebook @ OurArmyLifeAccordingToTheWife
or on Pinterest, my newest obsession ArmyLifeFromTheWife


June 1, 2012

Still My Favorite Place... NYC (Part 1)

I've traveled to many places, and seen many things, but New York City is a unique experience. I've visited so often that I've lost count. And yet, I always discover something new to see and do. In many ways, the city is constantly changing, but somehow it remains the same year after year.

I can still buy a 'dirty water dog' on practically every street corner, and yellow cabs always crowd the road. Street performers work for change, and artists hock their wares. The sidewalks teem with people, the stores contain the best fashions.

And it's still my favorite place to be.


For me, New York means family. It's the Yankees and the Giants (don't hate!). It's the best pizza in the world, and the best shopping. The City is museums, and Christmas lights, and ice skating. It's the Statue of Liberty and the Empire State Building. Strolls through Central Park, and shows on Broadway.

I love watching people experience the City for the first time. And what an experience it is! If you've never been, pack your bags and go. Right now. A trip through New York City should be on everyone's bucket list.

It still surprises me when people say they have never been to NYC. When I discovered that my good friend Becky was one of those people, I knew we had to remedy the situation as soon as possible. Since we were already planning a trip to Ireland (which happened to fly right by NYC), I figured we should stop. I mean, why not?

We spent weeks thinking of all the things to see and do. With only two days to explore, I wanted her to see anything and everything, but I knew that wasn't possible. I fully expected to run through all the typical tourist sights: the Statue of Liberty, Empire State Building, Ground Zero... you know the ones I'm talking about. Even if you've never visited the City, you know those places.
  
To my complete surprise, she didn't want to do any of those things!

Instead, we talked of museums and the Today show. She wanted to hike the Brooklyn Bridge! No one has EVER made that request before. This was, by far, one of the most unusual trips I've taken through NYC with a first time tourist.

Oh, we hit a lot of hot spots, don't get me wrong. But, we didn't stop at as many as I expected. I loved exploring with Becky. She understands my photo obsession... mostly because she has one herself. She was willing to walk the streets, and she climbed into a cab without fear. Even I can't do that!

We didn't see all there was to see on her first trip, because that would be impossible. However, in the short time we had, we saw a whole heck of a lot!

I stay with family when I visit New York, then I ride the train into Manhattan. So, whether they want to or not, the first place all my friends see when they visit with me is Grand Central Station.


Now an official city landmark, Grand Central is an NYC icon. How many of you have seen it featured in movies and commercials? Even if you don't arrive in the city by train, GC is worth a quick trip inside. Besides rail lines, the terminal boasts many markets, shops, and restaurants.

Upon stepping out of the terminal, I always tell my friends the same thing... 'Look up'. Simple words, yet effective. The height of the city can be overwhelming, but the view is worth it. The first thing Becky and I see is the Chrysler Building...


Even in the wee hours of the morning, NYC is bustling with life. At 5:30 a.m., we were wandering the streets, slowly making our way to the filming of the Today show.

I'm almost ashamed to admit this, but... I don't actually watch the Today show. Please don't think less of me! I was more than willing to stand in line for the experience, but I'm pretty clueless when it comes to this cultural phenomenon. Needless to say, I've never attended the live show. Though Becky was the first-time tourist, we were doing something that I myself had never experienced.

      
Though I'm not a habitual watcher, I really enjoyed seeing the crowd with their signs. The energy was high, and the people were friendly. One of these days, I might have to watch the show!

From the Today show, we moved on to wander the city. On nearly all my visits, I make the time to stop at Saint Patrick's Cathedral. Of all the city's attractions, this is one of my favorites. Between the skyscrapers and the traffic, St. Pat's sits regally amidst it all. The cathedral takes up an entire city block on it's own!

The cathedral is open to tourists, but be careful that you don't interrupt service. No one wants to hear the click of a camera shutter as they try to commune with God.

After our visit, the next stop on the list was Top of the Rock. Most people choose to visit the Empire State Building, but we were daring to be different! The views from the Top of the Rock are wonderful, including looks of Central Park and the Empire State Building. For the real adventurer, I suggest visiting both. They each have their own unique panoramas.


The Top of the Rock observation deck is housed inside of the NBC Studios building, in Rockefeller Plaza. Even in April, people were ice skating and enjoying the beautiful afternoon.

Rockefeller Center 
Just next door, the famous Radio City Music Hall offers tours and shows. We decided not to take this particular tour, due to time constraints. Instead, Becky and I chose to spend a few hours wandering the halls of MOMA, the Museum of Modern Art. Within its walls reside several of my favorite paintings, including Vincent Van Gogh's 'Starry Night'.

'Starry Night'

The crowd around the painting 
For an art lover, this is truly a magnificent experience. The walls and hallways overflow with the work of Pablo Picasso, Vincent Van Gogh, Jackson Pollock, Salvador Dali', Andy Warhol, Henri Matisse, and Claude Monet (among many others!). It was nice to traverse an art museum without The Hubs whispering in my ear, "I could have painted that!"

After the museum, boy were we hungry! We hit up a cart for an authentic NYC hot dog (the best in the world!), and contemplated our options.

Ok, so we all know my OCD self had a list, a map, and a time frame. But we pretended to consider the options, and then we moved toward the next spot on the all-important list.... F.A.O. Schwarz.


This toy store is every kid's dream. They stock anything and everything. There are places to play, places to read, and places to play music. The sweet shop feels like Willa Wonka's factory. The Big Piano is available upstairs, for those of you who have seen Tom Hanks' Big. (If you haven't seen the movie, correct the problem immediately. Then go to NYC and jump around on the piano!)

Becky and I wandered in kiddie heaven for a while. We stopped for candy on our way out as an afternoon snack (no judgement here!). With bags in hand, we meandered toward Central Park....

And that is all for now! Mostly because I'm tired, but also because a city tour is very overwhelming, so I know it must be the same reading about it. More on our NYC adventure is coming soon!

If you've been to NYC, what are your favorite places to visit? What are your favorite things to do? Feel free to share in the comments below!

February 1, 2012

Keys in the Freezer = BBQ Chicken Pizza

It's been one of those weeks. Actually, if I'm going to be totally honest, it's been one of those months... maybe years.

You know the kind of week I'm talking about, because we've all had them. The kind where you lose your keys in the refrigerator because you can't keep your head screwed on straight for five minutes. And yes, as cliched as it is, I did that earlier this week. Technically I lost them in the freezer, but still. Please hold your laughter until I can no longer hear its echo.

The reasons for this debacle are many and varied, and totally unimportant. Just know that I'm trying to disentangle myself from the pileup as you read. I'm also indulging in a little chocolate therapy to make the world seem brighter. It's working wonders.

As for the Hubs... well, seeing as he left before sunup today, and came home well after sundown, you can only imagine that he's having one of those weeks too.

What do we do when the world is spinning like mad and we can't keep up? In this house, we make pizza.

Ha, you thought I was joking, but I'm not! Sometimes there is just way too much going on around us, and that leaves no time to plan for dinner. I can always tell when we're running too fast, because pizza is suddenly on the table.

When things get really bad, we order take-out Chinese. So at least we're still in the game. For now.

Pizza may seem a bit unhealthy as our go-to, quickie meal, but there are ways to keep it wholesome. Use a keys-in-the-freezer-week as an opportunity to clean out your vegetable drawer! Plus, you can always make your pie with whole wheat crust and low-fat cheese too.

Naturally, I did none of these things. But you could, if you really wanted to.

Instead, we made this:

BBQ Chicken Pizza

If you've lived your whole life without this indulgence, please correct the oversight immediately.

This recipe actually started as a challenge. The Hubs claimed that he would never eat barbecue sauce on pizza.

Oh, oh, oh.... I beg to differ. Loudly. Challenge heard, and accepted.

And so it began... with chicken.

Ingredients, Part I

While I was rushing around, changing out loads of laundry and answering my phone, I quickly tossed together the chicken for the pizza. So easy, even the Hubs could do it.

Two chicken breasts in a pan. Salt and pepper both sides. Toss with 1/2 cup of your favorite barbecue sauce. Bake in a 375 degree oven for 20-25 minutes. Let rest at least 10 minutes before dicing. DONE.

See? Easy. If you don't even have time for that, you can use some pre-cooked rotisserie chicken tossed with a little barbecue sauce. There are always ways to simplify.

One of the best parts of this recipe is that it makes enough for 2, 12-inch pizzas. Or one really big pizza pie. Either way, it means leftovers.

On to the next.

Ingredients, Part II
Yep, I'm using pizza crust from a bag. Remember, this is our keys-in-the-freezer dinner. Simple is better.

You can use any kind of crust you prefer. The toppings-ready kind is something of a miracle when you have very little time. But I prefer to mix my own, even if the mix comes in a Betty Crocker bag. I also like to do three things when making the crust:
     
        1. Spray the pizza pan with non-stick spray, then dust it with a little cornmeal. It makes me feel      
            like a professional.
        2. Dust my hands with a little flour before spreading the dough. I don't like my hands sticky.
        3. Finally, I prick the crust with a fork and pre-bake it for about 5 minutes before adding my
            toppings. Otherwise, I think the crust can get soggy. Bleck.

The next few steps might seem a bit labor intensive, but it only sounds that way. In reality, the whole process takes maybe 10 minutes. Trust me.

Slice a red onion thinly, into half-moon slices. Toss the slices into a skillet with a tablespoon or so of butter on medium-low heat. Let them cook, stirring them here and there, for about 10 minutes while you do other things. The onions will soften and brown, which brings out their sweetness. In the end, they should look something like this:


For a shortcut, you could just slice the onions thin and use them on your pizza raw. While they won't be caramelized, the oven temperature will help them cook right along with the pizza.

While the onion cooks, warm another skillet over medium-low heat. Add 4 tablespoons of olive oil and 3 cloves of minced garlic to the pan. It's not necessary, but I also added a few fresh oregano leaves to my pan. I told you that pizza can help clean out your veggie drawer!


This only needs to be on the heat for about 60 seconds, just long enough that the garlic becomes aromatic and infuses the oil. After I pre-bake my crust, I brush this over it before adding any additional toppings. The flavor is delish, and adds a new taste level without a lot of hassle. You could skip this step if you want, but I seriously don't think you should. Also, just a quick tip: this makes a great sauce base for any blanco pizzas you might try in the future.

Now comes the easiest part of any pizza recipe, the assembly. After brushing the crust with the oil mix (you won't need to use all of it), sprinkle on about a cup of fresh mozzarella onto each pie (Remember, this recipe makes two!).

On top of the mozzarella, drizzle some more bbq sauce. This amount is at your discretion, but keep in mind that the sauce will thin and spread a bit as it bakes. Next, cover with your diced chicken, one breast per pie.

Here's one of the secrets to great BBQ Chicken Pizza... several types of cheese. Cover the chicken with 1 cup (per pie) of shredded Gouda cheese, then add your onions (1/2 on each pie), and then add a light sprinkle of Parmesan cheese.

It's pizza time! Bake until the cheese is melted and the crust is nicely browned. I top mine with some chopped cilantro, it's a fabulous finishing touch. But if you don't care for cilantro, you could try out some green onion, or maybe parsley. Whatever you choose, enjoy! This is a pizza that's not to be missed (Refer to photo #1, drool, then go make pizza!).

As to my challenge with The Hubs.... you guessed it! I win. Not only did he LOVE the pizza, but he's already asked me to make it again. Score one for me!

What are your keys-in-the-freezer, quickie meals? Feel free to comment below and share your experience with the rest of us!


The Standard Form:


BBQ Chicken Pizza

Ingredients:

2 bags Betty Crocker pizza crust mix
2 chicken breasts
1 red onion, sliced thinly
2 tablespoons butter
½ cup bbq sauce, plus more for drizzling
4 tablespoons olive oil
3 cloves garlic, minced
Optional: 2 tablespoons fresh oregano leaves
2 cups shredded Mozzarella cheese
2 cups shredded Gouda cheese
½ cup shredded Parmesan cheese
6 tablespoons roughly chopped cilantro
Salt and pepper

Directions:

Preheat oven to 375 degrees. Salt and pepper both sides of the chicken breasts. Toss with ½ cup bbq sauce. Bake in a glass pan for 20-25 minutes, or until done. Let rest 10 minutes before dicing into small pieces. Set aside.

Soften the onions in a skillet with the butter over medium-low heat. Cook for 10 minutes, stirring occasionally, until lightly caramelized. Set aside.

Increase oven temperature to 450 degrees. Mix the pizza crusts according to package directions. Lightly spray your pans with non-stick cooking spray and dust with a bit of cornmeal. Stretch the dough to fit, then prick all over with a fork. Pre-bake for 5 minutes, then remove from oven.

In a skillet over medium-low heat, warm the olive oil with the minced garlic, and the optional oregano, just until aromatic.  Brush the oil over the pre-baked pizza dough, just enough to cover. Do not over saturate.

Sprinkle 1 cup of the mozzarella cheese on each crust. Drizzle with extra bbq sauce. Add the chicken (one breast per pizza), the top with 1 cup of Gouda cheese each. Divide the onion evenly onto each pizza, then add a sprinkle of parmesan cheese.

Bake until cheese is melted and crust is golden brown, about 10-12 minutes. Top with the chopped cilantro, slice and enjoy! 


January 13, 2012

Neurosis and Hawaiian Pizza

First blog post ever, and I'm going to let the cat out of the bag. Eventually you'll find out the truth anyway. It will be little things at first, things that might make you wonder about my sanity. Then the bigger things. So, let's just lay it all out on the table in the beginning and get it over with.... I'm a teensy, tiny bit neurotic. 

There, I've said it! It's true! And I'll tell you my other dirty, little secret.... not only am I neurotic, but I like it that way. 

For example: I started this whole blogging experience in October with the help of my friend, Abby. Here it is January, and this is my first post ever?! 

Yep. I'm not even embarrassed about it! I only started about a dozen times, but 'something' wasn't right. I chased this elusive 'something' for months, searching for the perfect way to start my amazing blogging adventure. You know what I discovered? There is no perfect way. You just gotta jump right into the deep end of the pool and try to swim. Which, by the way, several people have already told me. Repeatedly. Being hard-headed is pretty much a way of life for me. You'll get used to it. 

So, instead of the exotic 'something' that I know you're looking forward to, this is what you get today: Hawaiian Pizza. Which, when made properly, can practically be a religious experience. I know this because I just snarfed down a third of the pie when it came out of the oven. Thank goodness I hit up the gym this afternoon.

I experimented a little with my ingredients, but not much. You don't mess with perfection. Pineapple and Canadian bacon? Perfection.

This is what I started with.... but not how I finished! 


I thought I was so smart, taking a photograph of my ingredients like I've seen other people do. Well, guess what? I'm neurotic. That means I forgot a bunch of ingredients in this picture, and I added ingredients later that I wasn't expecting to use. Total fail. I'll try to do better next time, I promise. 

Naturally, the first ingredient I forgot was the pizza dough. I mean, really? It's only the most obvious part, but that's me. Forgetfulness... also a way of life around here. 

You can use any kind of dough that you want for your pizza. Make it from scratch, buy a bag of mix, or use a Boboli... whatever floats your boat. Making pizza dough from scratch is on my list of things to learn, but today I had some in the fridge from my friend Abby, who spoils me with her pizza dough bounty :) 


Start by spraying your pizza pan with some non-stick spray and dusting it with a little cornmeal (Totally not in the picture, did you notice?). Preheat the oven to 425 degrees, or whatever your package directions indicate. While it warms up, stretch your dough to cover the pan. If necessary, you can coat your hands with a bit of olive oil to make the dough easier to work with. Prick your crust all over with a fork. I pre-cook my dough a bit so it's not so... well, doughy. You don't have to do this, it greatly depends on what kind of crust you are using. But if you're like me, just pop it in the oven for 5 or 6 minutes. When it comes out, it should look a little something like this:


Around here, we call this 'rustic'
Actually, yours will probably look more uniform and prettier than mine. The Hubs and I had just finished an hour workout at the gym, and we were hungry! Looks mostly take a backseat around here when the Hubs is hungry.

Once the dough is pre-cooked, it's just a matter of piling on your sauce and toppings. I wanted to shake things up a bit though. First, I sliced 4 pieces of bacon into 1" pieces. I threw those into a skillet with a tablespoon or so of brown sugar (the brown sugar is the secret here... if you haven't tried it, please do. Yum squared). Cook this for just a few minutes. I wanted the bacon to be done, but not too crispy since it would be going back in the oven on top of my pizza. After removing the bacon to a paper towel to drain, I threw some thinly sliced red onion into the skillet with the bacon grease. Saute the onion slices until soft and lightly browned, then place on the paper towel with the bacon.

You could easily make the pizza sauce from scratch, but the hunger factor allowed no time to make sauce today. Today was all about quick and simple. When I need pizza sauce in a pinch, this is my go-to favorite:


It's not too runny, which I like. Whatever you like best, go for it! It's pretty hard to mess up pizza. I do have one stipulation though - please, please, pretty please, do not use that pre-shredded, yucky mozzarella cheese in a bag. Bleck. Your taste buds will thank me for this, I promise you. Instead of that unnaturalness, try this:


It's yum. It's heaven in your mouth. You will never go back to that stuff in a bag, I swear. You don't even have to shred it for your pizza. Just slice it thin and pile it on!

Top all that delicious mozzarella cheese with some thinly sliced Canadian bacon plus the brown sugar bacon (if you didn't eat it all already!), and the sautéed onions. And don't forget the pineapple! You can't have Hawaiian Pizza without the pineapple, it's just not done. You can buy fresh, buy canned, or you can go the route I did with this:


I gave these a rough chop before throwing them on the pizza, but you can leave them whole if you want. Top everything off with a 1/3 cup of shredded Monterey Jack cheese and a sprinkle of kosher salt.

Nothing left now but to put it in the oven and wait while the amazing smell fills your house. If you've pre-cooked your dough, then this only needs about another 10 minutes in the oven, until the cheese is melted and the edges are golden. When all is said and done, you wind up with a pizza that should look a little something like this:

Ta da! Hawaiian Pizza

From start to finish, this is about a 30 minute meal. Homemade pizza is a new obsession for me, and it's quickly gaining some prominence in our household. It's easily customizable, and not too hard to make healthy. (Although, I doubt this Hawaiian would qualify in that category!) A whole wheat crust, plenty of veggies, and some low-fat cheese would turn this typical junk food into a healthy evening meal. Granted, that's very unlikely to happen here, at least not without many (loud) protests from the Hubs. Maybe someday I will fool him into healthy eating, but today is not that day.

So, I guess this is the end of my first post ever... I know it took me several months to get here, but now that I've started, you'll have a hard time stopping me! You can expect many more recipes, as I'm a closet foodie that finally came out a few years ago. But there will also be photography, and travel, and my random ramblings. Being married to the military has its advantages and disadvantages, ups and downs, and everything in between. I want to share what I can with you. As for my neuroses, we'll just consider this therapy. See you soon!


The Standard Form:


Hawaiian Pizza


Ingredients:

1 pizza crust
Non-stick spray
Sprinkle of cornmeal
5 ounces pizza sauce
4 slices bacon, cut into 1" pieces
1 tablespoon brown sugar
1/2 red onion, thinly sliced
3 ounces Canadian bacon
3 ounces pineapple, roughly chopped
8 ounces Polly-O mozzarella cheese, thinly sliced
1/3 cup Monterey Jack cheese
Sprinkle of kosher salt

Directions:

Preheat the oven to 425 degrees. Spray a pizza pan with non-stick spray and sprinkle with some cornmeal. Stretch the pizza dough to fit the pan, then pre-cook the dough for 5-6 minutes in the oven on the lower rack. While the dough is pre-cooking, place the bacon pieces in a skillet along with the brown sugar. Cook over medium-high heat for a few minutes, until the bacon is just cooked. Remove to a paper towel-lined plate to drain. Add the onion to the skillet with the bacon grease and saute until softened and lightly browned. Remove to plate with the bacon.

Spread the sauce evenly over the pizza dough. Top with the sliced mozzarella, Canadian bacon, brown sugar bacon, onions, and pineapple. Sprinkle with the Monterey Jack cheese and a little bit of kosher salt.

Return the pizza to the oven and bake for 8-12 minutes, until the cheese is melted and the edges are golden. Wait a few minutes before slicing. Enjoy!